
In his previous post, How do I configure Access Explorer for the first time?, Jason shared an overview of how to configure Access Explorer, which is an Enterprise Reporter 2.0 service that scans and indexes security access information on files, folders, and shares on managed computers in managed domains. The data is stored in the Access Explorer database and can be used to see interactive, user-centric information at any given time. Using the Report Manager, you can run permission reports on this data.
Part of configuring Access Explorer involves creating Managed computers that are scanned by the Access Explorer agent for security data. One of the options at this stage is to create a Remotely Managed Computer.
Why would I need a remotely managed computer?
Good question. Creating a Remotely Managed Computer is a very useful tool for managing scans on your servers. If you have a server with a large data store or a large number of files, a complete scan for security information and access changes could take a long time. To reduce the load on the server with the large data store, you can make it a remotely managed computer to spread the scan process across multiple servers.
Spreading out the scans over multiple servers takes a little planning. First, you need to decide where to install the agents. Second, you need to organize the folder structure into blocks so you can assign groups of folders to each agent.
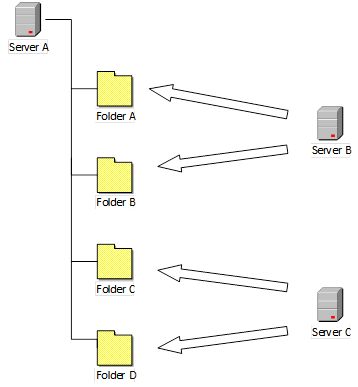
In the example below, Server A has a large number of files in each folder. To break up the load, you will split the scanning task between Server B and Server C. Server B will scan folders A and B, while Server C will scan folders C and D.
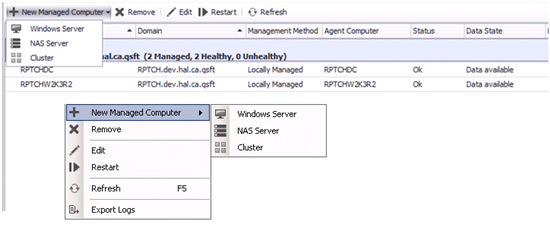
Once this planning done, you are ready to install a Remotely Managed host. As with a Locally Managed host, select Managed Computers in the Configuration Manager of Enterprise Reporter. From the menu, select New Managed Computer (or right click in any white space and select New Managed Computer), and select Windows Server.
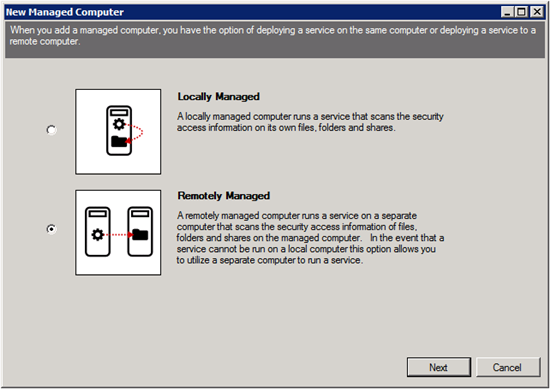
In the New Managed Computer wizard, select Remotely Managed, and click Next.
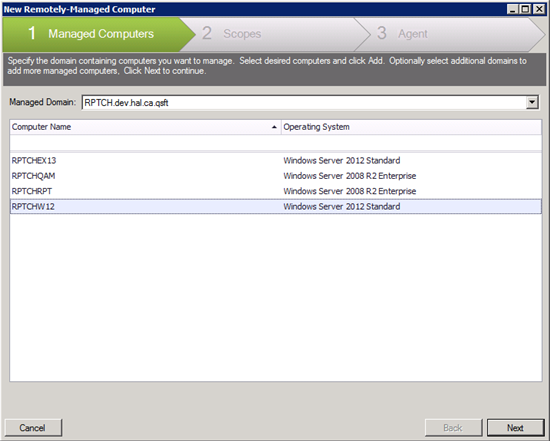
The Managed Computers page of the wizard displays the servers that are available to be managed. Select a server and click Next.
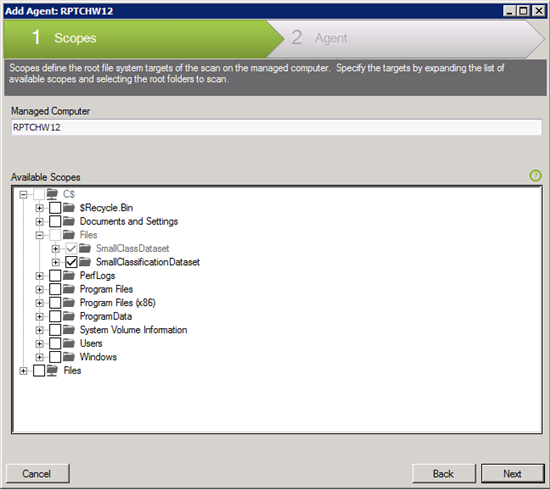
The Scopes page of the wizard displays the available resources on the selected server. Note that these scopes are shared resources available on the server.
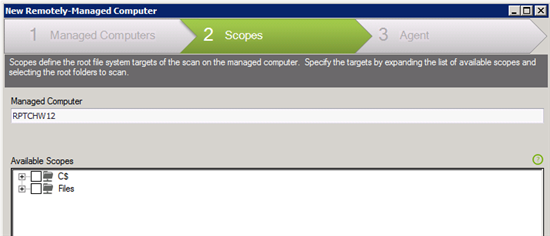
You can either select the folders for the first agent through the administrative share C$ or through the share named Files, as seen below.
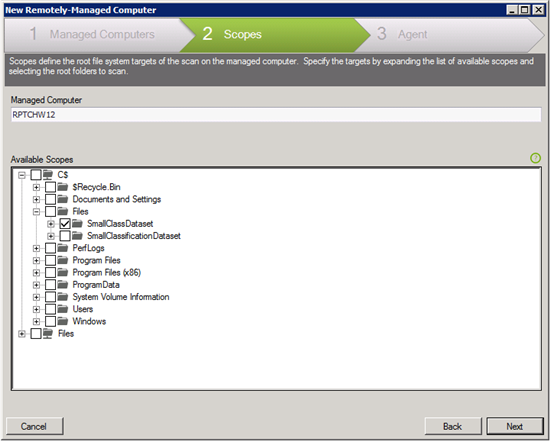
Shown in this example, the SmallClassDataset folder is selected through the administrative share C$. Once the folders are selected, click Next.
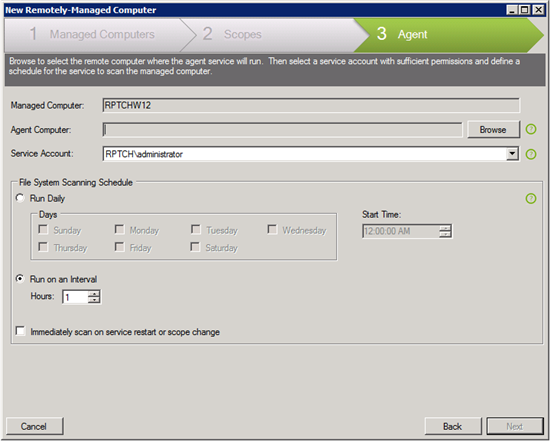
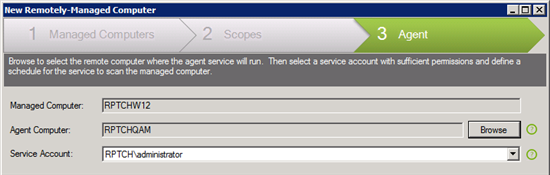
The Agent page of the wizard displays the Managed Computer. The agent uses the service account to schedule information. On this page, you assign the computer on which to install the agent. To select that Agent Computer, click Browse.
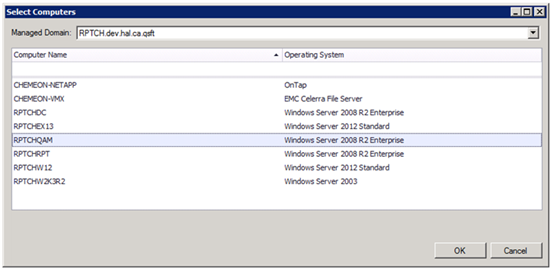
A list of the available computers displays. Select a computer, and click OK.
The computer that you selected to serve as the Agent Computer displays. For the agent to be installed and function correctly, the Service Account must be in the Local Administrators group located on the Agent Computer.
Next, select the scanning interval. If there are a lot of files, you might want to schedule the scan to occur during off hours to avoid impacting users. In this example, the scan occurs at 1 AM.
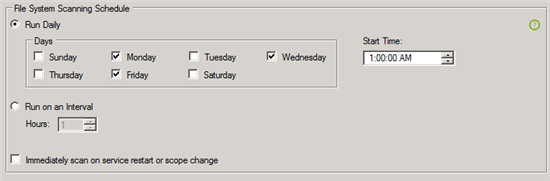
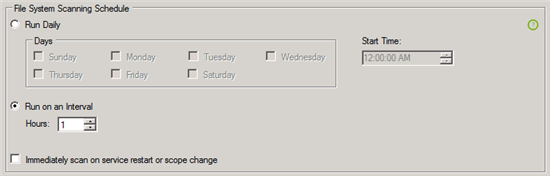
You could choose to run the scan on an interval. By default, the scan occurs once an hour. You can change the interval up to once every 12 hours. Consult with the owner or person responsible for the folders and files to see how closely they need to monitor changes to access and permissions.
The last option on the Agent page determines if a scan occurs when the scope is changed or if the agent is restarted. It can be useful if you need an immediate update of the folder access and file permissions and do not want to wait until the next schedule scan. However, depending on the scope, the scan could take considerable time, so select this option carefully.

Once you are finished setting the option on the Agent page, click Finish to deploy the agent.
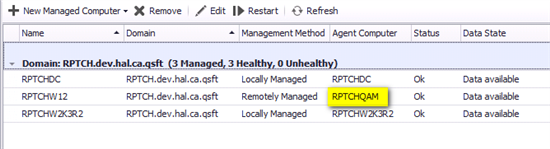
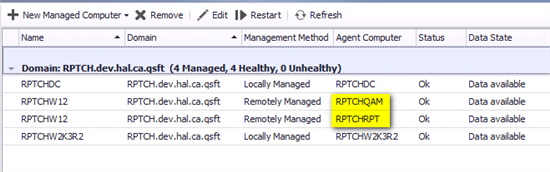
Looking at the list of Managed Computers, note that RPTCHW12 is remotely managed by the agent installed on RPTCHQAM.
In our example, we want to add a second Agent Computer to help manage the scan load on RPTCH12. To add the next Agent Computer, right-click the server you want to manage, and choose Add Agent.

Since we have already selected the server to monitor, the wizard opens to the Scopes page. Select the scopes for this agent to scan, and click Next.
As before, on the Agent page, click Browse to select an agent. Select the computer you want to use, and click OK. Make the selections for the agent schedule, and click Finish to deploy the agent to the Agent Computer.
Looking at the list of Managed Computers, note that RPTCHW12 is managed remotely by two Agent Computers, RPTCHQAM and RPTCHRPT. Two agents are scanning one server for changes to folders and files. Each Agent Computer is scanning a different scope to break up the scan load.
So, using remotely managed computers can help you manage your discoveries and reduce the load on your servers. For more information on adding a remotely managed computer, see the Enterprise Reporter Configuration Management User Guide.
