
How often have you needed to quickly find the OS version, service pack version, BIOS serial number, processor architecture, or other piece of information for a server? Some of that information can be retrieved from Active Directory, but much of it requires a quick trip to the server unless you have a tool like System Center Configuration Manager. With a bit of work in Windows PowerShell, however, you can quickly retrieve this information yourself. This trick only requires that PowerShell be installed on your local computer; you don’t need it on the server. The server simply needs to have Windows Management Instrumentation (WMI, installed and running by default) and must allow traffic to the WMI service.
Identify the WMI Classes
The difficult bit of this solution is to identify the WMI classes that contain the information you want. There’s no easy way to do that, as there’s no central directory of WMI information; you’ll often just be hopping onto your favorite search engine and hoping for the best. Here’s a quick list to get you started:
- Win32_OperatingSystem offers OS architecture (x86 or x64), Windows version, service pack version, and other OS-related details.
- Win32_ComputerSystem offers things like installed memory.
- Win32_Processor can show you the architecture of the processor, through the AddressWidth property.
- Win32_BIOS has the BIOS serial number, version, and other details.
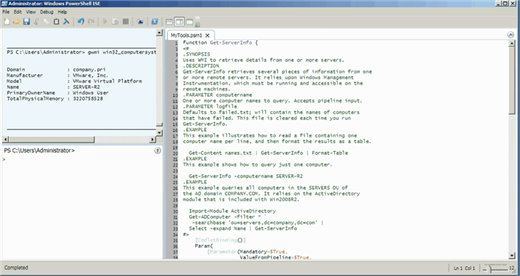
Figure 1 – Server Info PowerShell Script
The trick will be to use PowerShell to retrieve the desired information and then combine it all into a single output stream. Since it’s possible for a computer to be offline (or blocked by a firewall) when you try to query it, we’ll also need to build in a bit of error checking. And, while I’m at it, I might as well build this script to look and work as much like a native PowerShell cmdlet as possible. You can download the script here. That way, you can share the tool with other admins more easily. I’ll save the below code in /Documents/WindowsPowerShell/Modules/MyTools/MyTools.psm1. Doing so makes this a script module, meaning I can load it by simply running:
Import-Module MyTools
By distributing the .psm1 file to colleagues, and having them save it in the same location on their computers, they can load it just as easily.
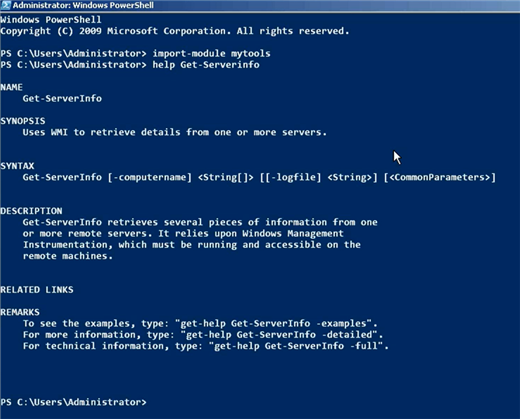
Figure 2 – Import MyTools.psm1
function Get-ServerInfo {
#
.SYNOPSIS
Uses WMI to retrieve details from one or more servers.
.DESCRIPTION
Get-ServerInfo retrieves several pieces of information from one
or more remote servers. It relies upon Windows Management
Instrumentation, which must be running and accessible on the
remote machines.
.PARAMETER computername
One or more computer names to query. Accepts pipeline input.
.PARAMETER logfile
Defaults to failed.txt; will contain the names of computers
that have failed. This file is cleared each time you run
Get-ServerInfo.
.EXAMPLE
This example illustrates how to read a file containing one
computer name per line, and then format the results as a table.
Get-Content names.txt | Get-ServerInfo | Format-Table
.EXAMPLE
This example shows how to query just one computer.
Get-ServerInfo -computername SERVER-R2
.EXAMPLE
This example queries all computers in the SERVERS OU of
the AD domain COMPANY.COM. It relies on the ActiveDirectory
module that is included with Win2008R2.
Import-Module ActiveDirectory
Get-ADComputer -filter * `
-searchbase 'ou=servers,dc=company,dc=com' |
Select -expand Name | Get-ServerInfo
#>
[CmdletBinding()]
Param(
[Parameter(Mandatory=$True,
ValueFromPipeline=$True,
ValueFromPipelineByPropertyName=$True)]
[Alias('name')]
[string[]]$computername,
[string]$logfile = 'failed.txt'
)
BEGIN {
Del $logfile -ea SilentlyContinue
}
PROCESS {
foreach ($computer in $computername) {
$continue = $true
try {
$os = Get-WmiObject -class Win32_OperatingSystem `
-computer $computer -ea Stop
} catch {
$computer | out-file $logfile -append
$continue = $false
}
if ($continue) {
$bios = Get-WmiObject -class Win32_BIOS `
-computername $computer
$proc = Get-WmiObject -class Win32_Processor `
-computername $computer | Select -first 1
$hash = @{
'ComputerName'=$computer;
'BIOSSerial'=$bios.serialnumber;
'OSVersion'=$os.caption;
'OSBuild'=$os.buildnumber;
'SPVersion'=$os.servicepackmajorversion;
'OSArch'=$os.osarchitecture;
'ProcArch'=$proc.addresswidth
}
$obj = New-Object -TypeName PSObject -Property $hash
Write-Output $obj
}
}
}
}
Much of this code is a template that you can simply re-use, so let’s focus on the specific bits that you might want to modify. First up:
if ($continue) {
$bios = Get-WmiObject -class Win32_BIOS `
-computername $computer
$proc = Get-WmiObject -class Win32_Processor `
-computername $computer | Select -first 1
These lines query WMI classes other than Win32_OperatingSystem. So if you need to have the tool query additional information, you’ll copy and paste these lines. Here, I’ve used the ` backtick character to allow me to wrap two logical commands into four physical lines – just so that they’ll format correctly in this article. If you use those backticks, it’s very important that they be immediately followed by a carriage return, and not by any other whitespace (such as a space or tab character), or the code won’t execute.
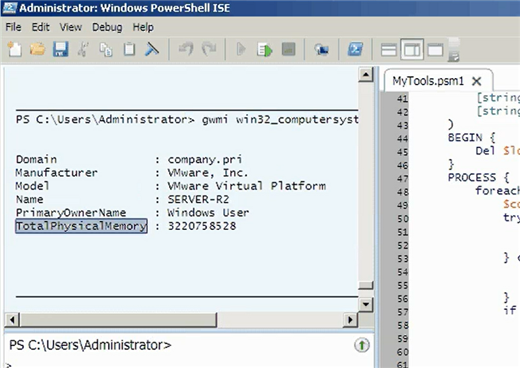
Figure 3 – Physical Memory Class
Notice that I’m putting the retrieved information into a variable - $bios and $proc, in these two cases. You’ll have to make up your own variable for any additional information you retrieve. For example, let’s suppose you want to retrieve TotalPhysicalMemory from the Win32_ComputerSystem class. You’d start by adding the following:
if ($continue) {
$comp = Get-WmiObject –class Win32_ComputerSystem `
-computername $computer
$bios = Get-WmiObject -class Win32_BIOS `
-computername $computer
$proc = Get-WmiObject -class Win32_Processor `
-computername $computer | Select -first 1
It doesn’t matter where you add the extra lines – I’ve added them before the Win32_BIOS query, which is fine.
Once you have the desired information in a variable, you need to add it to the output object. That’s created in a hashtable:
$hash = @{
'ComputerName'=$computer;
'BIOSSerial'=$bios.serialnumber;
'OSVersion'=$os.caption;
'OSBuild'=$os.buildnumber;
'SPVersion'=$os.servicepackmajorversion;
'OSArch'=$os.osarchitecture;
'ProcArch'=$proc.addresswidth
}
Just use the variable you created, followed by a period, and the desired property name. Here’s the addition for total physical memory:
$hash = @{
'ComputerName'=$computer;
'BIOSSerial'=$bios.serialnumber;
'OSVersion'=$os.caption;
'OSBuild'=$os.buildnumber;
'SPVersion'=$os.servicepackmajorversion;
'OSArch'=$os.osarchitecture;
'ProcArch'=$proc.addresswidth;
'RAM'=$comp.totalphysicalmemory
}
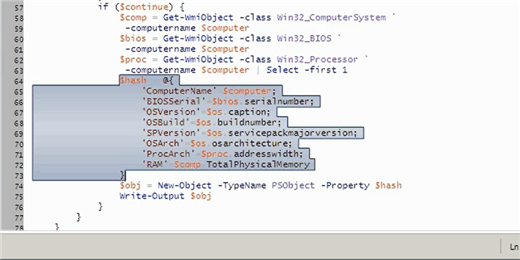
Figure 4 – Hashtable with ‘RAM’ Variable
Just make sure that each line in the hashtable, except for the last one, ends with a semicolon. If you need to figure out what properties a WMI class contains, just do this:
Get-WmiObject –class classname | Format-List *
That will display a complete list of the class’ properties, including their names and the values they contain.
What kind of information would you want to add to such a tool? One thing to keep in mind: Every unique WMI class that this tool queries is another block of data that has to go to the remote machine for processing, and another block of data that needs to come back across the network.
