The container world is developing very fast. Now container technology is making its way into the enterprise data environment and it can be deployed onto both production and support infrastructure. Thus it might be the architecture for the next generation services and micro-services.
Among all the container technologies, Docker is quite dominate in this world. And a bunch of docker based container orchestration tools are very popular for the container users.
With container orchestration tools, the user can easily manage their containerized applications. However, they cannot easily find out the problems that could exist in their orchestration environment. This is why we need monitoring tools to help us save our time to make sure everything is OK.
Foglight for Container Monitoring can help the user to monitor various container orchestration environments. In the technique preview version, we will first support monitoring Kubernetes, which is quite dominate in the docker based container orchestration world.
Before using Foglight for Container Monitoring to monitor your kubernetes environment, you need to know what kind of kubernetes cluster you can monitor? how does kubernetes agent work? what you need to do before starting to monitor your kubernetes cluster?
1. Supported Environment
We've investigated the local build kubernetes clusters as well as kubernetes cluster created by cloud provided kubernetes services.
The following platforms are tested and supported:
- Local Kubernetes
- Local Kubernetes Cluster
- Local Openshift Cluster with admin priviledges
- Azure AKS
- Google GKE
- Amazon EKS
- IBM Cloud Kubernetes Service
2. How Kubernetes Agent Works
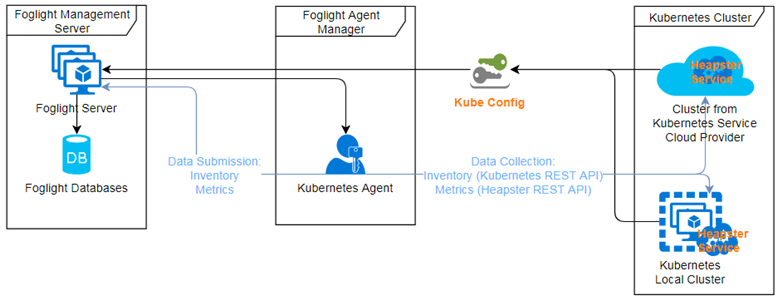
The Kubernetes Agent uses kubeconfig (a standard kubernetes configuration file used by the client to access to the kubernetes cluster) as the credential to access the Kubernetes API server. So you need to provide a kubeconfig for the Kubernetes Agent to monitor your environment.
Besides, Kubernetes Agent depends on the heapster (a kubernetes service which merging the collected metrics and provide the metrics API). Thus you need to deploy the heapster service onto your Kubernetes cluster also.
3. Kubernetes Agent Credentials
For local build kubernetes (local kubernetes, openshift origin), you can use the admin kubeconfig directly (might be located at /etc/kubernetes/admin.kubeconfig for kubernetes and /etc/origin/master/admin.kubeconfig for openshift origin) as the credential for Kubernetes Agent and skip all the following steps in Section 3.
For cloud kubernetes service provider created kubernetes cluster, most of them will generate the kubernetes kubeconfig through their command line tool (eg. AKS, GKE, IBM Cloud Kubernetes Service) or they will tell you how to generate the kubeconfig(eg. EKS).
However, some of them (eg. AKS, GKE, IBM Cloud Kubernetes Service) use token for authentication which will be expired after a certain period of time. some of them (eg. EKS) use proxy authentication by default. All of this ways are not suggested by Kubernetes Agent.
So we suggest to use service account with cluster-admin cluster role for authentication for the Kubernetes Agent. Please follow the steps below to update and generate your Kubernetes Agent Credential.
3.1 Create Service Account
3.1.1 Automation Scripts
You can follow the guide in this link to deploy the service account.
3.1.2 Generate Manually
Create a new service account:
kubectl create serviceaccount kubeclusteradmin
Cluster Role Binding:
kubectl create clusterrolebindings kubeclusteradmin-crb --clusterrole=cluster-admin --serviceaccount=kubeclusteradmin
Now, you will have a service account with cluster-admin role.
3.2 Generate Kubernetes Agent Credential
For the authentication part, some cloud provider use CLI tools to generate a default kubeconfig which uses token (will expired sometime) for authentication (eg. AKS, GKE, Openshift), some others use web hook or proxy for authentication (eg. IBM Cloud Kubernetes Service, EKS).
No matter which way, they all cannot be used as the Kubernetes Agent credential. We need to create a service account first (Refer to section 3.1), then update to the default kubeconfig generated by the cloud provider CLIs.
3.2.1 Generate Default KubeConfig
Azure AKS
You need to download both Azure CLI and Kubernetes CLI.
az login -u <username> -p <password>
az account set --subscription <subscription number>
az aks get-credentials --resource-group <resource group> --name <cluster name>
If you enable the two-factor authentication, then "az login with -u and -p" will not work, you need to use "az login" instead.
Afterwards you will get a default KubeConfig at <USERHOME>/.kube/config
Google GKE
You need to download Google Cloud Tool and Kubernetes CLI. Then you are able to get the instruction about how to generate the default KubeConfig through the console.
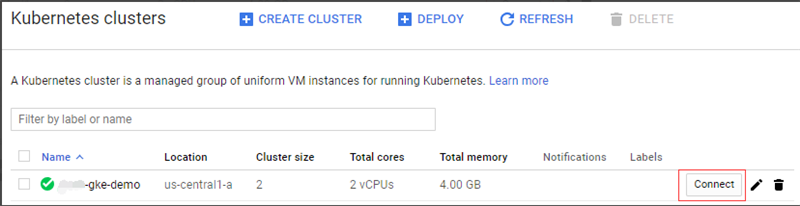
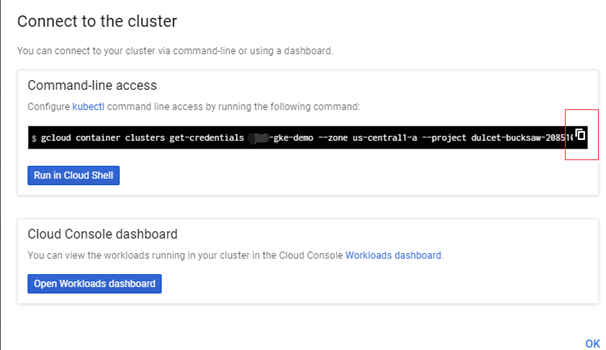
Then you will get a default KubeConfig at <USERHOME>/.kube/config
Openshift
If you build a Openshift Origin cluster and you can access /etc/origin/master/admin.kubeconfig, then use it as the Kubernetes Agent credential directly.
Otherwise, you can follow the steps below to generate a valid credential.
You need to download Openshift CLI and Kubernetes CLI. Then in the console, you should get the command line help about how to generate the default KubeConfig.
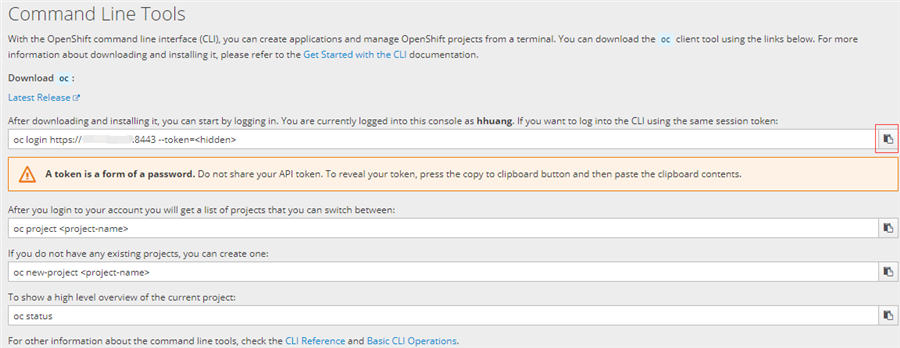
Then you will get a default KubeConfig at <USERHOME>/.kube/config
For openshift, we also need to get the kubernetes version, since we cannot get this from the kubernetes REST API.
If you finish the above step, you can type "oc version", and you will get a response similar to below:
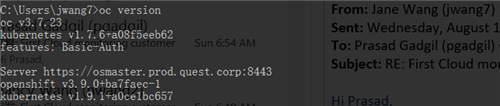
So the kubernetes version is 1.9.1. We will use this version number when we create agent and change its properties later.
IBM Cloud Kubernetes Service
You can get the default kubeconfig from both command line or download from the console. If you want to use command line, you need to download IBM Cloud CLI and Kubernetes CLI
ibmcloud plugin install container-service -r Bluemix
ibmcloud login -a https://api.au-syd.bluemix.net
ibmcloud cs region-set <region>
ibmcloud cs cluster-config <cluster>
kubectl get nodes
Then you will get a response similar to

Here the kube-config-mel01-kube-demo-cluster.yml for example is your default KubeConfig.
Amazon EKS
EKS has a very detailed guide for how to generate a default KubeConfig, please follow the official guide.
3.2.2 Update KubeConfig
We provide an automation tool for this step (linux shell script and windows batch file), you can refer to the guide in this link.
If you don't want to use the automation tools, you need to follow the steps below to manually update the KubeConfig.
kubectl describe serviceaccount <service account name> --namespace <service account namespace>

Remember the token (eg. kubeadmin-token-fkjjx).
kubectl describe secret <secret name> --namespace <service account namespace>
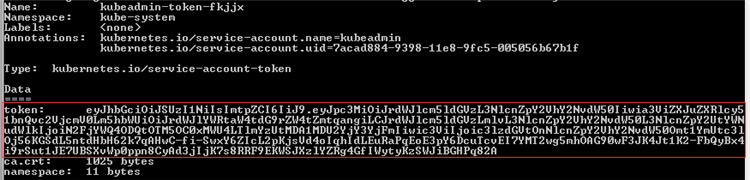
Remember the token (eg. eyXXXXXX82A).
kubectl config view current --minify=true -o yaml
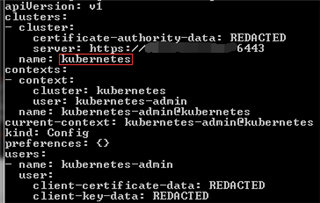
Remember current cluster (eg. kubernetes).
kubectl config set-credentials new-user --token=<token>
kubectl config set-context new-context --cluster=<current cluster> --user=new-user --namespace=<service account namespace>
kubectl config use-context new-context
Finally, your kubeconfig locates at location defined by the environment variable KUBECONFIG or <USERHOME>/.kube/config if that variable not defined.
4 Deploy Heapster Service
If you want to monitor a local kubernetes cluster or EKS cluster, then you need to deploy the heapster service on your own.
You can deploy heapster based on the official guide, or you can use the one provided by us.
5 Monitor Kubernetes Cluster
Now you've already got the Kubernetes Agent credential, you can start your trip with Foglight to monitor your kubernetes cluster.
You need to enable a trial license by clicking a button at the first time use.
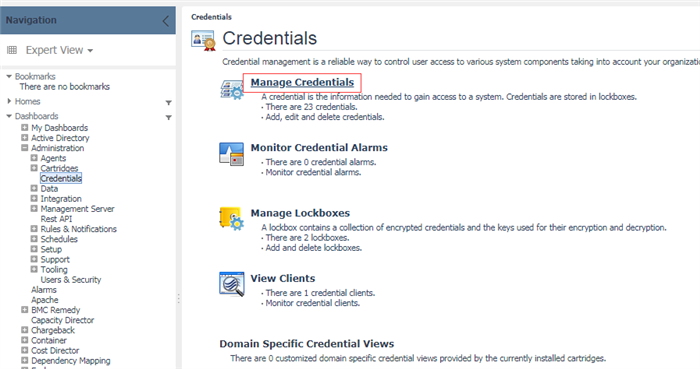
5.1 Upload Credential
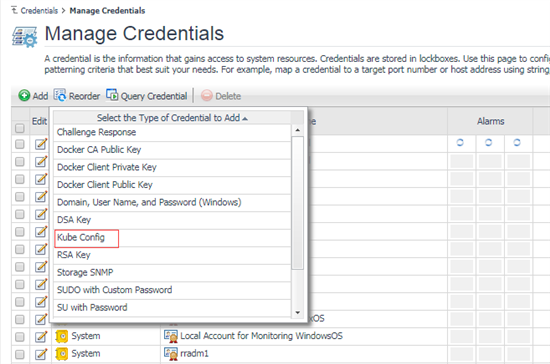
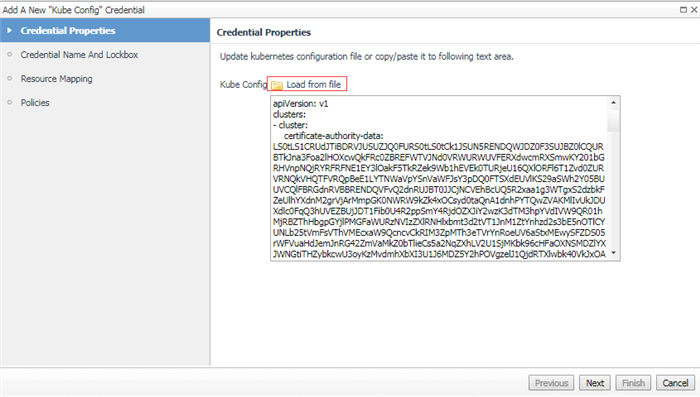
Choose KubeConfig in your local platform, then upload onto Foglight.
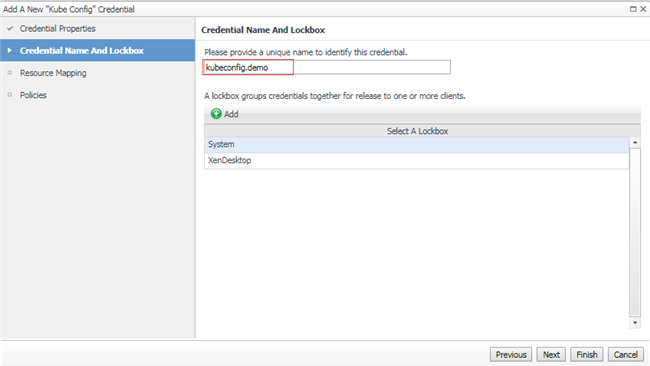
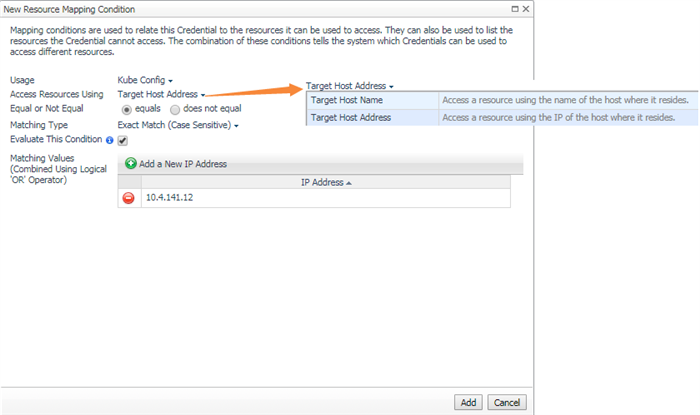
Then in the resource mapping configuration step, you can use map by host name or IP address. This is the address defined in your KubeConfig(eg. API server IP Address). Then process to finish adding the credential.
5.2 Create Agent
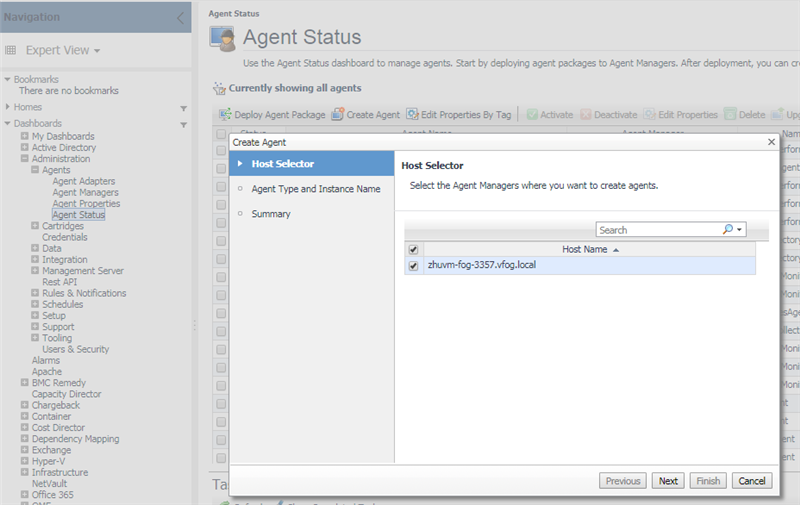
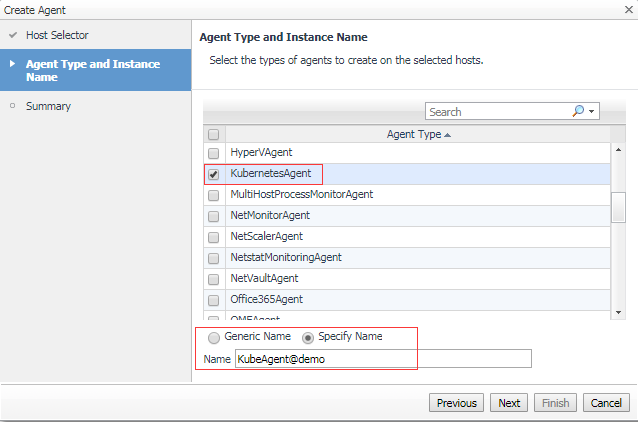
When the agent creation is finished, change the agent properties as below.
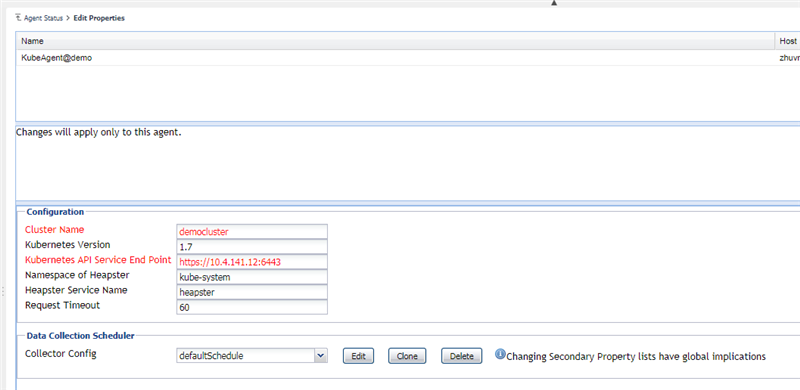
Usually, you only need to change cluster name (identified your cluster), API Service Endpoint (the endpoint defined in KubeConfig's cluster.server).
However, if you are going to monitor openshift, then you need to change the kubernetes version. You can use kubectl version to check the Server version.
Besides, if you are going to monitor local kubernetes cluster or EKS, then you might need to change the heapster settings since you deploy this service on your own. Otherwise, the heapster service deployed by the cloud kubernetes service automatically under namespace kube-system and the service name is heapster.
Then save the changes and activate the Agent.
Note: For the monitored openshift kubernetes environment, we need to change the Kubernetes Version to the correct one which the openshift cluster is using. You can refer to "3.2.1.3 Openshift" for more detail.
5.3 Monitoring
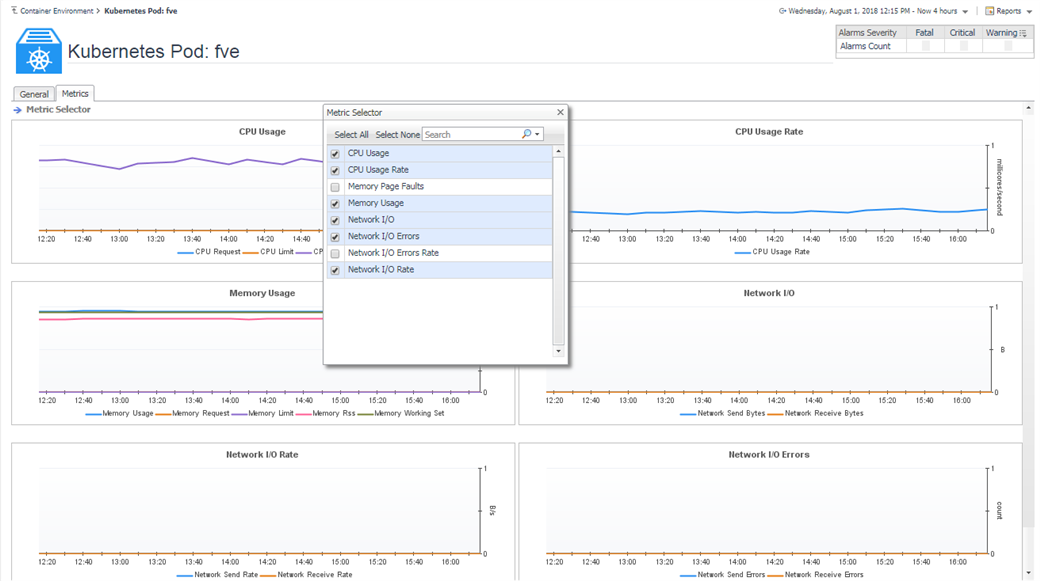
5.3.1 Pods
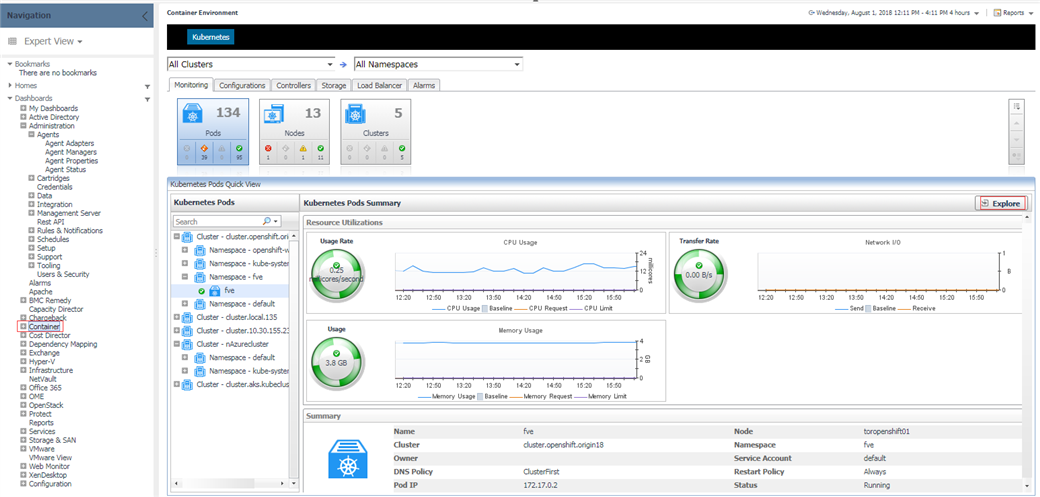
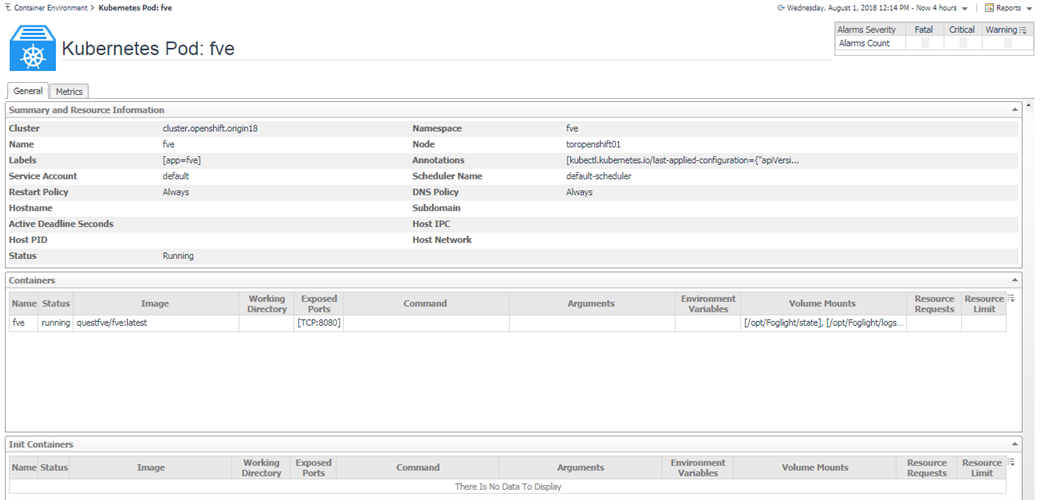
Above are the pods summary and detailed pages.
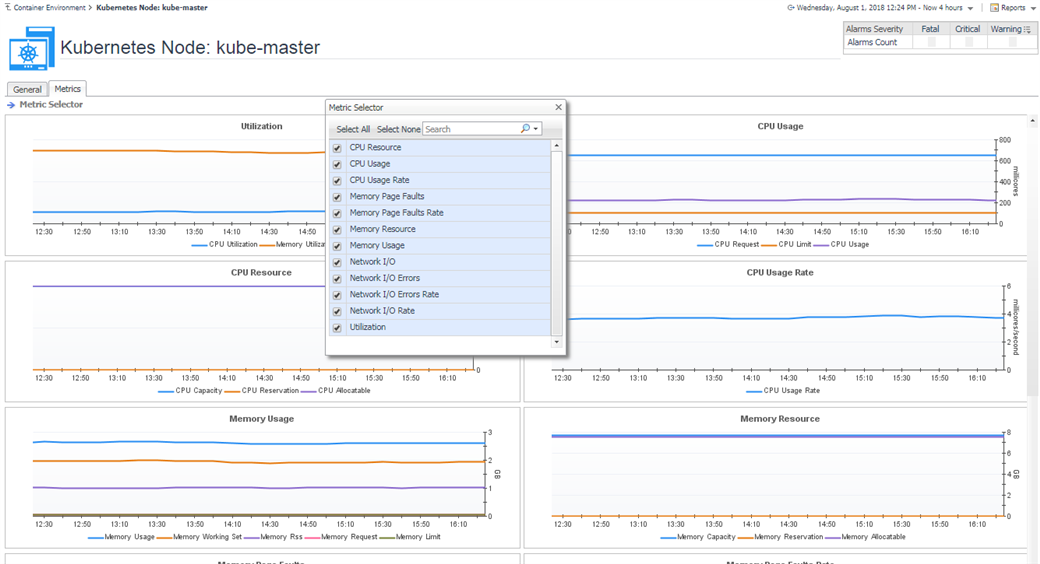
We provide some default metrics in the detailed pages, however, you can change through Metric Selector.
If there is any abnormal status, then the status will change color and mouse over can display the detailed information as below.

If there is any alarm triggered, then in the detailed pages, you can click on the alarm widget to view the detail as below.

5.3.2 Nodes
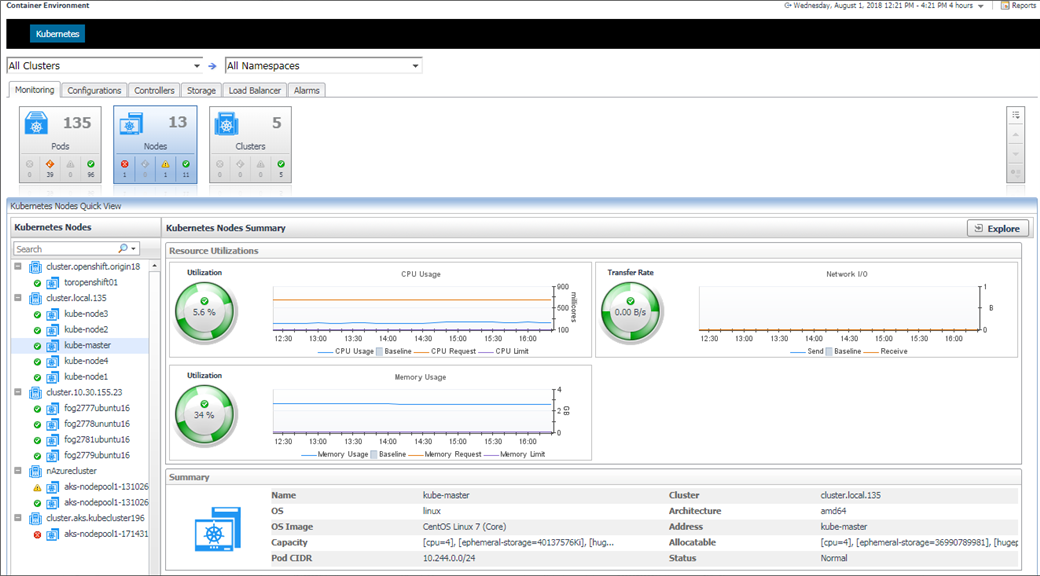
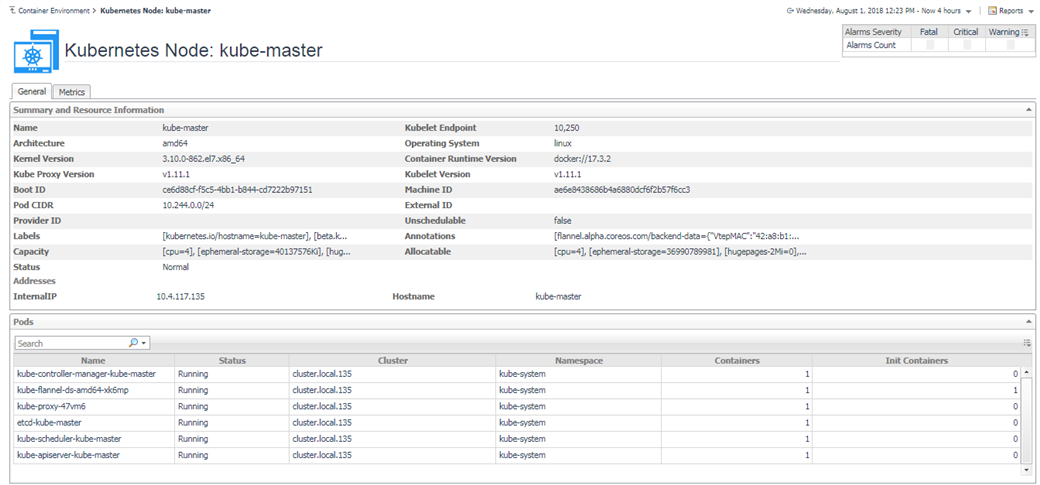
In the detailed page, you can see the pods that are currently running on this node.
The node status and alarms usage are the same to Pods.
5.3.3 Clusters
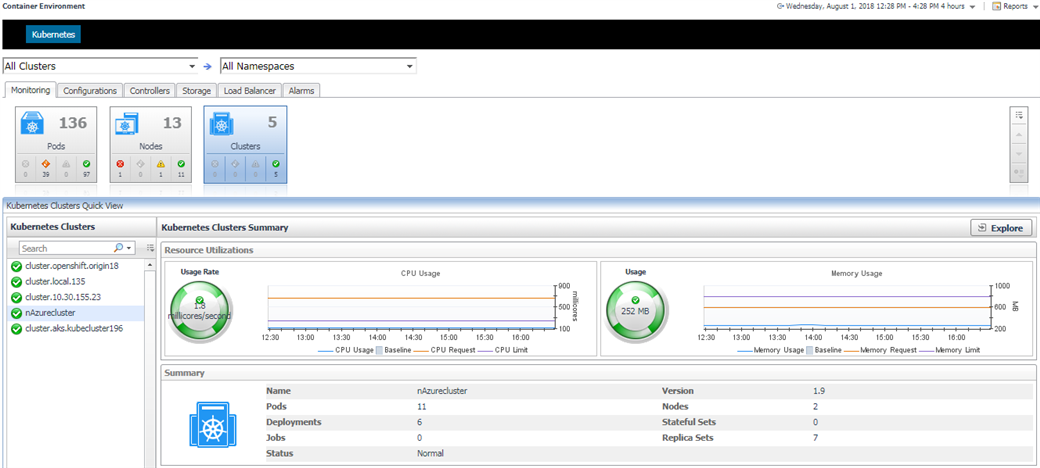

In the summary page, it lists the kubernetes components count in this cluster. You can click to see the detail as below.
5.3.4 Heatmap Preview
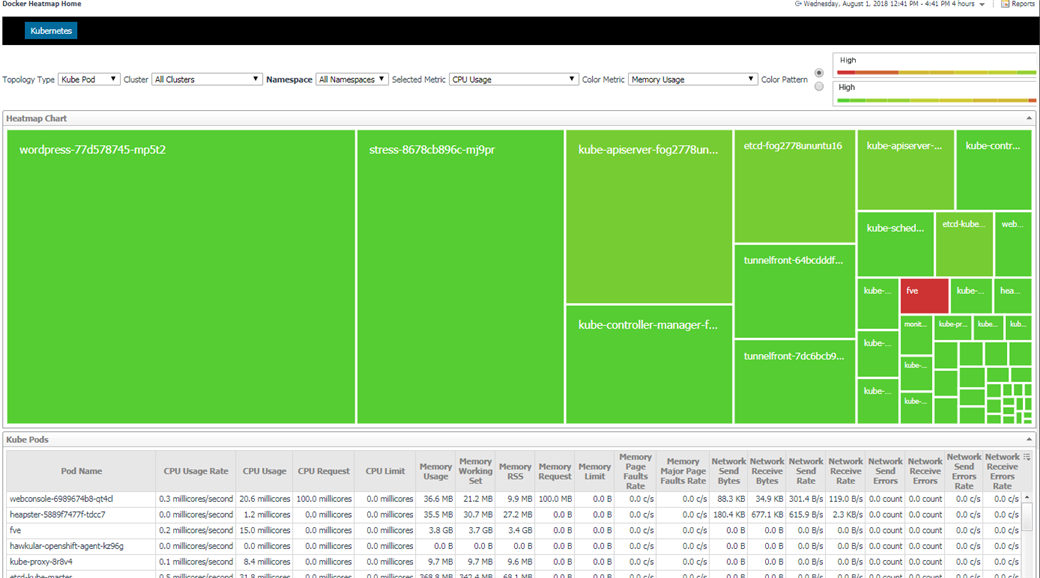
We provide heatmap for Kubernetes components including cluster, node and pod. It is very obvious to check out which components have a higher value for which metric. Thus, you might need to pay attention to these components.
From the above chart, you can see wordpress-77d578745-mp5t2 has the highest CPU Usage (biggest block), however, fve has the highest Memory Usage (colored in red).
5.3.5 Scatter Preview
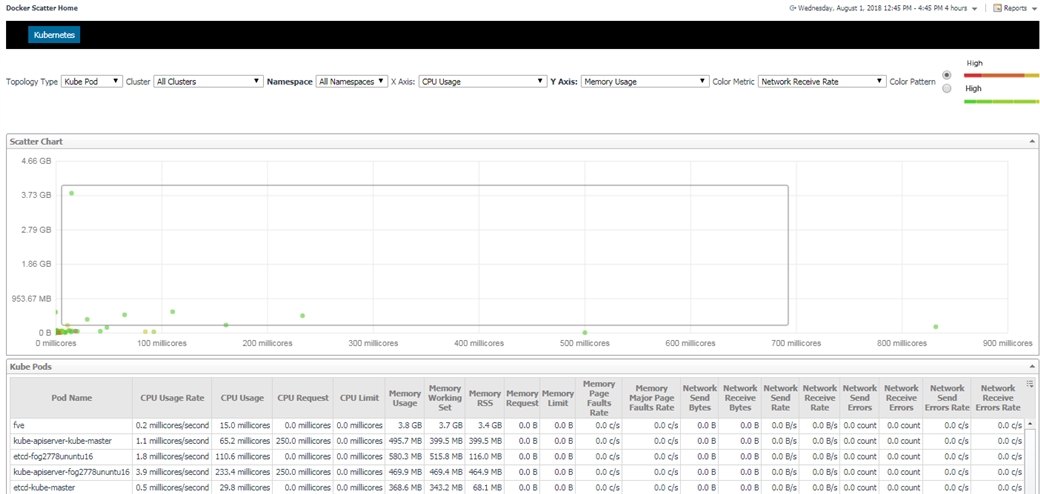
We provide scatter chart for Kubernetes components including cluster, node and pod. Similar to heatmap, it can obviously point our some of the components that need to pay attention to. What's more, it add one more metric to provide a two dimension view.
From the above chart, you can see there one pod's CPU usage over 800 millicores (0.8 core), and another one's Memory Usage over 3.73 GB.
Besides, the darker pods are the ones that have higher network receive rate.
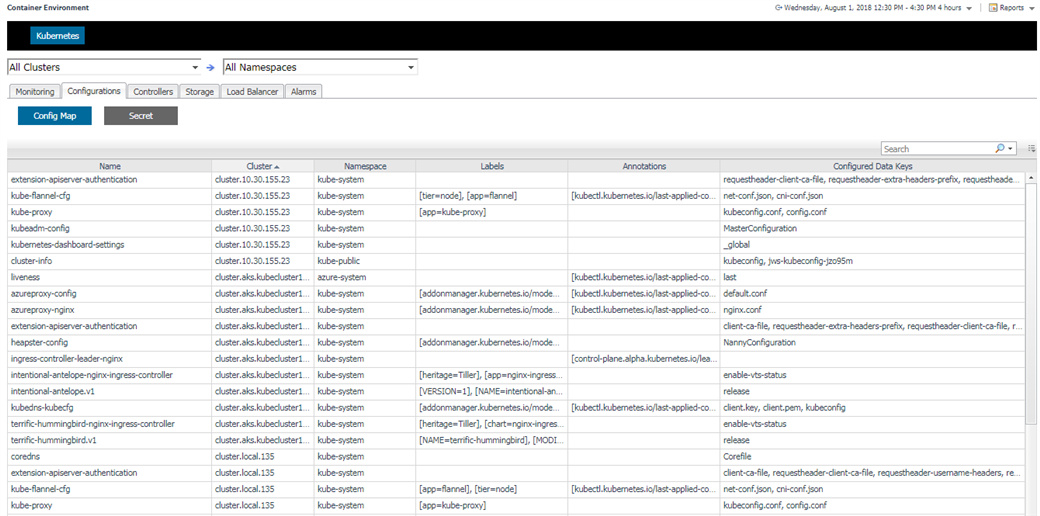
5.3.6 Configurations
Configuration tab contains ConfigMap and Secret.
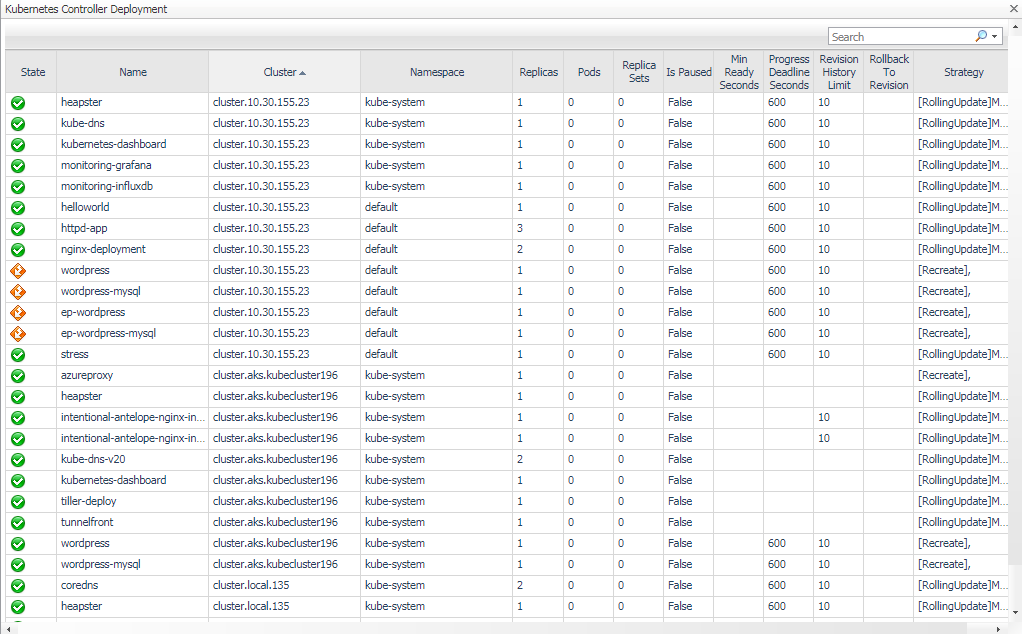
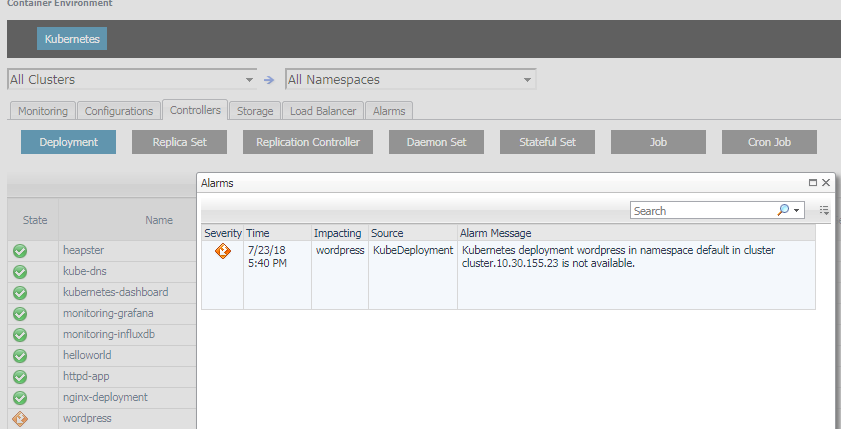
5.3.7 Controllers
Controllers are pod controllers, including Deployment, Daemon Set, Stateful Set, Replica Set, Replication Controller, Job and Cron Job.
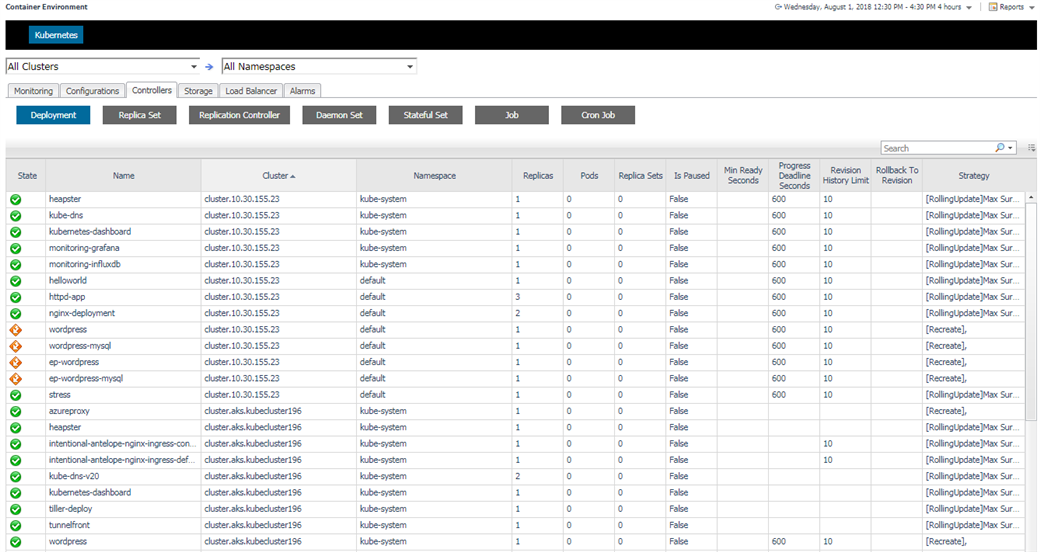
Click on the alarm icon, you can see the alarms triggered by the component as well as triggered by its pods and containers as below.
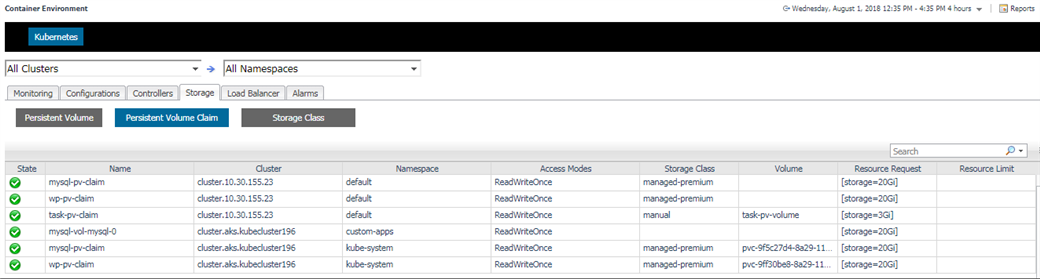
5.3.8 Storage
Storage contains Persistent Volume, Persistent Volume Claim and Storage Class.
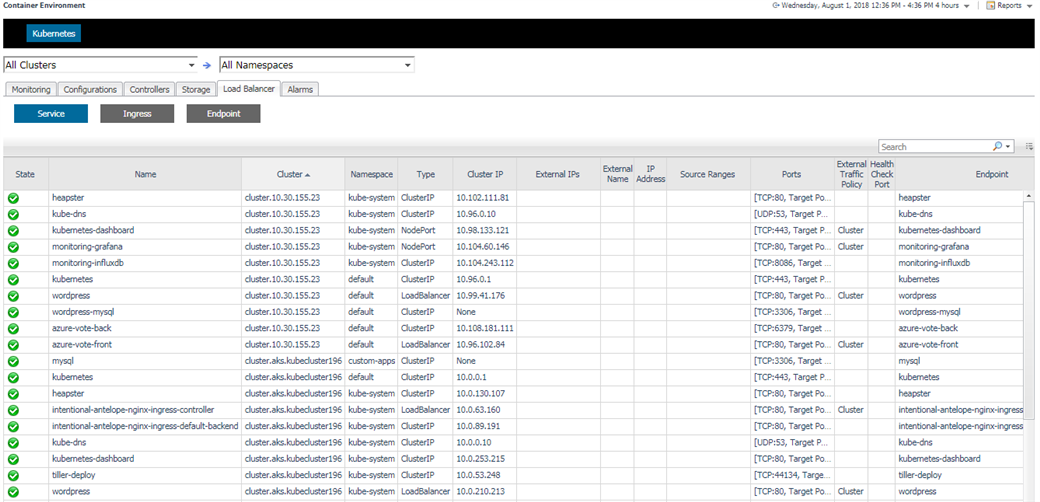
5.3.9 Load Balancer
Load Balancer contains Service, Ingress and Endpoint.
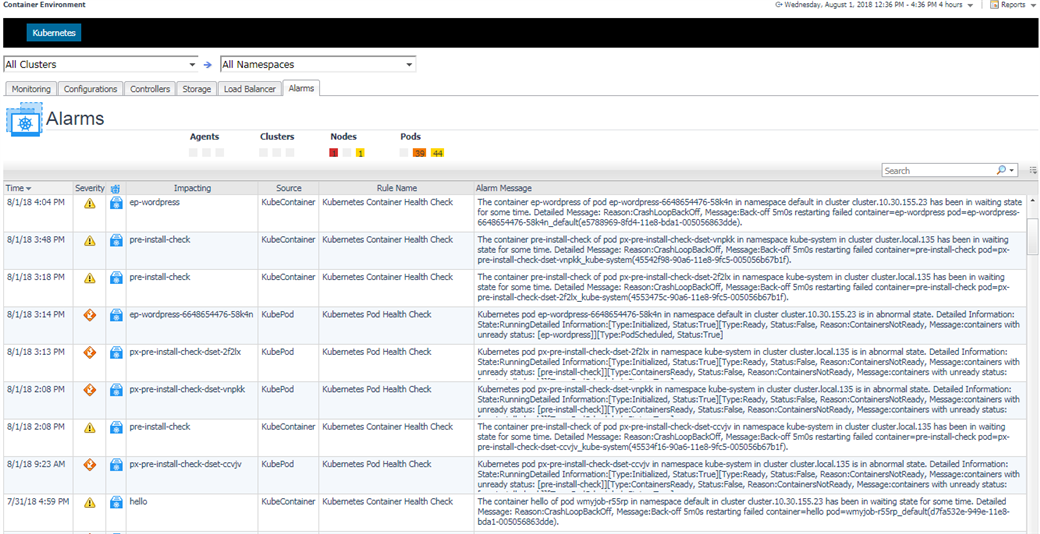
5.3.10 Alarms
There is also a alarms page listing all the alarms.