
Introduction:
Why do we think they’re more important than ever? Good question and the answer to that question will depend on the team members asking it:
- The DBA Team: They are not interrupted multiple times a day to restore x-amount of configuration/testing data rows to tables so others can do development or testing.
- The DEV Team: The Developer can reset his own application configuration tables. The Developer can also reload or unload any source and target data sets they may need to do successful development. That produces better quality work and better-tested products.
- The QA/Test Team: They can refresh their own setup data or set/refresh their own testing tables either before or after testing scenarios are completed. This ensures consistency of testing and Data Integrity.
- The Functional BA Team: They are able to configure new items, test, and confirm within a Non-Production environment. They can modify application setup data until it is exactly correct. From there they version, manage and migrate the data they know is correct to the Production environment.
When it comes to versioning, managing, and migrating specific rows of data using a tool other than a standard SQL tool, it can be a bit intimidating. Here we will walk you through the creation of a new Stat Data Object item.
With a Stat Data Object, you can version these rows of data, and migrate these rows of data as needed. These are great for Developers and Testers to be able to run processes and recover their testing data quickly with a drag and drop. These are also good if you have a “Config” type environment where you test out different variations of configuration, such as Chart of Accounts, and wish to move the finished data.
Stat Data Objects also provide additional transparency when changes are made to the configuration side of applications by auditing the version, and migration of the data rows.
For some, these can be a bit convoluted. However, we are seasoned DBA’s, Developers, and or PeopleSoft Administrators.
We are the Brave!
We are the Valiant!
We are the Stat Administrators and there’s no one else around to do it for us.
The Data:
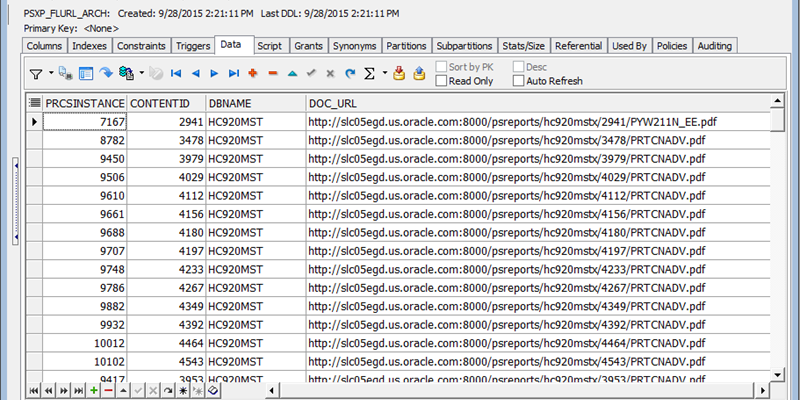
Pictured below in the screenshot the data we want to allow our users to access.
Our user wants to be able to migrate any row of data within the PSXP_FLURL_ARCH table. Perhaps this data is setup in a configuration type environment and we want to be able to version, manage and migrate it from environment to environment. Or, perhaps when a Database Refresh happens, we want to be able to quickly recover that data back to our local configuration tables.
The first thing we want to do is get the table layout for the data you are after. Here’s the PSXP_FLURL_ARCH DESC Call to see the Table Layout: You can see this by either Loading a SQLPlus Window or a TOAD session.
|
PSXP_FLURL_ARCH: |
|
|
|
PRCSINSTANCE |
NOT NULL |
NUMBER(38) |
|
CONTENTID |
NOT NULL |
NUMBER(15) |
|
DBNAME |
NOT NULL |
VARCHAR2(8) |
|
DOC_URL |
NOT NULL |
VARCHAR2(254) |
Data Object Setup:
Let’s go into Stat and create a new Data Object. In the Stat User interface, go to Maintenance > General > Data Objects.
Select the “PeopleSoft Objects” Tab.
Select the “New” Button to Add a New Row to the Data Object Maintenance window: Enter “PSXP_FLURL_ARCH” in the “Object Name” field.
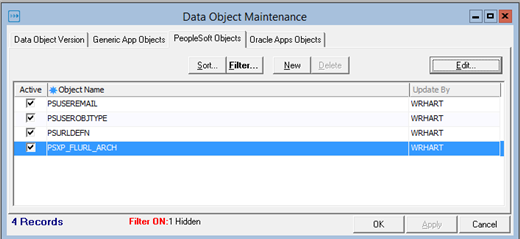
Select the “Apply” button on the bottom right-hand corner of the window to save the new row. When you do this the Edit button on the top right of the window will be enabled. Select the “Edit” Button in the top right corner.
Data Object Detail Setup:
When you enter the Data Object Detail Setup screen, you will see a blank setup screen.
Step One: Identifier Fields:
We will start in the “Identifiers” section on the top right portion of the window.
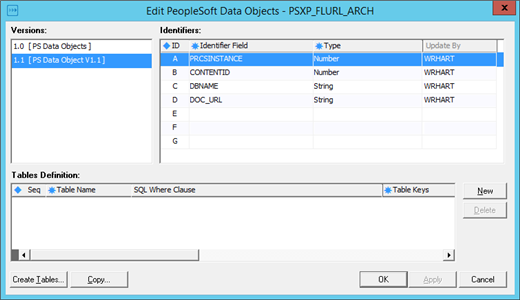
The first thing you want to do is enter the Field Name into the “Identifier Field” column that you want the Query to select, or the fields in the table that you want to be able to version, manage and migrate.
The safest way to bring over the field/columns is to do a Cut & Paste from your query. This way you are sure to enter the proper names as required.
Enter the Identifier Field values/rows as you want them to appear to the user.
SELECT PRCSINSTANCE, CONTENTID, DBNAME, DOC_URL FROM PSXP_FLURL_ARCH;
|
PSXP_FLURL_ARCH: STAT FIELD IDENTIFIER: |
|
|
|
|
A |
PRCSINSTANCE |
NOT NULL |
NUMBER(38) |
|
B |
CONTENTID |
NOT NULL |
NUMBER(15) |
|
C |
DBNAME |
NOT NULL |
VARCHAR2(8) |
|
D |
DOC_URL |
NOT NULL |
VARCHAR2(254) |
Select the “Type” from the Type Drop-down. There are only three types available in the list; these include Number, Character, and String.
For additional information see the “Defining Object Identifiers” section in the Stat Administrator’s guide.
Step Two: Table Definition:
In this section we are working in the lower “Table Definition” section of the Data Object window.
Start by selecting the “New” button on the right-side-center and you are presented with a new row in
the “Tables Definition” section. (#1 in the image below)
Stat will automatically post in the SQL Where Clause for you based on the fields that you entered above.
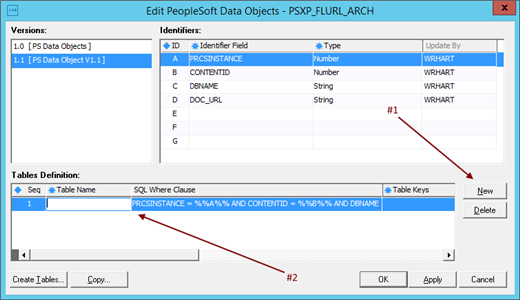
Enter in the actual Table Name (PSXP_ FLURL_ARCH) for the table from the query/description statement above into the “Table Name” field. (You may or may not need the Schema Owner in the Table Name field.)
Next, enter the Table Keys according to the DB schema. For our table these would be:
PSXP_FLURL_ARCH: PRCSINSTANCE, CONTENTID, DBNAME, DOC_URL
Enter in the Column names into the “List of Columns” field as you would in a SQL Statement.
I.e. PRCSINSTANCE, CONTENTID, DBNAME, DOC_URL
When completed select the “Apply” Button.
Step Three: Create Archive Table Definition:
Select the “Create Tables” button to continue on the lower left-hand corn. (This would be #1 in the picture below.)
When you select this button, a new window will appear.
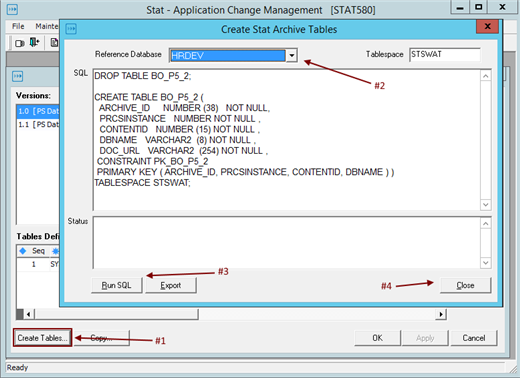
For the “Reference Database” dropdown menu, select the environment where you want to run the SQL Script for the temp table to be defined. (#2 in the picture above)
When you select the environment from the environment drop-down menu, Stat will display the SQL Script in the below “SQL” section of the screen and the “Run SQL” button is now enabled. Select the “Run SQL” button. This will compile and run the SQL to create the named Temporary Table required within Stat. (#3 in the picture above)
If this is the first time you have selected the “Run SQL” button, it is expected that you will see an error message appear.
It will look similar to “Failure to drop table {Table Name}: Table or view does not exist.”
This is due to the “DROP TABLE” statement in the first line of the SQL.

From the above screenshot, the table is named BO_PX_X format. Your temp table will most likely be named differently. This is needed in the event that you make changes in the future and need to re-run the build.
When completed, you should see “Table BO_PX_X created.” Once the SQL is run, select the “Close” button to close the pop-up. Select the “OK” button back on the Definition Page to close the Data Object Definition window.
If all is well, you have just created your Stat Data Object. Let’s take it for a ride!
Using Our New Data Object:
Within Stat create or open a CSR. Go into the version control area of the CSR. Open the “Objects” tab where objects are check-in and checked-out.
Select an “Environment” from the Environment drop-down list.
Select the “Object Type” drop-down and you will now notice that Stat has added a new section.
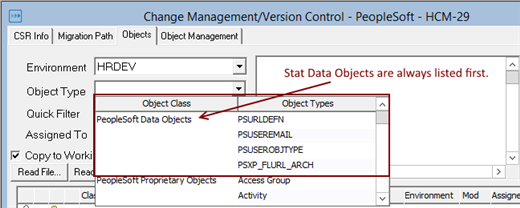
Instead of seeing the “PeopleSoft Proprietary Objects” listings, you will now see that the first section is “PeopleSoft Data Objects”.
Within the dropdown select the “PSXP_FLURL_ARCH” Data Object item as you defined it and to the right you will see the results of the configured SQL statement execute and the returned rows are now available to: Version, Manage, and Migrate as you see fit.
You can add these Data Objects to your CSR by either double-clicking on the specific rows, or highlighting them and selecting the “Add Object” button on the right side of the screen.
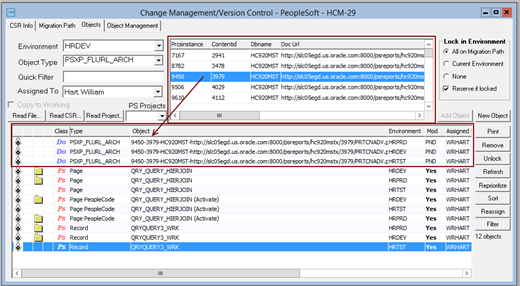
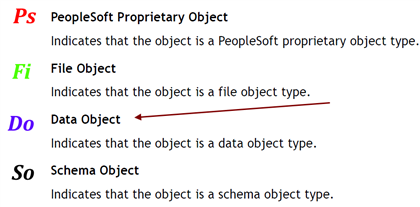
When you add, or checkout, the Data Objects they are added to the list of objects in the lower section of the CSR. You will notice that the “Class” column has a new value shown. That value being the “Do” for “Data Object”.
In Closing:
If you made it this far and you’re not yelling at your computer, or me, then Congratulations! Great Job!!
Seven Things I Wish I Knew Earlier:
- Oracle Only: Data objects are supported only in environments running Oracle.
- Data Objects are meant for small amounts of data. 10 – 100 rows. Any more than that you will be better served using a SQL or DMS script.
- Data Objects are great when you want to track the data specific changes for configuration setup or configuration auditing.
- You are currently limited to 7 Columns (A-G) in the Identifiers query. These fields must also be included in the SQL WHERE Clause of the Data Object.
- Data Objects work best for single table queries.
- Know your Parent/Child relationships. e. if you move a row of data – Is there a Parent table that this data is dependent on?
- Data Object Locks: You can logically lock Data Objects but not physically lock Data Objects at the database level that you would do with items such as a PS Record or PS Page.
Although the intent of this work was to give you a "Quick Start Guide", please don’t forget about the hard work that went into creating the documentation in the Stat Administrator’s guide. It’s an excellent resource and it’s my first ‘go-to’ place when I need answers.
Data Objects are covered in their own chapter in the Stat Administrators guide entitled “Data Object Maintenance”.
Thanks for reading!
