In a recent blog post, my colleague Corey Rivers explained how to integrate Foglight into your LDAP/AD environment. Many Foglight implementations, both small and large, leverage LDAP/AD for authentication to Foglight's web-based user interface. Doing so minimizes administrative overhead associated with managing multiple accounts, and eases the burden on users by not requiring them to remember multiple usernames/passwords.
Best practices also dictate that we, as users, should only enter our credentials on websites that encrypt traffic with SSL. Foglight's web-based user interface supports SSL encryption, and even allows for it to be enabled and required during the installation.

Most installations, however, will likely want to replace the default self-signed certificate with one of their own. Doing so will avoid inconveniencing end-users with annoying browser warnings like "The security certificate presented by this website was not issued by a trusted certificate authority." or "The security certificate presented by this website was issued for a different website's address.".
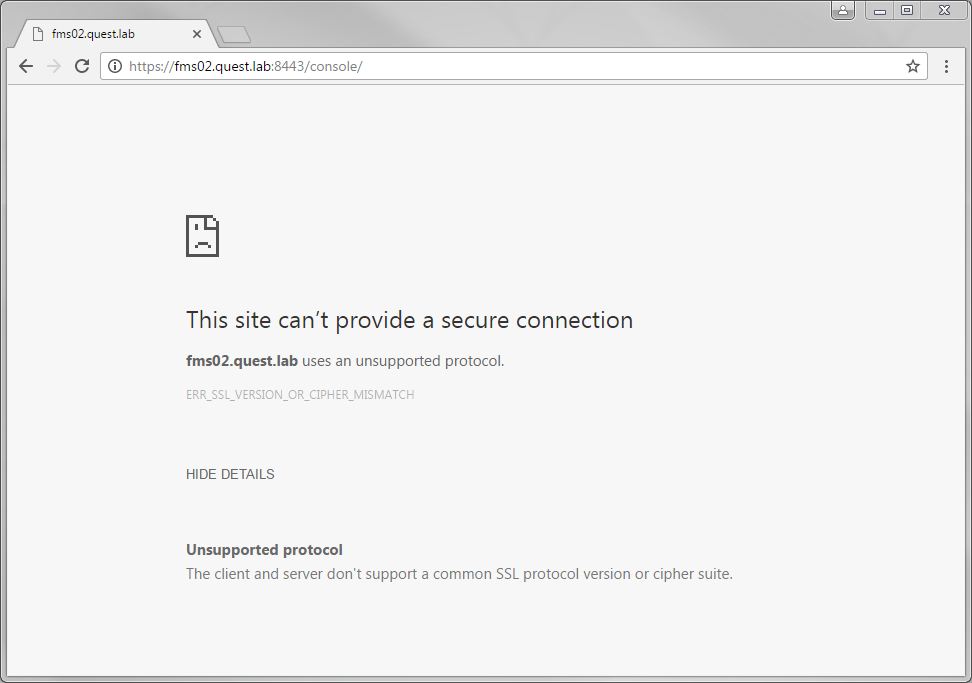
Here is a screenshot of what Chrome displays when attempting to connect to an FMS running the default FMS SSL certificate:
While the process of replacing Foglight's default certificate is well documented, recent changes in the behavior of modern browsers require us to tweak these steps with some additional arguments in order to end up with a certificate that meets the demands of today's SSL standards.
Let's walk through the process of replacing the default certificate with one of your own:
Step 1: Delete the default certificate from the Tomcat keystone. With the FMS stopped, issue the following command from a command line on the FMS: (click in the command box to see the full text)
<foglight_home>\jre\bin\keytool -J-server -keystore <foglight_home>\config\tomcat.keystore -storepass nitrogen -delete -alias tomcat
Step 2: Create a new key under the tomcat alias in the keystore. The commands outlined in the online documentation referenced above will generate a key that is 1024 bits in length, and uses the DES encryption algorithm. It is these two parameters (key length and encryption algorithm) that aren't strong enough to meet today's browser requirements. We can generate a more robust key by simply adding two switches to our command. Adding a "-keysize 2048" switch will net us a longer key. Adding a "-keyalg RSA" will enforce a stronger key generation algorithm. The new command should look like this: (click in the command box to see the full text)
<foglight_home>\jre\bin\keytool -J-server -keystore <foglight_home>\config\tomcat.keystore -storepass nitrogen -genkey -alias tomcat -keyalg RSA -keysize 2048
Step 3: Generate a new CSR. The command should look like this: (click in the command box to see the full text)
<foglight_home>\jre\bin\keytool -J-server -keystore <foglight_home>\config\tomcat.keystore -storepass nitrogen -certreq -alias tomcat -file <your_request_file.csr>
Step 4: Get the CSR signed by your preferred CA.
Step 5: Import the new certificate into the Tomcat keystore. The command to do so is: (click in the command box to see the full text)
<foglight_home>\jre\bin\keytool -J-server -keystore <foglight_home>\config\tomcat.keystore -storepass nitrogen -import -trustcacerts -alias tomcat -file <your_converted_cerificate>
Step 6: Start Foglight. Then, sit back, relax, and sleep better at night knowing that your user's credentials are being encrypted in transit by a strong certificate that won't throw alerts!
Check out the, now SSL encrypted, Foglight UI in the screenshot below: