

Do the Holidays have you dreaming of sipping eggnog by the yuletide fire? Watching football in front of the big screen TV in your favorite recliner? Or better yet, spending cherished time with your loved ones? If so, having your Service Desk running like a well-oiled machine will ensure peace of mind so that you can enjoy all the great things that make this holiday season special for you.
Did you know that you can have tickets automatically created based on a schedule for routine tasks such as verifying tape backups, scheduling site visits, and performing maintenance? In this article, I will walk you through building this out in the Kace Systems Management Appliance Service Desk.
Step 1: Create a New User called Scheduled Tickets and ensure that it has a valid email address associated with it:

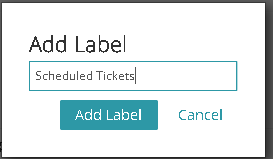
Step 2: Create a New Label and Associate it with the Scheduled Ticket User. Go to User’s List Page, Select the Scheduled Tickets User by selecting the check box, then Choose Action, Add Label, Name it Scheduled Tickets as such:
Step 3: Create a New Queue called Scheduled Tickets and set it up as you would any other queue. More than likely, you will want this queue to be hidden from all users to avoid confusion so my recommendation would be to “Restrict Submitters by Label” and use the Scheduled Tickets label that we just created in the previous step.

Step 4: In order to make this work, we will ultimately create ticket rules in the Scheduled Ticket Queue which will send an email so that the ticket gets created in the appropriate Service Desk queue. Go to Ticket Rules and make sure you are creating the rule under the Scheduled Tickets Queue.

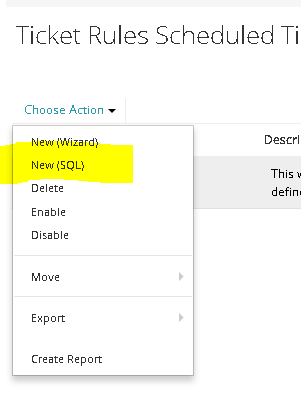
Step 5: On the Ticket Rules Page, select Choose Action Drop Down and New (SQL).
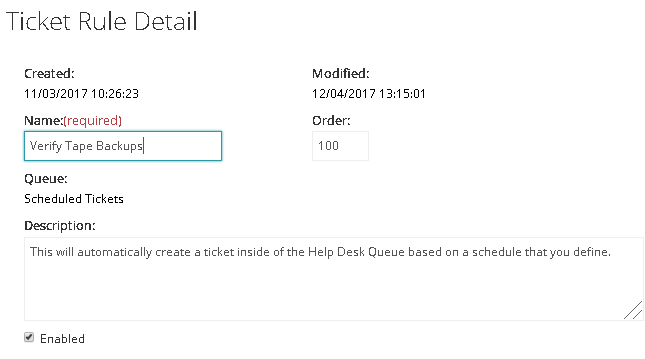
 Step 6: Name the Rule and in this example we will use Verify Tape BackUps. In the Description section “This ticket rule will automatically create a ticket inside of the Help Desk Queue based on a schedule that you define”. Enable the Rule by selecting the check box.
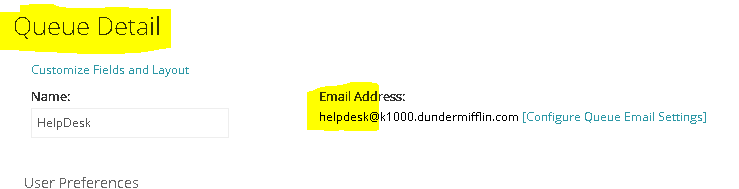
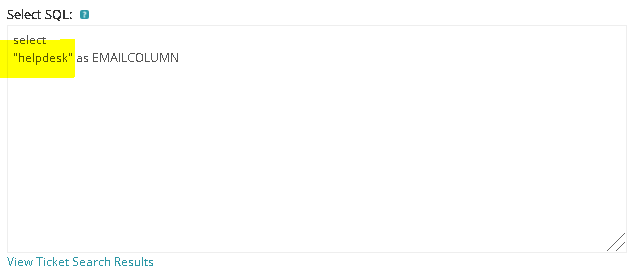
Step 7: In the Select SQL section enter the following information: select “helpdesk” as EMAILCOLUMN. Please note, more than likely “helpdesk” needs to be changed to be the email prefix of the queue that you want these tickets created in. For example, I want a help desk technician to verify tape backups. The queue in which my help desk technicians work from is called “HelpDesk”:
And here is what my SQL Select statement looks like:
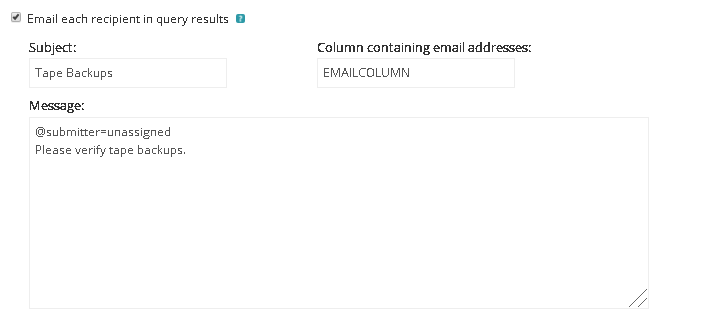
Step 8: Select the checkbox next to Email each Recipient in Query results. Subject = Verify Tape Backups, Column containing email addresses = EMAILCOLUMN and for Message: @submitter=unassigned, Please verify tape backups.
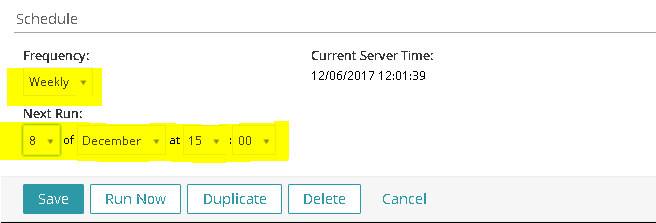
Step 9: The last and final step is to decide how frequently this ticket should be created. For example, I want my ticket created every Friday at 3:00 pm so I am using the following:
And in case you are wondering what it will look like, here is an actual scheduled ticket:

Once you understand how it works, you can get more creative by changing ticket attributes using variables that contain the @ symbol in the message body. For instance, here are a few that you can manipulate in the message section of the ticket rule:
@due_date A due date. The date can be in any format. For example, 4/3/2014, April 3, 2014, or next Thursday.
@impact A valid ticket impact.
@owner The owner's username, full name, or email address.
@priority A valid ticket priority.
@resolution A resolution.
@status A valid ticket status.
@submitter The submitter's username, full name, or email address. The email address is used for the username and email address fields. The full name is set to the Name portion of the email address. For example, name@domain.com.
@title A title for the ticket.
@custom_fieldname
I hope you found this article to be helpful. Instead of referring to your outlook calendar or using sticky notes, why not track all the hard work you actually do this Holiday Season in your Kace Systems Management Appliance Service Desk?
