Welcome back. In this video, I will teach you how to configure backups within Recovery Manager for Active Directory. I will also provide an overview of the options available for the computer collections. And finally, I will demonstrate how to properly manage existing backups.
Before you begin configuring backups, you need to decide where to store them. RMAN defaults to storing backups in the program data folder on the C drive. But that's where Windows is installed. And filling your drive with backups could crash your Windows Server.
So instead, you should have another drive. Like here I have drive D. Now, on Drive D I've just placed an RMAN backups folder, and I've made it shared. Now I want to configure this in Recovery Manager. So to do that, there is a global setting. You right click on the top node and go here to Settings.
Now, I can either type in the right directory or I could just browse to it. So I'm going to browse to it. It's not on Drive C. Expand drive E, and here it is, RMAN backups. And so there we go.
There's also unpacked backups. An unpacked backup is a backup that's been extracted. Recovery Manager compresses all the backups that it creates. But you might want to have some unpacked for object level recovery. So on this unpacked backups folder, you can see there is another path listed here.
I'm going to expand this one. And I'm going to drill into that backups folder again and point it towards unpacked. You can decide how many unpacked backups. I think the default is 3. And if you do extract a backup that's older than 3 sessions, it will stick around by default 7 days.
I changed that in my lab here to three days. And there are some other settings here, but they don't have to do with backups. So we'll go ahead and save those.
The first step to creating backups is to create a computer collection. A computer collection is a logical container that defines the backups in RMAN. In it, you configure backup type, schedule, protection, storage locations, components, and more.
Now, there are two ways to create a computer collection. First is to launch this backup system state wizard. The other way is to right click on Computer Collections and simply pick Create Collections. For this collection, I will name it test.
The first tab within the properties of a computer collection is the backup tab. Here you can define the backup type, whether you want to protect the backup with encryption, and you can even create your own custom description for the backup.
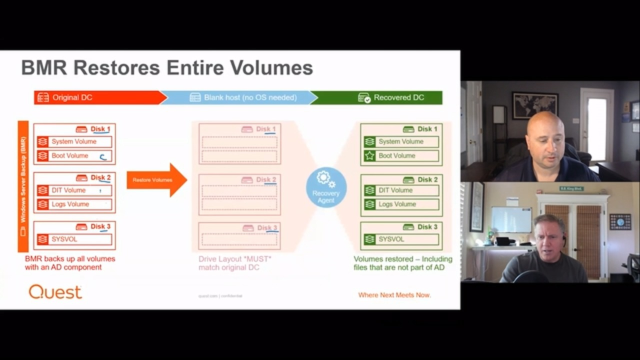
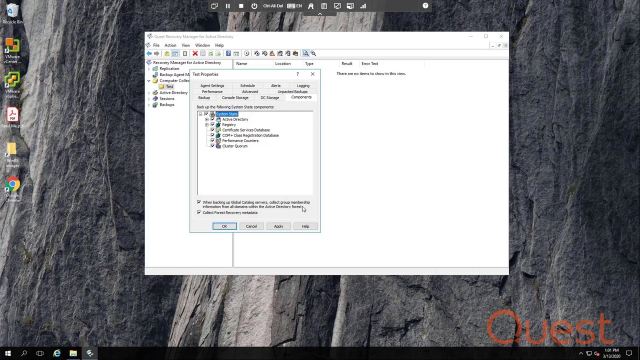
Recovery Manager supports two types of backups, AD system state, and bare metal. Active Directory system state is a preferred and default backup type. These backups contain the ntts.did file, sys vol, and some specific registry settings. Other components can be backed up in AD systems state if you select them on the Components tab.
Bare metal backups can only be selected if you own the Disaster Recovery Edition. We'll come back to these at the end. If you choose to encrypt backups, the password will protect it from unauthorized access. You cannot unpack the backup and thus restore any objects or attributes without knowing the backup password.
The next two tabs are the console storage and DC storage tabs. Console storage refers to the Recovery Manager server. DC storage refers to the domain controller. Now, note that you can specify a UNC in either one of these paths. But on the console storage tab, we don't recommend that. Because we recommend you store your backups locally on the console for object over recovery.
The backup file named format allows you to type a path or use helpful expression variables in order to create a unique path for each one of your backups. Expression variable names show up with 2% signs around them. Let's see how this works.
So if I clear this out, I could type if I wanted to. But if I use the expression variables, All I have to do is point and click. So here is my default backup location that we set in global settings earlier. And maybe I can add then domain name and computer name. And maybe date and time at the end and that makes my file name unique.
And you'll notice every single path that slashes are entered for me automatically. And down here, it resolves those variables and shows you an example of what that file path will look like. If a local drive letter is used on the DC Storage tab, it's referring to the local drive on the DC itself. So in my example here, this would be on the C drive of the domain controller.
If you do plan to store backups on the network share, it's recommended that you put a network path on the DC Storage tab. This way the data is sent directly from the DC to the network storage device. Because the backup agent will copy it there.
And you can select a primary backup path and an alternative backup path. Note that this alternate path is not available for bare metal backups. If you do specify both a primary and an alternate location, Recovery Manager places a copy of the backup in both locations. So how would you use this?
Well, the primary location may be a UNC, some protected file share that is near the domain controller. Whereas the alternative location may be a local drive on the DC. Depending on the type of disaster, it may be advantageous to restore Active Directory from backups that are already on the DCs, rather than waiting for them to be copied over the network.
Now, one of the most important settings on the Storage tabs is the Retention Policy setting. This allows you to configure how many backups are kept. It's important to remember that this is the number of backups and not the number of days. So if you backup twice a day, and you set your retention policy to four, well, then only two days worth of backups, not four days, would be saved.
Retention on the DC Storage tab applies to all copies. Thus, if I use the primary and alternative paths, I will need to double my retention if I want to keep both the number of primary and alternate backup copies in sync.
Let's look at the Components tab. If you choose standard backups, then the Components tab allows you to remove or add components to be backed up. All you really need for Active Directory recovery, even Forest recovery, is the Active Directory and Registry Nodes. However, these other components typically don't take up much room. But you can decide if you want to back those up in a standard backup.
Some of them may not be installed on all these C's. And if the component is not installed, you won't have a problem having that object checked here. This checkbox down here allows the backup agent to reach out to other domains in order to get cross group membership.
This helps an object level recovery where a user may be a member of a group in another domain. But it's not really required. And in some situations, it may not be possible to collect this information. So it is OK if you uncheck this box. Collecting Forest recovery meta data is required for the Forest recovery process. But it's only available in Forest Edition or Disaster Recovery Edition.
The Agent Settings tab allows you to set credentials to be used to access the domain controller. If there's no account specified, then the account used to start the backup will be used instead. Backup agents can be pre-installed. Or they can be dynamically installed and then uninstalled during the backup cycle. If you pre-install agents and you want to enforce their use, then check this box.
The automatically configured Windows Firewall option is useful. This can create firewall rules on the DC which allow the backups to run properly. Lastly, if you own Forest Edition or Disaster Recovery Edition, then you can ensure the Forest Recovery Agent is up to date on each DC that you back up with this bottom choice.
Note that any time that you need to install an agent on a DC, the account running the backup must be a member of the domains built-in administrator's group. This may or may not fit your organization's minimal permissions model. Generally, the settings on the Performance tab do not need to be modified unless the DC is already very busy during the time of backup.
It is not recommended to set the CPU throttling to a value of less than 50%. But keep in mind that throttling a backup does not reduce the amount of work the DC needs to do. Instead, it just makes the backup take longer.
The parallel backup setting of 10 is recommended, especially if you're storing backups on the console. If you raise this, you could risk network saturation. Lastly, backups are most efficient when using fast compression. There are other options here. But fast compression is really the best.
The Advanced tab allows you to store a copy of the backup in another location for long-term storage. Note that there is no retention policy for this tab. We assume that you'll use a third-party solution to manage the retention of this backup.
You can also set the maximum backup time per session and/or per DC. This is helpful in situations where a remote DC is taking longer to backup than expected. If it takes too long, the backup will abort. We talked about unpacked backups earlier. Here you can specify unique settings for your computer collection, disable unpacked backups, or just use the global settings.
You can specify the backup schedule on the Schedules tab. The account used here will run the native Windows scheduled tasks which may be the account used to access the backup agent if nothing is specified on the Agent Settings tab. To add a new schedule, simply click on Modify and then create a new schedule. On the Alerts tab, you can setup email notifications and/or record results to a text file if needed.
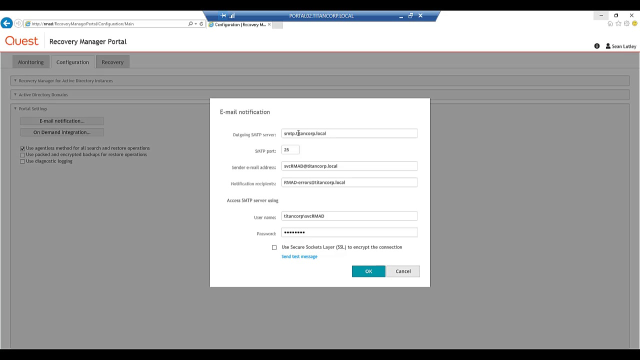
Note that for email to work, you must define an SMTP server on the settings dialog that we opened up near the start of this video. Extended logging is mostly for technical support. And it can be configured here on the Logging tab. Only enable this if requested by technical support as the logs can grow quite large if left enabled.
Now that my computer collection is made, I need to add domain controllers to the Collections. I can right click on the collection and then choose Add and pick any one of a number of options. Or I can use the Active Directory node, drill into my Forest. E my domain controllers, then choose the domain controllers I want from here, then drag and drop them onto the collection.
When I look at the collection, the DCs that are included will be shown to the right. If I do add DCs by using a container-- so for example, if I were to right click on the collection, go to add and pick container, then the domain controllers included in this backup operation would be dynamically discovered and added to the backup.
This works well if you want to backup every DC in your Forest or every DC in a particular domain, save for Forest Edition style recoveries. But it's not really recommended for object level recoveries where you really only need to backup one or two DCs per domain. Let's go back and discuss bare metal backups.
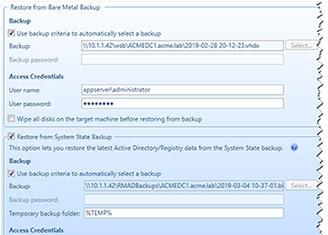
One moment while I create a new collection. When you select this option, several of the tabs in the properties of the collection are disabled. This includes console storage, components, advanced, and unpacked backups. On the Performance tab, the data compression is grayed out. And on the DC Storage tab, you can't enter an alternative backup location. You can only enter a primary path.
Do not specify a local path here. Local paths are not supported for bare metal backups. Instead, use a UNC. And if you use a UNC, use an IP address instead of a host name. This is because if you're using Active Directory Integrated DNS, then DNS might not be able to resolve a host name that you use here.
Now, after I've added that, I'll just come back in here and put in my other things, domain, computer name, and date and time. In that way, I get a unique name for each computer that I back up to this path. Because I'm using a UNC, I must specify an account.
And lastly, I'd want to use that retention feature. For my lab I'll just use one copy. In production, you might want to use two or three copies. And you really only want to run bare metal copies say once a week or once a month.
OK, now, let's manually run this test collection by right clicking and saying, Create Backup. I'll go ahead and click Yes. I can see here under the session's node that I have a backup running. And I could drill into this session and see each domain controller in the current state that it's in. I could also see the state of these from the computer collection itself. It tells me that it's working and creating a backup.
Now, I'm just going to pause this video and let the backup finish. OK, and there I can see my backup has completed. Once a backup is done, you can actually see the backups here and your backups in the Active Directory node. And I can tell here that ACME DC1's backup is unpacked because it has this folder icon.
If I wanted to remove those unpacked components, all I need to do is right click and select Delete Unpacked Components. This will remove any unpacked components from the drive.
Now, if I needed to delete these backups completely, it's far better to do it from within the Recovery Manager console than it is to do this from the file system itself as this will remove it from the backup registration database as well as from the file system. That's the end of this video. Thank you very much for your time.
 13:23
13:23