Hi, I'm Sean Laughtly, and I'd like to welcome you to the Unified Communications Analytics AD and Exchange configuring data sources video demonstration. Within the admin settings page, go to data collections. Click on the plus button to add some data sources. Here you're going to add what data sources you wish to collect from.
I'm going to add all the AD and exchange ones. Some of the data sources are dependent on other ones to get all the data and certain insights. Please, refer to the user guide or the deployment guide for all dependencies.
Let's start to configure some. Start with the domain controller. You can see that the data collection is enabled by default. You have different types of data to collect, what credentials you want to use to connect. The target users can be collected by all objects or you can specify organizational unit. I'm just going to accept all the defaults and then just save the changes.
Now let's set up the Office 365 user subscription configuration. This one is pretty quick to set up. You need to specify an account that has the proper permissions to use PowerShell to query, is there active directory? Just enter the account and password, set it, and save the changes, and you're good to go.
The exchange configuration data source gets to an inventory of all your mailboxes, active sync devices, servers, databases, et cetera. I'm going to accept all the defaults. Then we're going to set the LDAP connection parameter credentials.
You can target specific mailbox servers, OUs, or even specific mailboxes. I'm just going to collect all the mailboxes. Now you need to pick what version of exchange you're running. I'm running 2016. And then you're going to need to set your client access server for the connection to exchange to collect the data. And lastly, you need to set the credentials for remote PowerShell and then save the changes.
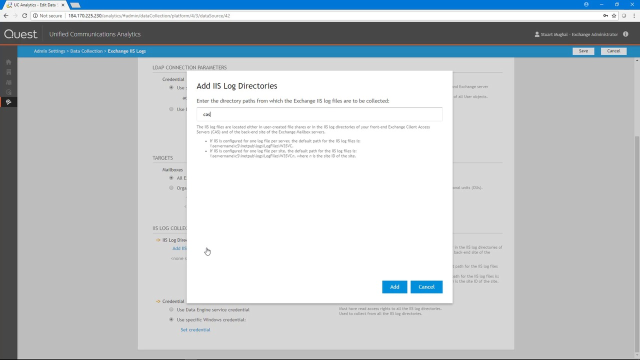
Next, I'm going to show is the exchange IIS logs. I'm going to collect all the exchange mailboxes then we're going to specify the credentials that we have done many times before. I'm going to collect all exchange mailboxes. The key to this data source is setting up your IIS log directories. They are located on your front end client access servers.
If you read below, you can see where the default directors are. I had them on a share, so I'm just going to put in the CAS name and the share name. To make sure you add credentials that have read access to the IIS log files directories, one thing to note, you need more fields added in IIS than Exchange has set by default. Please, refer to the deployment guide to make sure you have all the correct fields set.
Now of to the Exchange tracking logs. We're going to collect all the data, which is set by default. Here we set the credentials. We're going to collect from all exchange mailboxes. Here we need to specify the server and the directory where they Exchange tracking logs are located. It gives you the path to the right, which is the default place.
I'm just going to copy that directory then paste that directory into here. And there where it says server name, I'm going to change it to my server name. Since I'm running Exchange 2016, I'm going to change it to V15 directory as that's the default directory for Exchange 2016. Then click add. Then set the credentials and save.
Lastly, we're going to configure the Exchange Online hybrid user configuration data source. I'm going to leave all the defaults for the data to collect, which is users, dynamic groups, distribution groups, mail contacts, and mailboxes. Then we're going to specify the credentials.
Here we're going to specify the LDAP credentials to connect to Windows on premise. Here we need to specify the Exchange online PowerShell connection credentials. So we're going to put in the credentials and set them. Then save and that completes the configuration process.
Now you're going to want to click on the view data collection status link. Here allows you to see what data source collections are completing successfully, generating warnings, or errors. You can just click on one of the job types then hover over the details section, and it will give you additional details.
And that concludes this video demonstration. Thank you for taking the time to watch, and there will be many more to come. To learn more about unified communications analytics, visit Quest.com/products/unified-communications-analytics.
 04:50
04:50