[MUSIC PLAYING] Hello, I'm Laura Rogers. And welcome to my session, Building Approval Processes and Power Apps. So before we get started, I'll go ahead and just tell you a little bit about myself. I live in Birmingham, Alabama. My company that I've founded is called IW Mentor. It's online training for SharePoint, Power Apps, Power Automate, and Teams. And you can find me on Twitter @wonderlaura and @IWMentor.
So first of all, let's talk a little bit about what this session is about. Here's our agenda. We'll talk about an introduction to the session in the concepts. And then I have this method that I'm going to be teaching you about building an entire approval process inside of a Power App.
So I'm going to talk to you about why you would want to do that and why I came up with this method. And then I'm going to get into the details. We'll talk about the lists involved and the structure of the Power App, how the logic works and the formulas inside of the Power App. And we even have a flow involved as part of this process, so I'll talk to you about what that entails. And then we'll finalize it, and I'll do a demo and show you how it all works.
So first of all, here's the concepts. So you have approval forms in your company. You probably have hundreds of them. They might be in different stages of how modern they are. You might still have people filling out pieces of paper and walking around and handing them to people at their desks. You might have PDFs that people print out. But you're probably have a lot of approval processes.
So you have things like travel requests, new employee forms, onboarding, check requests, and you can probably think of many of them in your company.
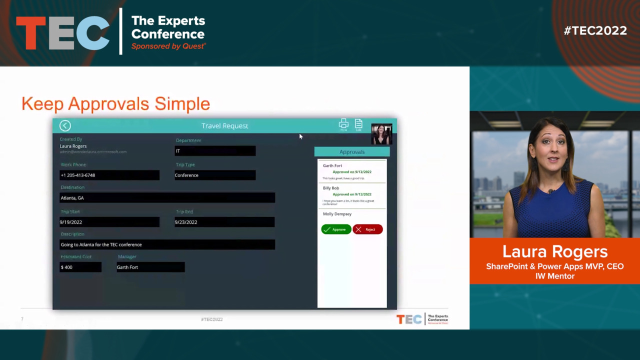
So my concept that I'm going to teach you today is what I like to do in Keep Approval Simple. Instead of having the approvers have a lot of different things that they have to look at and different links they have to click on and having the data living in different locations within Microsoft 365, this is a screenshot of my concept of having a form that someone fills out and having a very simple approval panel down the right so that when the approvers, when it's their turn to do something, it's very obvious and simple as to what they have to do.
They look at the form, and they click Approve or Reject. And then they're going to be presented with the ability to enter comments. And it goes from approver to approver. You can have as many as you like. And the form just keeps going down the side of the screen. So this is what I'm going to be talking to you about, why I'm doing this this way, and then how I built it.
So first of all, when you think about your approval processes in your company you might have a few very simple ones if you just have a quick document that has one or two people that have to sign off on it. But you're going to have a lot of different processes, and they're going to vary wildly as far as how complex they might get.
So you have different requirements, different levels of complexity, such as number approvers and parallel versus serial approvals, groups of people needing to approve things. So it could get a little crazy with how you need to build your logic. And sometimes some of these out-of-the-box methods that Microsoft provides are not going to cut it. And they're going to make it a lot more difficult to build those.
So that's why I've come up with this method. It's very flexible. You build the form and the approval interface all in one in your Power App. This is a Canvas App, and this is a no-code app. I'm not a developer, so I'm not going to be showing you how to deploy any code. This is just a pretty simple thing that power users, that level of people can do, power users and business users.
So I'm going to go over with you now the options that Microsoft provides and the levels. So these are the levels of complexity going down the screen as far as what's available and how simple and difficult they are. So you have, the first ones are easy, just out-of-the-box approvals that you can create. You have Microsoft's SharePoint content approval setting that exists in all lists and libraries. It's just a setting that you turn on.
You had the request sign off concept that is a flow that you can run on items in lists and libraries. And you have an easy little set a reminder, and that's a flow as well. And then you have, over in Teams, you have the ability to go to the approvals app and create an approval form. And those are all pretty easy, just a couple of clicks out-of-the-box methods. But then once your approval process requires something a little different or something more complex, those aren't going to work.
So then you have medium level complexity, and those involve the templates, like the flow templates when you go to the main flow interface, and you're presented with the ability to search through templates and pick one you like. So you could use the templates as they are. You could take one and adjust it to how you need it. But that is going to require a little bit more of technical knowledge of how to edit those flows.
And then you get to the crazy complex ones where you can just start from blank and build your process however you need it to be with many different conditions, branches, approvals, multiple products involved, like SharePoint, Power Apps, Power Automate Forms and Teams. And then that's going to be for those really tricky processes that are very involved to build.
So now, we're going to talk about why. So Microsoft provides this approvals action, and we have-- it's nice. It's lovely. It gives you interactive emails with adaptive cards in them, parallel approvals. It's got integration with the Power Automate mobile app, and it's got a dashboard with an approval section. And this is an example on the screen of what one of those approvals emails looks like. It's got a really easy approve and reject button, and it even lets them type comments directly in that form in their email in the adaptive card.
And this is what the approval app in Teams looks like. When you go to the Approvals App, you can click New approval request, and it gives you the ability to fill out a very easy blank form. This really just uses Microsoft Forms behind the scenes, and it gives you the ability to build this quick, easy form and say who you want the approvers to be.
And you, as the admin, can even go in and build several approval templates that have something like an overtime request or vacation request or a travel request. And you can build those in and even have them available to the whole organization or even specific Teams.
So that's another step up, but the problem with this is where's the data? So it's having you fill out these forms. It's having the users fill out these easy forms, and it's very easy to pick who the approvals are. But where is it sending the data? So then you have to go to the trouble of going to the Microsoft Forms interface and finding the spreadsheet that it keeps this data in and maybe exporting the spreadsheet and then doing something else with the data. So it gets a little tricky.
And also, with this approvals action, you have no interface into approvals other than your own. So this is going to lead me into my list of pros and cons with some of these nice, little, easy, out-of-the-box concepts.
So for the pros we have the fact that it's easy to use because-- so lots of different users, no matter what their level, they would be able to use these. They have the interactive emails with adaptive cards included. Parallel approvals, that means it goes to everyone at the same time. And you have integration with that mobile app, and you can go to that main interface at flow.microsoft.com and go to that approval section there where you can see all the approvals that you've sent and received.
Then I have my list of cons. The emails aren't customizable. You can customize what they say, but the main structure and the colors of the email itself is not customizable. You can only see your own approvals. This is a huge one. Now, I know you could go dig into Dataverse and find the database behind the scenes that stores all those approvals.
That is possible. But that, again, is another huge pain and ordeal that you'd have to go through because, inherently, this interface only shows each person their own. And you're usually going to want to have a process where the person in charge or the person-- the department that's receiving those approvals needs to just see the list of all the things that are going on and what stage they're in.
For example, the travel department needs to see the travel approvals and who they're waiting for and where they are. So that's a big negative to the out-of-the-box approvals is that people can each only see their own approvals. There aren't any out-of-the-box, built-in approval reminders, no overdue reminders, not even a due date.
Another huge negative is the fact that the approvals are not serial. They're only parallel. So most approval processes that I deal with, 90% of them at least, need to go from one person to the next in order, one person after the other. So these built-in processes only allow parallel, which is all at once.
And another huge negative is the 30-day time out. So these approvals, when you use the approval action and flow, it will time out after 30 days. It won't wait for that person to do their approval any longer than that. The flow will just time out, and it will be over. And there isn't necessarily just a built-in way to have it wait longer or start all over. If someone is not doing their job and reading those approvals and going ahead and taking action on it, it will just sit there and time out.
So now, here is the out-of-the-box approvals versus Laura's approval panel, this method that I've come up with. So we'll talk about comparing them.
So with out-of-the-box, the approver may have multiple different interfaces to go to, which means they might have to go to an email and then go to a task, go to their approval action, and then also go look at the thing that they're approving, which could be a document or a form or a PDF or whatever it happens to be. So the places the approver has to go might vary.
And the emails aren't customizable. There's no visibility into any other levels of approval besides your own. And it's difficult to build complex, multi-level processes. It just is. It's just extremely painful to go into flow and try to just simply use a flow with these approval actions to incorporate any large, multi-level approval process involving multiple people.
So in my approval panel you have one fully customizable-- it's a Canvas app, so it's fully customizable interface for submitters and approvers. You have completely customizable emails. You have the ability to have dynamic approvers and emails in the process and even a dynamic process.
Approvers see the entire process and who is approved and the comments that they've made. And you can add as many approval levels as needed. You can even add overdue notifications. This can be done with a flow that can kick off once a week or once a day and look to find out which things have not been approved yet. So you get everything you need with this method.
All right, so now let's talk about the structure. So we'll first start talking about the lists that are involved. First, you're going to have your request form. The request form is whatever-- a travel request or an overtime request, vacation requests, whatever it happens to be.
I'm going to call this generic form. So this is going to be your generic whatever your request form is, and so that will vary wildly. But in my example it's going to be very simple. It only has a couple of columns, and I'm just calling it generic form.
Here are some possibilities, just examples, like a travel request, check request, expense reimbursement. So you can see that I've got this simple interface where I've got this generic form that I'll show you in the demo but all the possibilities of what it can look like because my demo information is just going to have a form with two fields in it. But these are some ideas of what your form could be.
And also another thing about my demo is that it's very plain and simple looking. It's not extremely fancy. I didn't spend a lot of time on design. So it's really just bare bones showing you the concepts and how it works.
The second list is the approval list, and this is important because this is going to be a huge part of how the logic works. This is the second SharePoint list, and so I just name my blank list Approvals. These are the columns that I need to be in this list. I've got them listed here, and I've got a screenshot of the list settings for that list. Who is the approver? What are their comments?
I have this parent lookup and parent ID, and that is what ties it to that main form that the approvals are associated with. The outcome is whether they decided approved or rejected or whatever you want your outcomes to be. And completed on is when they clicked approve.
Stage is what we're going to call the different stages of your process. So all of your processes might have different stage names, like the first approver, second approver, manager, VP approval, HR. So you'll have a lot of different names for what the stages are for any given form.
All right, so now let's talk about-- now that we've talked about the list and the structure behind the scenes, now we'll talk about the Power App and its structure.
Now, this is an example here of a welcome screen. This is a very fancy pretty one that I spent a lot of time on with the colors. But the concept is really just-- it's a gallery and a Power App. It's got a button to fill out a new request at the top. And then I've done something additional. I've added some tabs across the top to show you the concept that you could do in Power Apps of having different filtered views.
Maybe you want to see a list of all of the requests and the list of only requests that are waiting for my approval. And then I've done some color coding on it, but it's just really a gallery that lists all of the different travel requests. So that is my welcome screen.
Then my other screen is the main form screen. So I just have two screens, and these are just two different examples of main forms. So the example on the left is the very simple one, bare bones, just generic form. It's got a new form. It's got a submit button and a back button. And then the one on the right is I wanted to show you what's possible when you spend more time making it look nice. And that's an example of a travel request.
Same concept though, so the one on the left I'm calling the First Approver, I'm just calling it First Approver. And then the one on the right, the First Approver is called Manager. But in both examples, I'm filling in someone's name to go to for that first approval.
There's a way in Power Apps, even, that you could have it prepopulate and have it already have the person's manager filled in there. And you could even make it read only so they can't change who the approver is. So that's, again, another of the awesome possibilities in Power Apps.
All right, now, once we have a form that's not new anymore, that's already been filled out and sent in for approval, then when the approvers get their email and they open it, this is what they're taken to. They're taken to a form. So imagine whatever your form is down the left side of the screen, this is just the generic one. But then the right side is where I have that approval panel.
And you can see that this one has gone through a few approvers already. I've got first approver, second approver, and I'm on the vice president now. And the vice president is presented with the Approve and Reject buttons. And I see I've done a little color coding showing when they approved it and what comments they made. And this approval panel could just keep going down the screen. And that is a gallery.
And then when you click Approve or Reject in that gallery, that's what pops up this form, the approval form. And then the approver is picking what the next stage is. They're picking who the next approver is, and they're making comments and clicking Submit. And then when they click Submit here, that is what's creating the next approval list item with the stage and approver, unless it's final. And I've done some logic in here.
So if they pick final, there is no next approver box, and it lets them just submit. So final just means I'm done. I'm the last approver. This is the end. This is complete, and that sets it to completed.
So now, I'm going to do the demo at the end. Now, I'm going to go over the logic and how the logic and formulas work to make all of this function the way I just showed you. So first of all, the welcome screen is just a gallery, and it is a list of the items in the main form screen. When a form is clicked, that's what takes them to the form screen for that form.
And then for the main form logic, when you fill out a new form, as soon as that form is submitted, that's what creates that first approval item over in the approval list. And it takes whoever your first approver is-- in this example, it's the manager, and that is the assigned-to person. And then it automatically updates the status.
So the form status is important. The form status is something you'll need as part of that main form. And that is what's going to continuously get updated each time the form goes to the next approver. So it's going to update the form status to awaiting first approver.
Now, here's the logic in the approval gallery. I'm displaying information about each approval. I've got their name, completed date, outcome, and comments. And of course, you can color code and style this to your heart's content. It's a Canvas app. And then I have the Approve and Reject buttons.
I'm only displaying these buttons if the currently logged in user is that approver. And I'm only displaying it for the current approval level. So when I click a button, that is going to set a variable that is going to cause that box to pop up in front for them to fill out the next fields.
So this is the approval form that pops up when they click Approve or Reject. And you can see at the top of the form it says, in this example, I clicked Approved. So that is showing me that that's actually the variable storing whatever button I just clicked, that information about what that outcome is. So it's approved, route to, and I can pick my next stage. And I can pick my next person.
And then when I click Submit, that is going to patch. So it's doing a patch, and it's going to look at who I picked as the next approver. And it's going to create an item in that approvals list behind the scenes with the patch function in Power Apps. And then Cancel, of course, closes the form.
So the way that people get notified in this app is a very simple flow. So I'm not using any of those cool out-of-the-box approvals actions that Microsoft provides. I'm just using an email. So when a new item is created in that approvals list, which is getting patched from the Power App-- that's the trigger for the flow.
And then it's going to get that generic form parent item. So that way, when it goes and does it Get Item Action, that gives you all of the metadata that you need about that form, the main form, the thing that someone filled out because you have that parent ID column that you can use to go ahead and retrieve that related information.
And then I'm just sending an email to the approver. And I have a hyperlink that I'm sending them in the email that has got a query string in it. So when they click that link, it is going to take them directly to that specific form, and they'll immediately be presented with the approval panel to make their decision.
You can even do additional things if you'd like in your flow, like send a Team's message to the person. And another thing you can do-- the fact that you have this as a list, as a SharePoint list of approvals, gives you the ability to create another flow.
And you can have an overdue reminder flow that just has a trigger of recurrence and just maybe once a day or once a week goes and finds the items that haven't been completed yet and sends those assignees, the approvers, information letting them know that their approval hasn't been done, that it's overdue. So you have the ability to do that as well.
So I'll walk through this form, and then I'll go ahead and show you some of the formulas that are pertinent that you'll want to know.
So here is my app. Again, this example app that I'm showing you is extremely simple. I don't have many fields. I really just wanted to convey the concepts and the logic involved and not get too overwhelmed with colors and conditional formatting. So here is the main screen of the app, this generic approval form.
The end user would click here to fill out a new form. And I'm just going to say test. And then I've got a default form status of new here, and I'm filling in who the first approver is. And for simplicity's sake, for the demo, I'm just going to pick myself. And again, this is something that you could have pre-populated from Power Apps if you don't want the person having the ability to pick anyone in the company.
All right, I submitted my form, and it's going in. And it takes me back to the main screen. And that approver has now been sent an email letting them know that it's time for them to approve this. And the item that I just submitted-- let's see-- is here, test 1030. And it is a status of awaiting first approver.
So then, when the approver clicks the link in the email, they're going to be taken directly to that form. And then here's the form screen, and this is where they have all the information down the left, that whole form that they just filled out, whatever it is, like a travel request. So you'll have a lot of fields down this left side. And then the first approver is presented with two buttons, and they click Approve.
And then here I have it giving them the ability to pick whether they want it to go to the second approver or whether they want to kick it back to the originator. So that is a little list that just gives them that option because they might want it to go back to the originator if they have something that needs to be changed.
So I'll just move it on to the second approver. And again, for simplicity, for the demo, I'll just pick myself, and make some comments. And when I submit this, this is what's patching to the approvals list to create the next item for whoever that next approver is.
So then that next approver gets an email, and then they go to this form. I'll go ahead and just do one or two more. They approve it. So then the next person has the ability to route it to either the vice president or the originator. The vice president is the next approver. And pick the approver, and submit, and you get the idea.
So it keeps going through. I'm just going to say the vice president is going to be the last one, and I'll just finish that approval process right there. Approve, and I'm going to say he doesn't want to route it to HR. He's done. It's final. All done. And then submit it.
So each time somebody submits it, it changes to the next stage. And you can see that stage in the main list of all the items. And now, you can see this one says approved final. But as you look down the screen, you can see that various forms are in various stages.
All right, so now that I've showed you how it functions, which is pretty simple, now let's take a look at the logic involved and how some of these formulas work.
So first of all, this is just a screen with a gallery on it showing the items in the generic form. And let's see, then my new form button is pretty simple. It takes me to the new form and navigates to the screen where the new form is.
And here's my new form. Let me zoom out a little see. This is the new form. So when it's on a new form, it doesn't have any information, any approval panel yet. It's just the form.
And then here's some of the important logic here. The Submit button-- I don't like to build a lot of logic into the Submit button itself. So the Submit button is very simple. All it does is a submit form command. And then the key, when you're doing your submitting forms and Power Apps, is to put your logic in the form property called On Success.
So once the form has successfully been submitted, then this is the logic that it's going to go through. So I always like to set a variable. I set the var-- I call it var record. And this is a variable that holds that entire record of the thing was just submitted. So then I have all that data that I can do something with, all the column information of the form that was just submitted.
And then I navigate to the welcome screen. And then here's where I have the logic that creates that very first approval item in the approvals list. So it looks to see if that form status equals new, and it defaults to new for a new form. Then this is where the patch is happening.
So this is a patch function. And patch is really great. It gives you the ability to create or edit items in any SharePoint list. This could be any SharePoint list in any site. You just need to be able to have added it to your app as a data source here. And then it is ugly and messy the way the syntax works, especially when you have those more complex fields, like lookups and people columns. So that's why this looks a little odd with all of these fields here.
But basically, I'm setting the title of the new approval. I'm saying who the approver is, and that is who the person selected in that approval people picker. And then I'm setting the parent lookup and ID to whatever the ID is of the record that they just submitted. And then I'm telling it the stages first approver.
Now, I'm also doing a patch, so after I create that item in the other list, I'm also going to patch to that main form list. And I'm going to change the status, the stage. So the status is going to then say awaiting first approver. And this is where, of course, whatever in your process, whatever you're calling your stages and steps through your approval process, this is where-- this can be your own verbiage, whatever you want to call it.
So that's the magic that happens that kicks off that first approval item. And then let's go through this in order. So I'm going to go show you what's happening behind the scenes next. So go to Flow.
And in Flow, that is that very simple flow that I showed you that triggers and kicks off the email that goes to each approver. But it's a very simple flow because all it does is it looks to see when a new item gets created in that approvals list and then just sends an email to whoever that person is.
So here's my Flow. It's called New Approval created, generic form. So the form just got submitted, and now I'm in here looking at that email that's going to go to someone. Now, the email-- this flow is for every single approval. So when it's a new approval, when it's the first one, when it's the second one, every single one is just using the same flow.
So here's the trigger when a new item is created, and then I do have a little bit of some variables that I'm doing to initialize that query string URL. So I'm creating a variable that has that clickable link of the URL to the app with the ID query string parameter in it. So it says question mark ID equals, and then whatever the ID of that item is so that when someone gets the email, they're going to be taken specifically to that item.
Now, this is where I go and get that generic, that parent form information. So when I'm using the Get Item action, that gives me the ability to get one item. And I just need to know the ID of it. So since I have that parent lookup column in the approvers list, I have the ID of the parent, so that gives me all the metadata about the parent.
And then when I send an email, I'm just sending it to the approver. And I'm saying approval for whatever it is. And this is where I can use a lot of different pieces of metadata from that main form if I'd like. I can add a lot of verbiage to this email letting them know a lot of information about whatever the form is.
And then I'm including that clickable link so that they can be taken directly to the Power App. Everyone is just going to that same simple interface.
And then there are a lot of other things that you can do in here, too. You could add-- you could change your verbiage. You could have-- maybe build logic in here that sends different emails to different people if you want it to say different things. So that's also possible.
So now the email has been sent, and the first person gets their link, and they click on it. And then that takes them to the Power App. So let's see. I'll mock that up. Let me go back to the main screen. So then the link that-- I'm not going to go through the process of opening my email and doing all that in this demo. But they'll basically get a link that takes them to this screen.
Now, this is another piece of logic that I want to point out. When someone else, other than the approver opens the form, this is what they see. They don't have a proven reject button. I'm not Brenda, so only the approver is going to be able to click those buttons. Anyone else that's looking at this form just sees an awaiting approval gray box.
And also I have the form in view mode. That's another bonus is that you could say-- now, depending on your requirements, you could say I don't want anyone ever editing this form once it's been submitted by the originator. So therefore, I'm only presenting it as a view form to all the different approvers. And no one's going to even have the ability to edit the form at all. They're just looking at a view-only form.
And then let's go to another one that's awaiting vice president here. That one's also-- oh, wait. There we go. Let me go to that one. Let's see.
So then here's the logic that's happening when the next person approves it. They pick who they want it to go to, and then let me go ahead and go into the logic of this form. I'm going to exit my demo-- my preview mode here. So now, the trick to this approver box is that this is not a field that exists in that approvals list. This is who the next approver is going to be. So this is who you're picking for the new item that hasn't been created yet. So that's what that people picker is going to do.
So you're picking the next stage, the next approver. And then I have logic in this Submit button and the display mode so that it simply is disabled until you have picked the next stage and the approver.
And then here's where the magic happens with this form. So in the Submit button what am I doing? On select, I'm taking whatever they clicked on, like Approve or Reject, and I'm setting it to this CTX next stage variable. Update context is a context variable just on that screen.
So CTX pop-up is making that pop-up go away. The CTX select approver is going to be whoever they clicked in the people picker for the next approver. And then next stage is whatever they picked as the next stage name. And then I'm doing a submit form.
So then, again, the magic is happening in the form controls on success. So here in the on success, this is probably the biggest formula that we have going on in this app, all the things going on when someone submits one of these approvals.
So because also I'm doing something a little bit different, if it's final, because I don't want it to go to another approver if it's final. So if the next stage is final, I'm going to patch to that main form and just say approved final, and just change the status to approved final. And the process is done.
Also, if it's final, I have this email I want to send to the person who created the form, who filled out the form, letting them know that it's been approved final. So this is really just me showing you that there are multiple ways to send emails. You can send an email from a flow. But you can also send an email directly from the Power App.
The flow that I showed you that sends the emails to each approver, to me that was just the most simple way to just have an email go to every approver without having to put a lot of logic in different places for that sending an email function. But this is the one that I have that's going to the originator once it's been approved at all levels.
So it's using that Office 365 outlook connector, and it's doing the Send Email function and sending it to the person who created it. It's saying it was approved final, and it's just saying your request has been approved at all levels. Of course, this is where you could change your verbiage.
And then, otherwise-- notice I'm putting a lot of comments in here. Otherwise, if it's not final, I'm going to patch to create a new approval item for that next approver. So I'm patching to the approvals list, and I'm creating a new item. And then this is where that next level-- whatever the next level gets created.
So I'm saying here's the title of it. The title of the item is just going to have the person's name. And then I'm filling in the approver people picker and then that parent look up and parent ID. Whenever I'm doing a lookup, any sort of relational lists that I'm dealing with Power Apps, I always do two fields for the lookup.
I do an actual SharePoint lookup column to look up to that parent list. And I also do a number column, which is where I store the number of the ID of that parent item. And that gives me the flexibility in Power Apps when it comes to being able to filter things and the delegation concept where I'm not going to have any limitations when I filter it by that number column.
So that's what I always do. I just have two different parent columns. And then I'm telling it whatever that next stage is that I have in that variable, that's the next stage. And then also, if it's not final, patch the form status. So that is the main parent form. And I'm saying awaiting, and then whatever that next stage is. And then I go back to the welcome screen. So that is all that's happening when someone clicks this Submit form when they're sending it to the next stage.
Now, there are a couple of different things you can do when it comes to what the next stage is. You're probably thinking, well, I don't want people picking the next stage. I don't want people picking the next approver. I just want it to be automated. Or I don't want people to be able to have such a long list of stages to pick from.
So when it comes to this dropdown box, that's where you could either not have a dropdown box for a next stage or an approver and do more logic over in the flow. Or you can do-- I'll show you an in-between method that I used where I filtered this list of stages.
So you could just, instead of having anything complicated, you could just have a simple list of stages. And everyone would be presented with the same list. But what I did here is in my apps on Start, and this is like the bonus at the end, in the App's On Start, not start screen, On Start, I have it collecting.
So I'm collecting a list of stages, but for each stage I'm saying when do I want that stage to be shown. Maybe I only want the second approver stage to show when it's currently awaiting first approver. And I only want the third approver stage to show when it's currently waiting the second approver. So you get the drift.
So here's where I'm defining that as a collection. And therefore, I've done a filter on it. So let's go back to this awaiting vice president. So I've got this list that's a collection for the next stage here. And it's filtering my collection where the current status equals whatever my form status is.
So right now, my form status is awaiting vice president. So I'm only presented with the items that I have defined that I want the vice president to pick from. And again, the sky's the limit. You can add extra logic here. You could add extra logic in your flow. You could have your flow have different switches and conditions and send different emails to different types of approvers.
But that is a wrap-up of my concept of how you can build all of your approval processes in Power Apps just using SharePoint lists. And it gives you so much more flexibility than what you get stuck with with those out-of-the-box functionalities and out-of-the-box actions and features that are available that are so frustrating. So thanks for coming to my session.
[MUSIC PLAYING]