
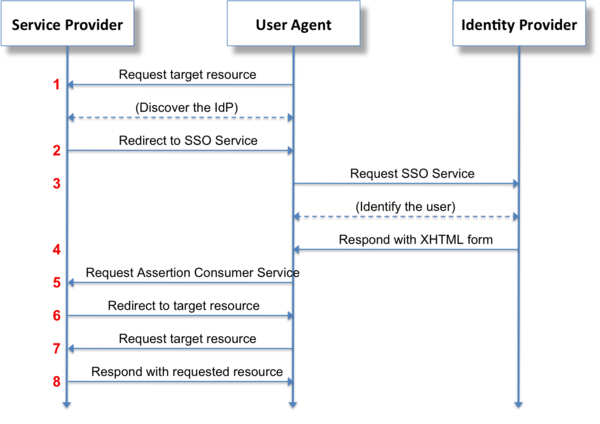
Security Assertion Markup Language 2.0 (SAML 2.0) is a version of the SAML standard for exchanging authentication and authorization data between security domains. SAML 2.0 is an XML-based protocol that uses security tokens containing assertions to pass information about a principal (usually an end user) between a SAML authority, named an Identity Provider, and a SAML consumer, named a Service Provider. SAML 2.0 enables web-based, cross-domain single sign-on (SSO), which helps reduce the administrative overhead of distributing multiple authentication tokens to the user. Visit https://en.wikipedia.org/wiki/SAML_2.0 for more details about SAML 2.0.
Figure 1: Web Browser SSO Profile
In addition to the Kerberos SSO supported in previous Foglight releases, Foglight 5.9.3 starts to support SAML SSO 2.0. The following lists the SAML Identity Provider products what have been validated to support in Foglight 5.9.3 release.
- PingFederate 8.x and 9.x
- AD FS 2.0
The sections below walk you through the procedure of configuring Foglight with PingFederate and AD FS.
Configuring Foglight with PingFederate
Note: PingFederate supports both http protocol and https protocol. Foglight SAML login on PingFederate could be using either IP address or the host name. For detailed configurations about IP or host name logon, refer to Before you begin.
Before you begin
Note:
- If you are about to use SAML IP login, make sure to run the following command: “-Dquest.saml.hostname=<foglight-server-ip>” to start up your Foglight Management Server.
- When logging into your Foglight Management Server, make sure to keep using the same approach as what you configured during the SAML integrations. For example, if you set up the HTTPS SAML login using the IP address, you must log into your Management Sever with https://<foglight-server-ip>:<foglight-server-port>.
You need to enable SAML 2.0 SSO Configuration in your Foglight Management Server prior to setting up the SAML integration. Follow the steps below to enable SAML 2.0 SSO Configuration:
- Log into the Foglight Management Server as the Administrator.
- Under Dashboards, click Administration > Users & Security, and then click SAML 2.0 Integration Settings. The SAML 2.0 SSO Configuration dashboard appears.
- Click Enable.

- Download the metadata file that is to be imported to the PingFederate server later. Foglight supports both HTTP and HTTPS logon:
-
- For HTTP logon: Get the metafile from the Foglight server URL:
- IP logon: http://<foglight_server-ip>:<port>/console/saml2/metadata.xml
- Host name logon: http://<foglight_server-host-name>:<port>/console/saml2/metadata.xml
- For HTTPS logon: Get the metafile from the Foglight server URL:
- IP logon: https://<foglight_server-ip>:<port>/console/saml2/metadata.xml
- Host name logon: https://<foglight_server-host-name>:<port>/console/saml2/metadata.xml
- For HTTP logon: Get the metafile from the Foglight server URL:
Step 1: Configuring the SP Connection
To configure the Service Provider (SP) connection:
- Sign in PingFederate as an administrator.
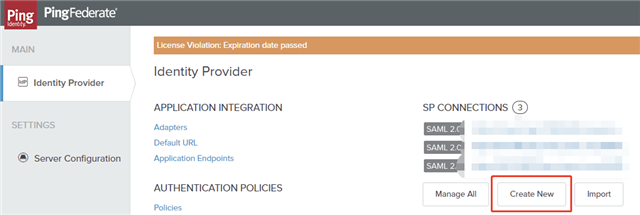
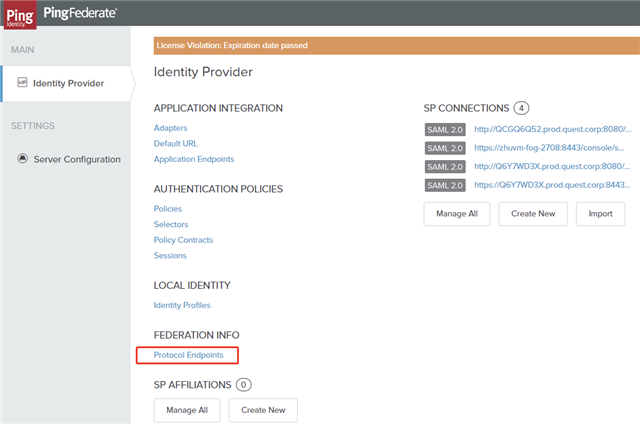
- Click Identity Provider and navigate to Identity Provider configurations.
- Under SP CONNECTIONS, click Create New.
- On the Connection Type tab, select the BROWSER SSO PROFILES connection template and click Next.
- On the Connection Options tab, select BROWSER SSO and click Next.
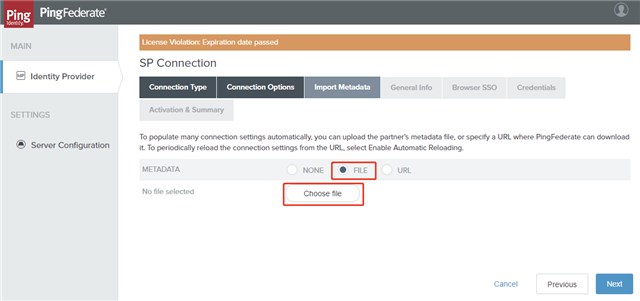
- On the Import Metadata tab, select FILE as the type of importing metadata, and then click Choose file to select the Foglight SSO metadata file. Click Next.
- On the Metadata Summary tab, review the information and click Next.
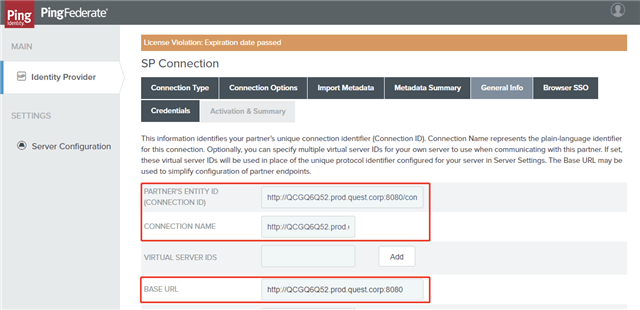
- On the General Info tab, ensure that the PARTNER’S ENTITY ID, CONNECTION NAME, and BASE URL fields pre-populate based on the metadata, and then click Next.
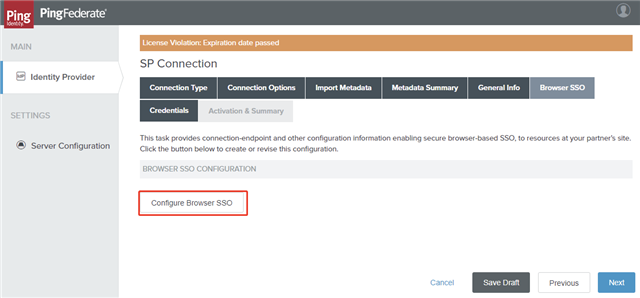
Step 2: Configuring Browser SSO
To configure the browser SSO:
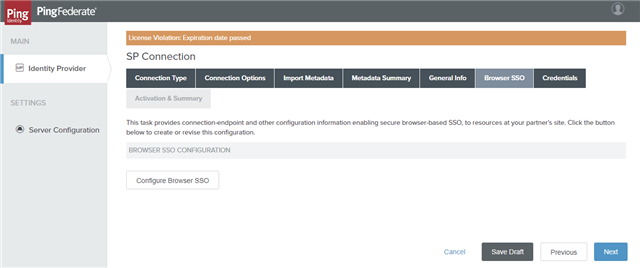
- On the Browser SSO tab, click Configure Browser SSO.
- On the SAML Profiles tab, select all of the options and click Next.
- On Assertion Lifetime tab, enter your desired assertion validity time (default is 5) and click Next.

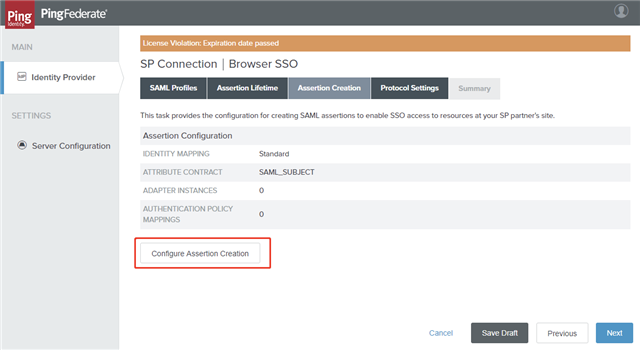
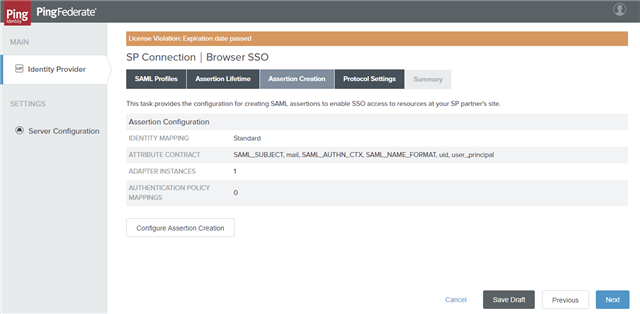
Step 3: Configuring Assertion Creation
To configure assertion creation:
- On the Assertion Creation tab, click Configure Assertion Creation.
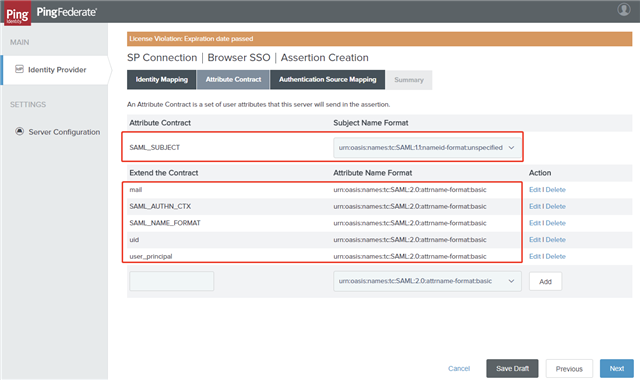
- On the Identity Mapping tab, choose the STANDARD option and click Next.
- On the Attribute Contract tab, select the Subject Name Format for the SAM_SUBJECT and extend the contract as below, and then click Next.
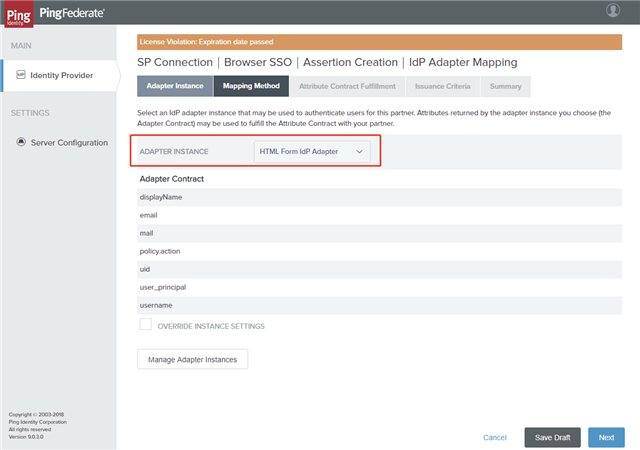
- On the Authentication Source Mapping tab, click Map New Adapter Instance.
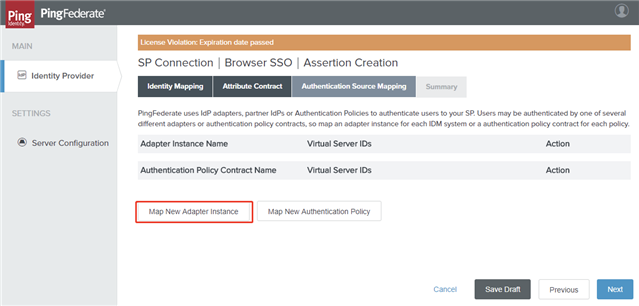
- Select an Adapter Instance and click Next. The adapter must include the user’s username.
-
On the Mapping Method tab, select USE ONLY THE ADAPTER CONTRACT VALUES IN THE SAML ASSERTION and click Next
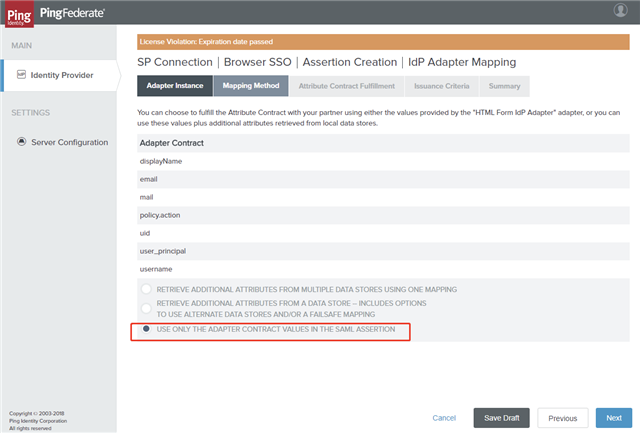 on the assertion
 -
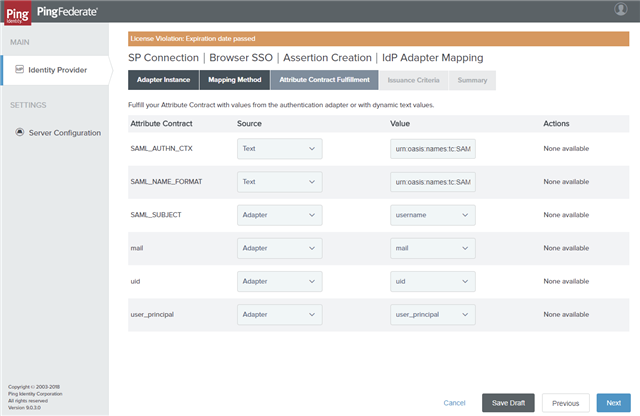
On the Attribute Contract Fulfillment tab, fulfill your Attribute Contract as below and click Next.
Attribute Contract Source Value SAML_AUTHN_CTX Text urn:oasis:names:tc:SAML:2.0:ac:classes:PasswordProtectedTransport SAML_NAME_FORMAT Text -
urn:oasis:names:tc:SAML:1.1:nameid-format:unspecified
-
- On the Issuance Criteria tab, leave the default values as is and click Next.
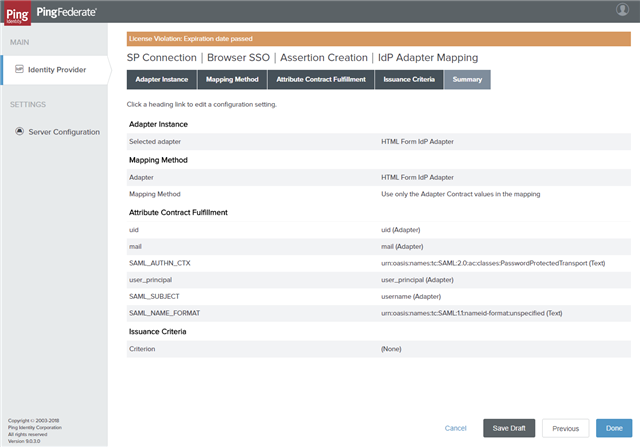
- On the Summary tab, verify adapter mapping configurations and click Done.
- On the Authentication Source Mapping tab, click Next.
- On the Summary tab, click Done.
- On the Assertion Creation tab, click Next.
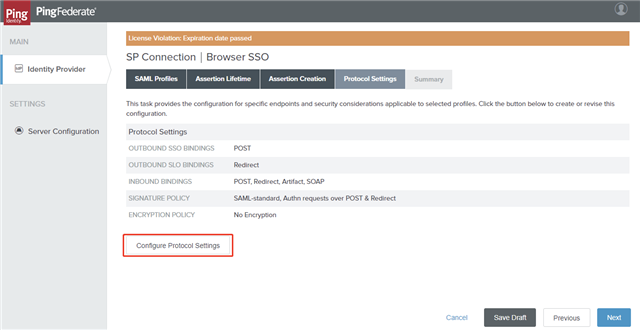
Step 4: Configuring Protocol Settings
To configure protocol settings:
- On the Protocol Settings tab, click Configure Protocol Settings.
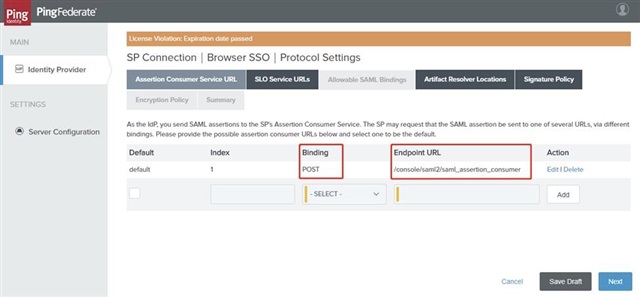
- On the Assertion Consumer Service URL tab, ensure the Binding and Endpoint URL are set as below and click Next.
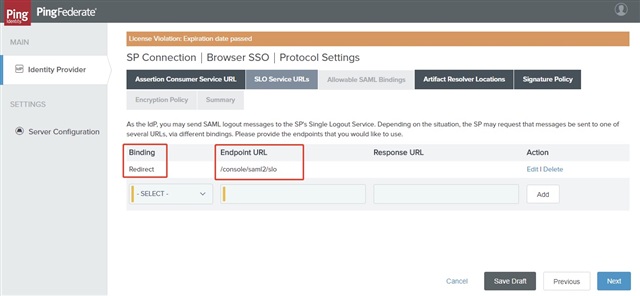
- On the SLO Service URLs tab, ensure the Binding and Endpoint URL are set as below and click Next.
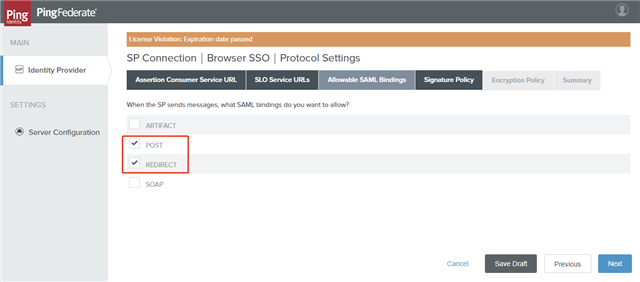
- On the Allowable SAML Bindings tab, select POST and REDIRECT and click Next.
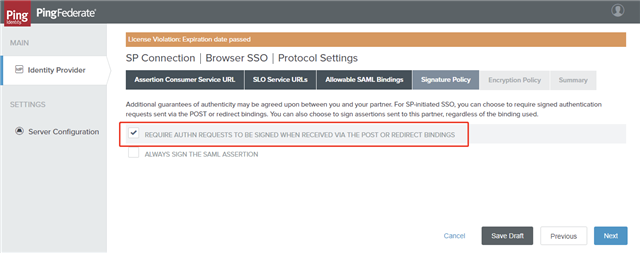
- On the Signature Policy tab, select the REQUIRE AUTHN REQUESTS TO BE SIGNED WHEN RECEIVED VIA THE POST OR REDIRECT BINDINGS option and click Next.
- On the Encryption Policy tab, select the NONE option and click Next.

- On the Summary tab, verify the summary and click Done.
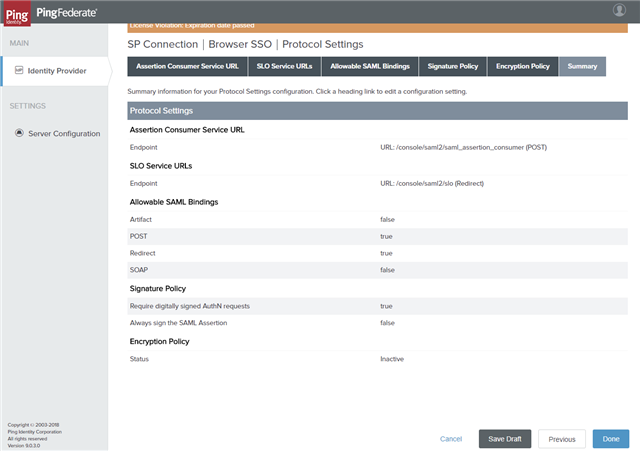
- On the Protocol Settings tab, click Next.
- On the Browser SSO Summary tab, click Done.
- On the Browser SSO tab, click Next.
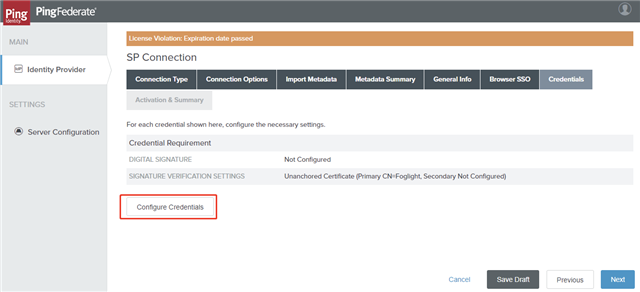
Step 5: Configuring Credentials
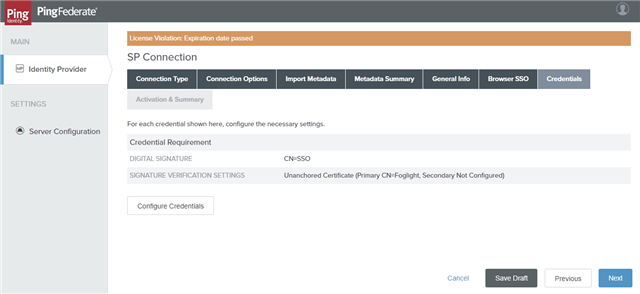
To configure credentials:
- On the Credentials tab, click Configure Credentials.
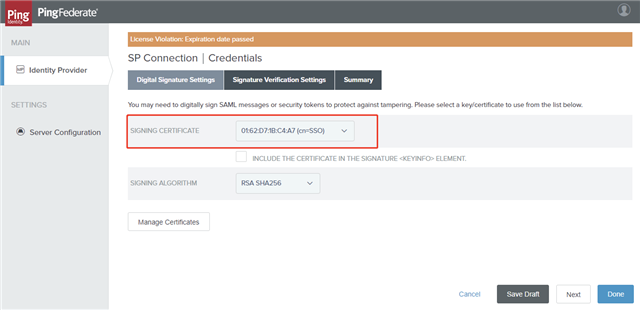
- On the Digital Signature Settings tab, select the Signing Certificate to use the SSO service and click Next.
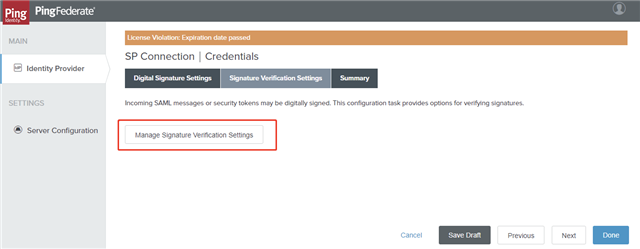
- On the Signature Verification Settings tab, click Manage Signature Verification Settings.
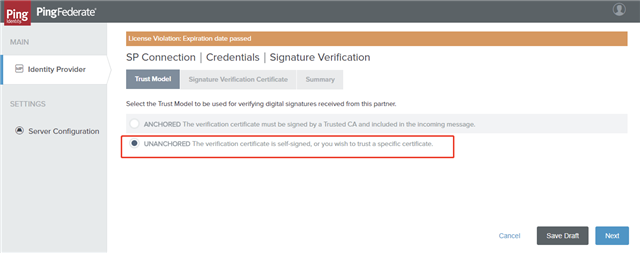
- On the Trust Model tab, select the UNANCHORED option and click Next.
- On the Signature Verification Certificate tab, select the Foglight certificate that should have been imported, and then click Next.
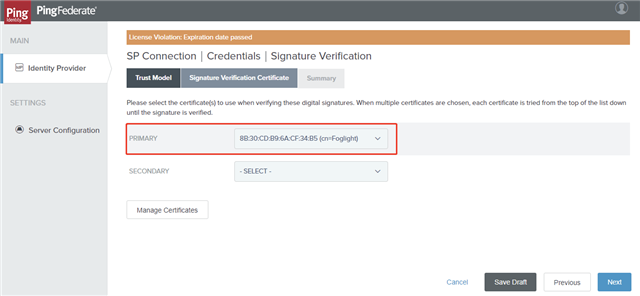
- On the Summary tab, click Done.
- On the Signature Verification Settings tab, click Next.
- On the Credentials Summary tab, click Done.
- On the Credentials tab, click Next.
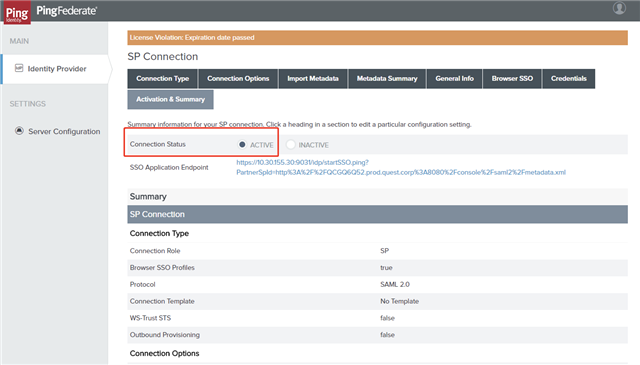
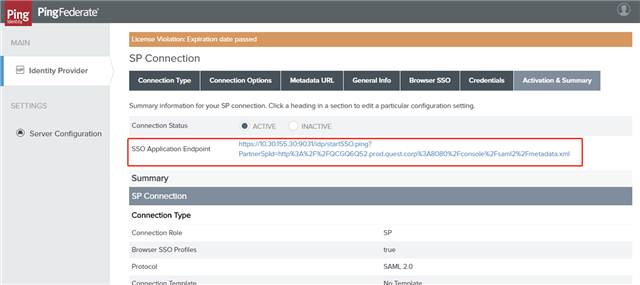
- On the Activation & Summary tab, choose the ACTIVE option for the Connection Status. Verify the configurations and click Save.
Step 6: Setting up SAML in Foglight
To set up SAML in the Foglight Management Server:
- Log into the Foglight Management Server as an administrator.
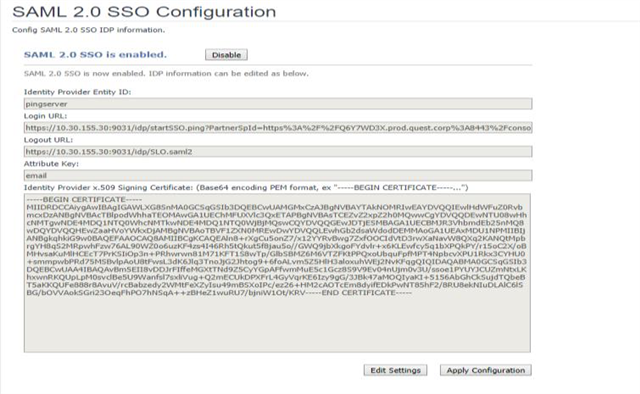
- Under Dashboards, click Administration > Setup > SAML 2.0 SSO. The SAML 2.0 SSO Configuration dashboard appears.
- Click Edit Settings and configure the SAML settings as below. You could get the actual values from the PingFederate server.
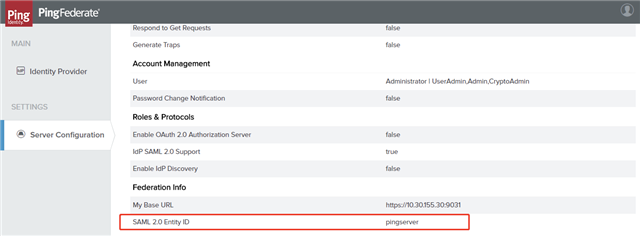
- Identity Provider Entity ID: You could get this value from PingFederate’s Server Settings.
- Login URL: You could get this value from the SP Connection that you have configured on the PingFederate server.
- Logout URL: The value is https://<pingfederate_server>:<port>/idp/SLO.saml2. You could get the logout common postfix from PingFederate’s Protocol Endpoints.
- Attribute Key: This is used to identity the attribute key of the assertion response. Take the below SAML 2.0 assertion response for example:
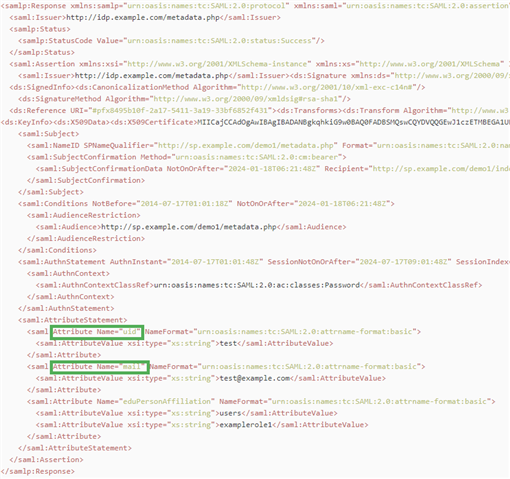
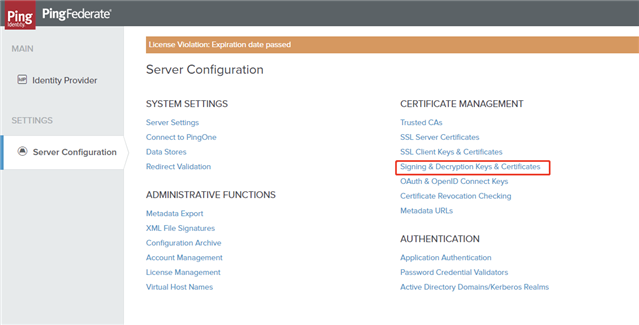
In the saml:AttributeStatement element, there are three saml:Attribute elements. Both uid and mail can be used to identify a user. In this sample response, either uid or mail can be used as the Attribute Key. Generally the IDP Server administrator knows details about this information. The Foglight Management Server tries to use several common keys, such as uid, email, mail, sAMAccountName and etc. Therefore if you are a Foglight administrator and have questions about this Attribute Key, reach out to your IDP server’s administrator for detailed information. - Identity Provider x.509 Signing Certificate: You could get this value from PingFederate’s Signing & Decryption Keys & Certificates.
- Identity Provider Entity ID: You could get this value from PingFederate’s Server Settings.
- Click Apply Configuration to save the configuration.
Then configurations of integrating SAML 2.0 SSO with the Foglight Management Server in PingFederate are completed.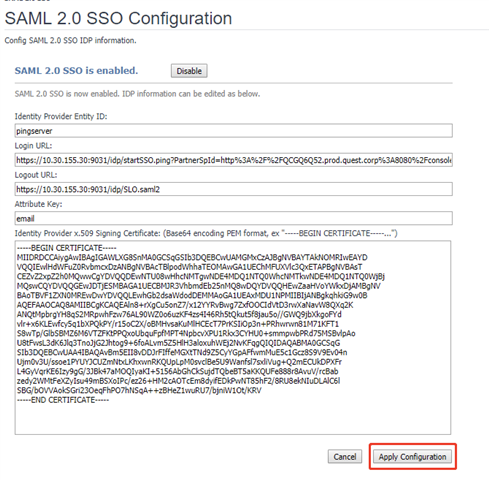
Configure Foglight with AD FS
Note: ADFS requires https protocol, so Foglight’s http SAML login cannot be used on ADFS. Foglight https SAML login could be using either IP address or the host name. For detailed configurations about IP or host name logon, see Before you begin, step 8 & 9 in the Step 1: Adding Relying Party Trust in ADFS section, and step 3 in the Step 3: Configuring Endpoints section.
Before you begin
NOTE:
- If you are about to use SAML IP login, make sure to run the following command:
“-Dquest.saml.hostname=<foglight-server-ip>” to start up your Foglight Management Server.- When logging into your Foglight Management Server, make sure to keep using the same approach as what you configured during the SAML integrations. For example, if you set up the HTTPS SAML login using the IP address, you must log in to your Management Sever with https://<foglight-server-ip>:<foglight-server-port>.
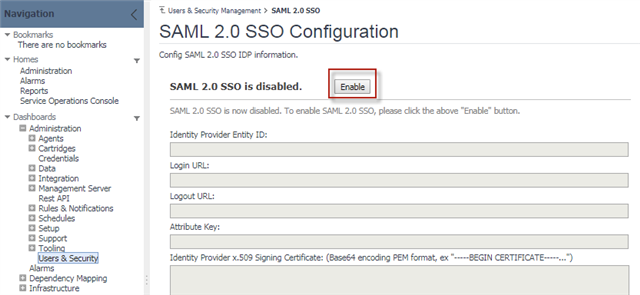
You need to enable SAML 2.0 SSO Configuration in your Foglight Management Server prior to setting up the SAML integration. Follow the steps below to enable SAML 2.0 SSO Configuration:
- Log into the Foglight Management Server as the Administrator.
- Under Dashboards, click Administration > Users & Security, and then click SAML 2.0 Integration Settings. The SAML 2.0 SSO Configuration dashboard appears.
- Click Enable.
Step 1: Adding Relying Party Trust in ADFS
To add Relying Party Trust:
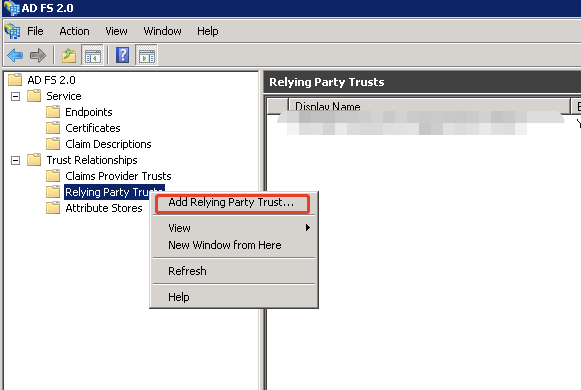
- Open the ADFS Management Console.
- Navigate to Trust Relationships > Relying Party Trusts. Right click Relying Party Trusts, and then select Add Relying Party Trust… from the context menu.
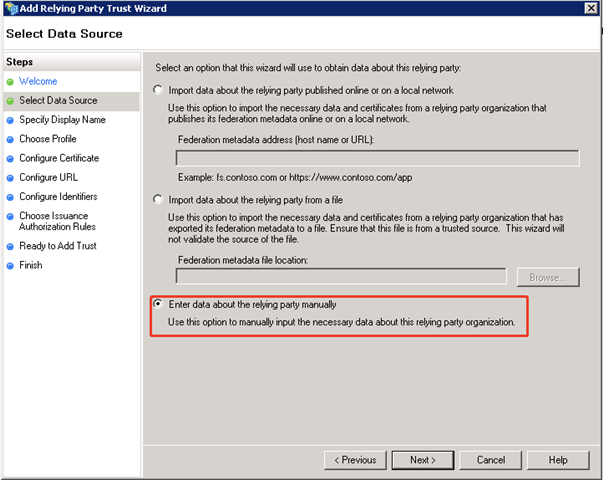
- Click Start on the Add Relying Party Trust Wizard.
- Select Data Source: Select Enter data about the relying party manually and click Next.
- Specify Display Name: Specify a display name and click Next.
- Choose Profile: Select AD FS 2.0 and click Next.

- Configure Certificate: Click Next.
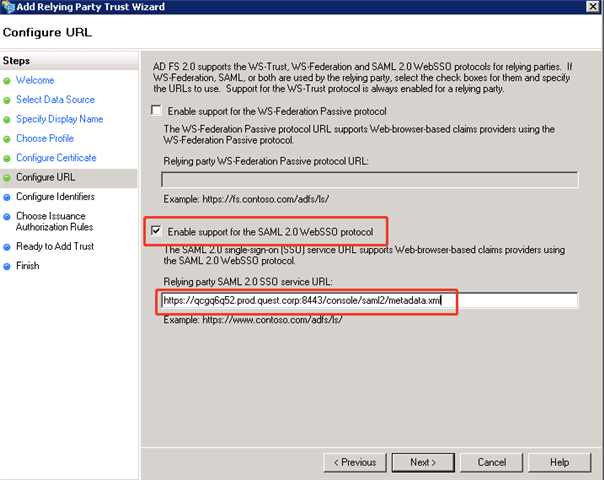
- Configure URL: Select Enable support for the SAML 2.0 WebSSO protocol, and then input Foglight’sSAML 2.0 metadata URL in https, which is:
NOTE: ADFS requires https protocol, so Foglight’s http SAML login cannot be used on ADFS.
- IP logon: https://<foglight-server-ip>:<foglight-ssl-port>/console/saml2/metadata.xml. Click Next.
- Host name logon: https://<foglight-server-host-name>:<foglight-ssl-port>/console/saml2/metadata.xml. Click Next.
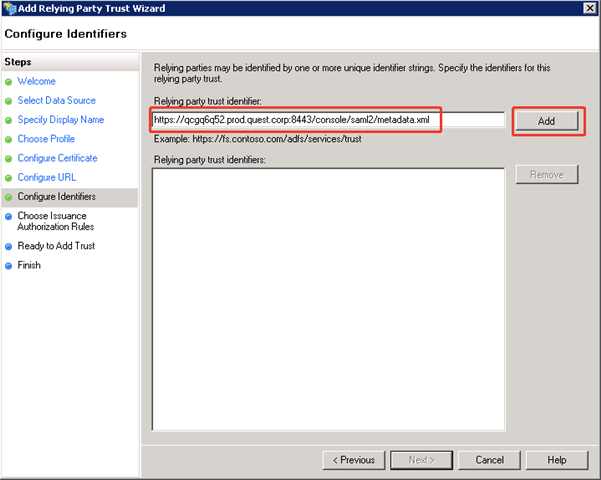
- Configure Identifiers: Input Foglight’s SAML 2.0 metadata https URL used in step 8 in the Relying party trust identifier field, click Add, and then click Next.
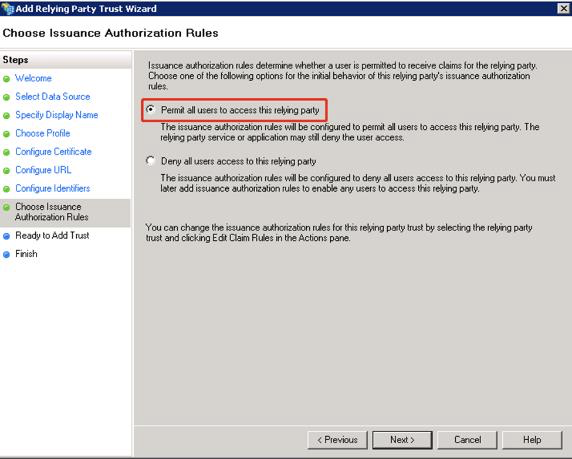
- Choose Issuance Authorization Rules: Select Permit all users to access this relying party and click Next.
- Ready to Add Trust: Click Next.
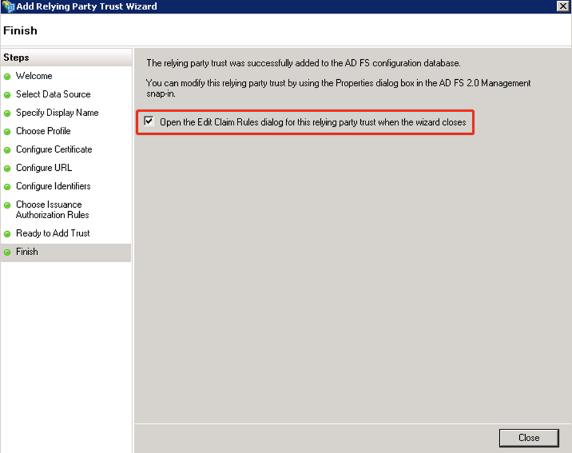
- Finish: Make sure to select Open the Edit Claim Rules dialog for this relying party trust when the wizard closes, and then click Close.
Step 2: Editing Claim Rules
To edit Claim Rules:
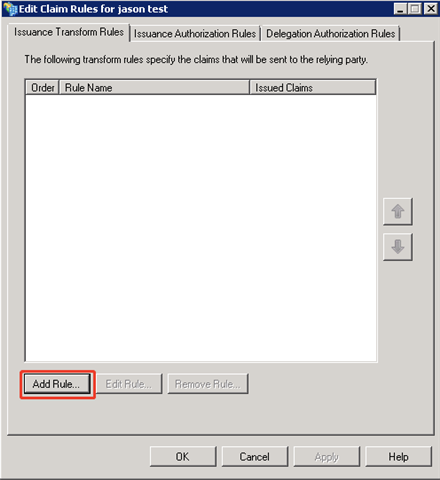
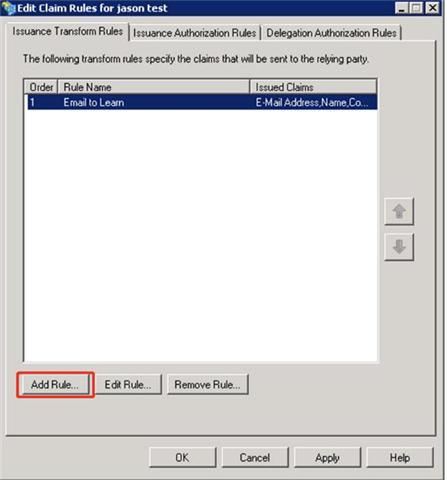
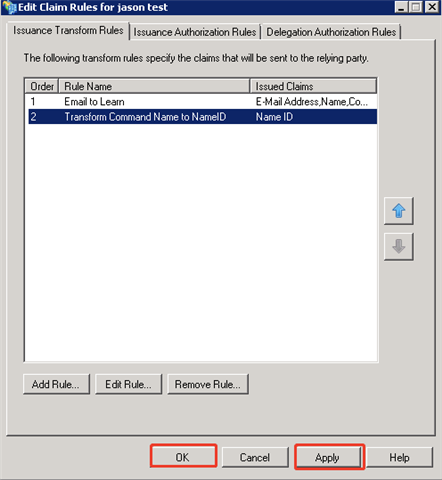
- On the prompted Edit Claim Rules dialog box, click Add Rule…
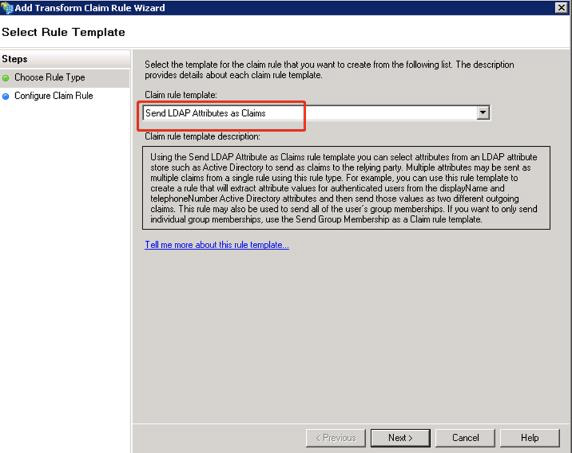
- Choose Rule Type: Select Send LDAP Attributes as Claims and click Next.
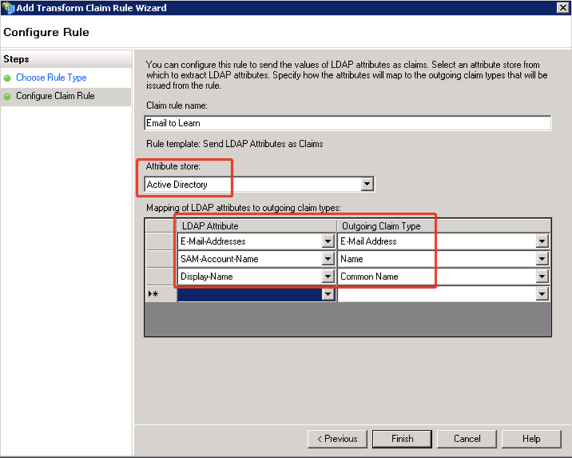
- Configure Claim Rule: Specify a rule name, and select Active Directory as the Attribute store. Add LDAP attributes mapping as below, and then click Finish.
- Click Add Rule… button again to add another rule on the Edit Claim Rules wizard.
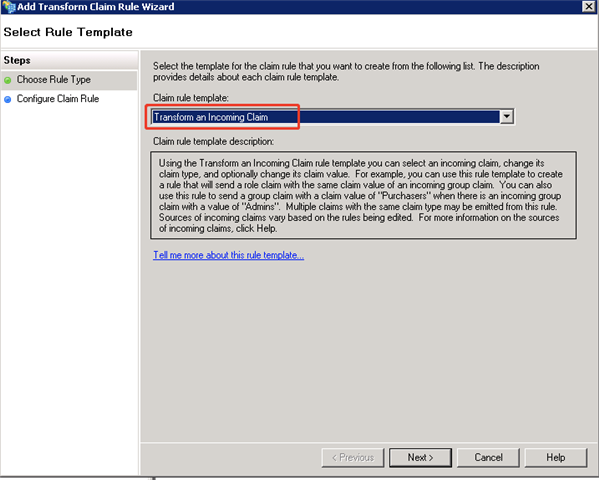
- Choose Rule Type: Select Transform an Incoming Claim and click Next.
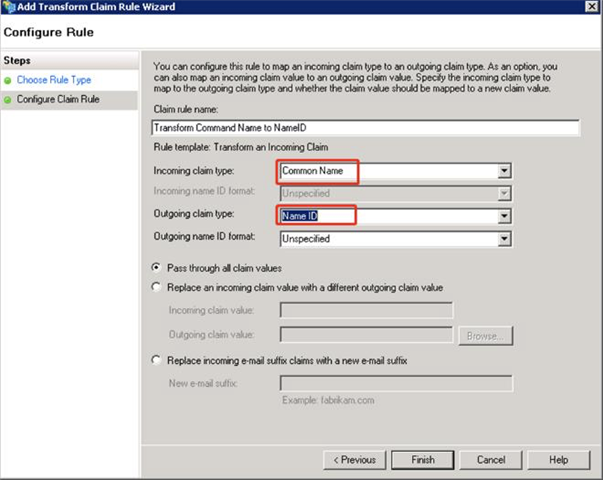
- Configure Claim Rule: Specify a rule name and configure it as below, and then click Finish.
- Click Apply to apply the configuration then click OK to close the Edit Claim Rules wizard.
Step 3: Configuring Endpoints
To configure endpoints:
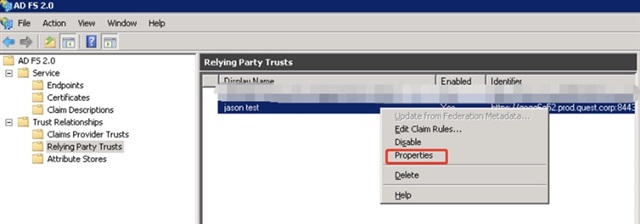
- Right click the Relying party Trusts item that you added above, and then click Properties.
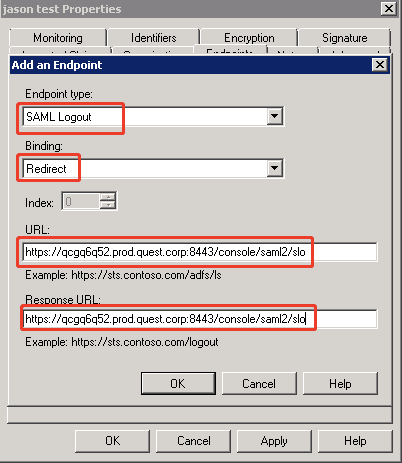
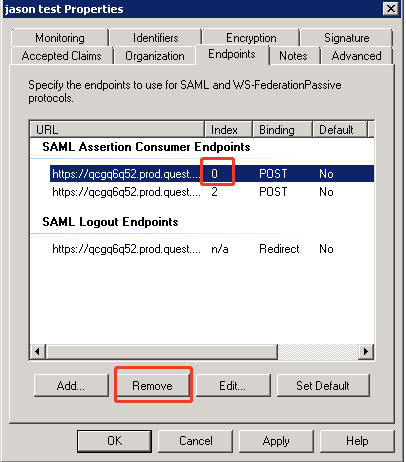
- Select Endpoints on the Properties wizard, and then click Add.
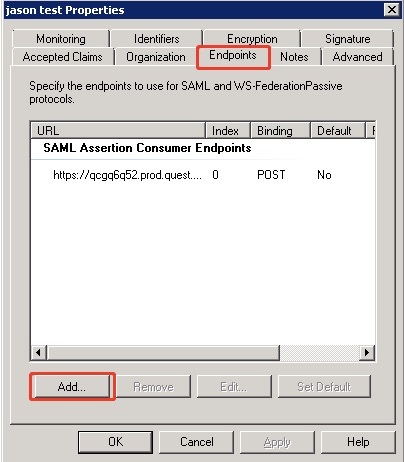
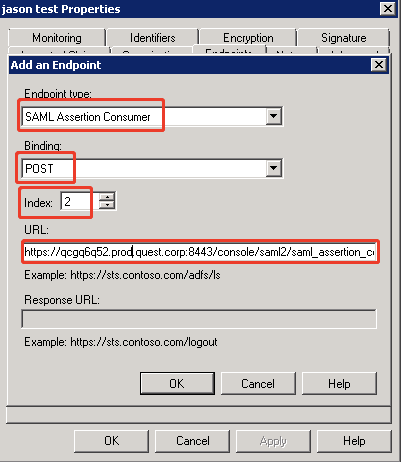
- You need add two Endpoints, including SAML Assertion Consumer endpoint and SAML Logout endpoint.
- For the URL field of SAML Assertion Consumer endpoint, the value is:
- IP logon: https://<foglight-server-ip>:<foglight-sslport>/console/saml2/saml_assertion_consumer
- Host name logon: https://<foglight-server-host-name>:<foglight-sslport>/console/saml2/saml_assertion_consumer
- Both the URL and Response URL fields of SAML Logout endpoint are:
- IP logon: https://<foglight-server-ip>:<foglight-ssl-port>/console/saml2/slo
- Host name logon: https://<foglight-server-host-name>:<foglight-ssl-port>/console/saml2/slo
- Select the default SAML Assertion Consumer Endpoint which index is 0, and then click Remove to delete it.
- For the URL field of SAML Assertion Consumer endpoint, the value is:
Step 4: Configuring Signature and Hash Algorithm
To configure Signature and Hash algorithm:
- Select Signature on the Properties wizard, and then click Add.
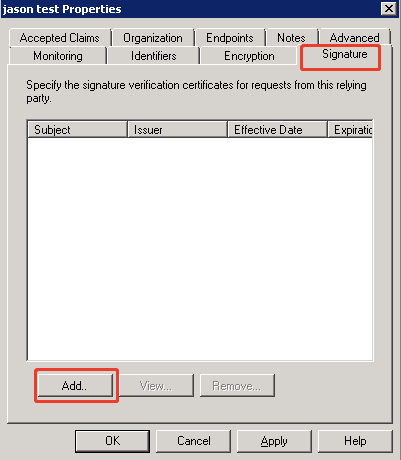
- Add a Foglight server’s signature file. You can get a default one from <foglight-serverdirectory>/config/sam_certificate.pem or you can generate your own signature file.
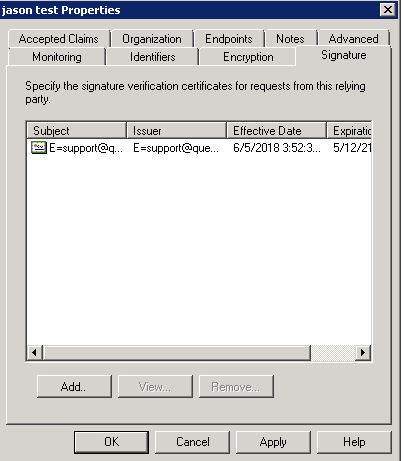
- After adding the signature file, select Advanced and choose SHA-1 option for the Secure hash algorithm field, and then click Apply.

- Click OK to finish the Properties configuration.
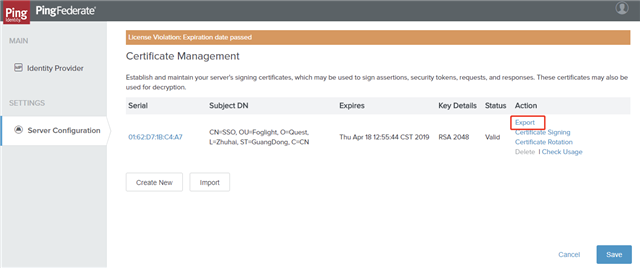
Step 5: Exporting the Certificate
To export the certificate:
- Navigate to Service > Certificates on the ADFS Management Console, right click the Token-signing item, and then click View Certificate…

- Select Details on the pop-up Certificate wizard and click Copy to File… to export the certificate which will be used in the following Foglight SAML setup.
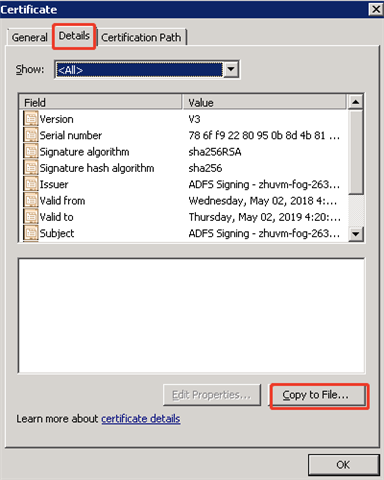
- Select Base-64 encoded X.509 (.CER) format as the export file type.

Step 6: Configuring the Trust Relationship
To configure the trust relationship:
- On the ADFS server machine, run PowerShell as administrator.
- Run the following command to load the ADFS PowerShell module.
Add-PSSnapin Microsoft.Adfs.PowerShell - Run the following two commands to set up the trust relationship. You need to change the to the Display Name of the Relying Party Trust that you have added in Step 1: Adding Relying Party Trust in ADFS
- Set-ADFSRelyingPartyTrust -TargetName <relying-party-trust-display-name> SigningCertificateRevocationCheck None
- Set-ADFSRelyingPartyTrust -TargetName <relying-party-trust-display-name> EncryptionCertificateRevocationCheck None
Step 7: Setting up SAML in Foglight
To set up SAML in the Foglight Management Server:
- Log into the Foglight Management Server as an administrator.
- Under Dashboards, click Administration > Setup > SAML 2.0 SSO. The SAML 2.0 SSO Configuration dashboard appears.
- Click Edit Settings and configure the SAML settings as below.
- Identity Provider Entity ID: The value should be
https://<ADFS_SERVER>/federationmetadata/2007-06/federationmetadata. - Login URL: The value should be https://<ADFS_SERVER>/adfs/ls/.
- Logout URL: The value should be https://<ADFS_SERVER>/adfs/ls/.
- Attribute Key: It depends on the identity key selected to identity the user. For example it can be
http://schemas.xmlsoap.org/ws/2005/05/identity/claims/name. - Identity Provider x.509 Signing Certificate: copy the content of the certificate file which you have exported in Step 5: Exporting the Certificate

- Identity Provider Entity ID: The value should be
- Click Apply Configuration to save the configuration.
Then configurations of integrating SAML 2.0 SSO with the Foglight Management Server in ADFS are completed.
