Part two of this series may be found here.
Part three of this series may be found here.
Over the years I have written hundreds of PowerShell scripts for RapidRecovery/AppAssure Management and Automation. One of the constant requests I have heard from customers was to embed some kind of GUI in the scripts that were NOT supposed to be run on a regular basis using the same parameter values over and over again (in these cases a simple .bat file is enough). I have done my best to deliver.
The easiest approach was to do some kind of menu placed in a loop – something reminiscing of the old DOS days – the kind of text menu where you choose “1” to perform an action, “2” to perform another action and “Q” to quit. Since this does not really work for even minimally complex situations, I moved to Windows Forms – which proved to be too much work to get them right -- and later to XAML (WPF) – which allow better looks but even more unjustifiable work. In both cases Visual Studio helps creating the interface but, making it running with PowerShell requires to modify the code and the result is hard to manage, especially for more complex scripts.
As such, I tried to embark in a quest for productivity by settings the specs for a GUI easy to create, modular and scalable. I daresay that I believe I am on the right path. I know it as I have prepared a GUI for a script using this method a few months ago and, recently, after forgetting all the "gotchas" and fine points, I was able to create a new (albeit simple) one in less than an hour (including the code that does the underlying job) using the modular functions I already created. Practically, I copied and pasted modules, have given the appropriate values and before I knew it (and without fully understanding what I was doing) I had a working PowerShell application featuring a nice GUI. As a bonus, I was able to wrap everything in an .exe with the help of the free excellent PowerGui tool (still available for download in many web locations despite being discontinued).
In this blog series, I will walk you through this process in a, hopefully, organized manner.
Let's begin with the background. The customer I mentioned above was not able to read the Rapid Recovery Windows Log in the events viewer (creatively named DELL.evtx) as another Dell related application was creating a folder called DELL at the same location. Due to the name conflict, only the DELL folders was shown in the Windows Events MMC.
The script we are going to write together allows getting the log files known to the Windows eventslog service (including the DELL.evtx), displaying and filtering the events and exporting the result to a csv file for future processing.
It is a very simple application but at the same time a perfect match to illustrate the point at hand.
Oh, and since I kept you waiting, we will build the GUI using HTML with a whiff of JavaScript (I dare you to notice it) and displaying it in Internet Explorer. All the GUI elements can be encapsulated in functions and the script can be divided in sections. At last but not at least, we will take advantage of the DOM structure. In the end, the GUI is built in a declarative manner.
It is hard to believe how fast the development goes if following this path – well, in the case of the SECOND attempt and subsequent ones as the first try requires some uphill charging until all the minutia is under control.
Now, I am going to get into the substance of this article. As I go along, I will discuss the various blocks needed to build the application. To better understand how the elements I present below do work and tie together, readers may want to use the Powershell Integrated Scripting Environment (ISE) or any other similar tool to re-create and run the code .
I begin with a "tough" statement:
"If I run a script with a GUI, I want to be able to launch it by double-clicking it, not from an elevated PowerShell console. "
It goes without saying that the traditional way of launching a PowerShell Script that does something useful is to open an elevated PowerShell console first, navigating to the script and launching it. Double-clicking the icon of the script file will launch the script in a non-administrative mode and thus the most powerful features of the script will be blocked by lack of permissions.
This is an issue that needs to be examined. To solve it the following steps are needed:
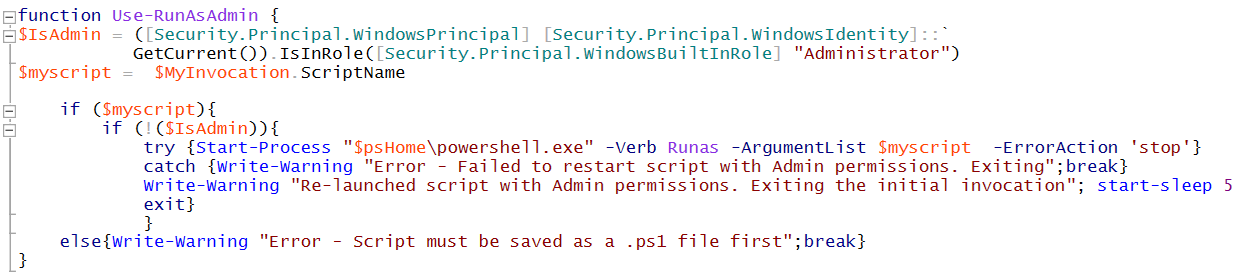
* Determine if the script is launch with administrative permissions:

* If it is not (which is most likely), get the name of the script:

* When done, re-launch the script with admin permissions:
 Everything can be neatly packed (with the usual flourishing) in a set-once and forget function:
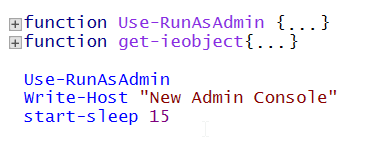
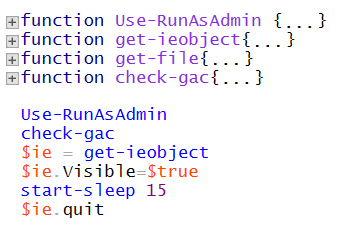
To launch this function, copy and paste it in a file (called for consistency RRLOGSBLOGEXEAMPLE.ps1 -- if you work this along with me) and launch it either by double-clicking or by right-click -> run with PowerShell after adding the lines below.
You will see the initial PowerShell Console coming up, then launching the second Powershell Console which has admin permissions. The initial PowerShell Console which is non-Admin will close and the new admin PowerShell Console will still stay open a few more seconds (as dictated through the “start-sleep 15” commandlet).
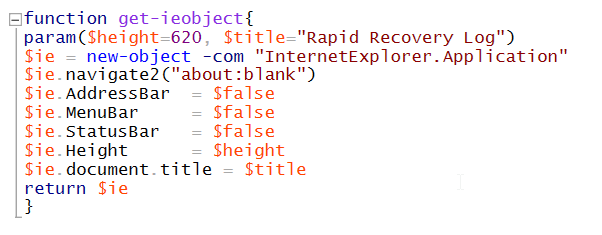
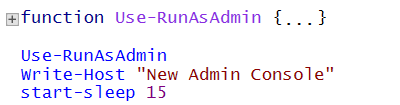
Time to go to the next step! Let’s put something of interest in the new Admin Powershell Console! Let’s create an Internet Explorer Object and put it in a simple function as well.