

Part one of this blog post may be retrieved here.
Part three of this blog post may be retrieved here.
In the previous post we worked together toward laying the foundation for a simple and scalable PowerShell GUI framework for managing Rapid Recovery. As a first requirement is to do everything right, we put together four reusable blocks coded as functions.
- Use-RunAsAdmin which makes sure that the script will run in elevated mode
- Get-IeObject which launches an Internet Explorer Com Object (not too much to see as yet, beside an empty webpage)
- Check-GAC which checks if a required Office DLL is in the GAC and gives instructions as of how to obtain it. (This is an one time operation but I feel that it still needs to be handled by the script).
- Get-File which helps the Check-Gac function by providing a Windows Style OpenFile dialog.
To finish the reviewing, at this stage, the script that we put together looks like this:
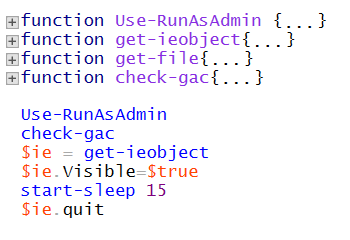
Running the script above and going through all the motions will result in an empty IE window that will disappear after 15 seconds. The question is how to fill it with usable controls.
In this post I will show you the next steps for creating the Graphic User Interface (GUI).
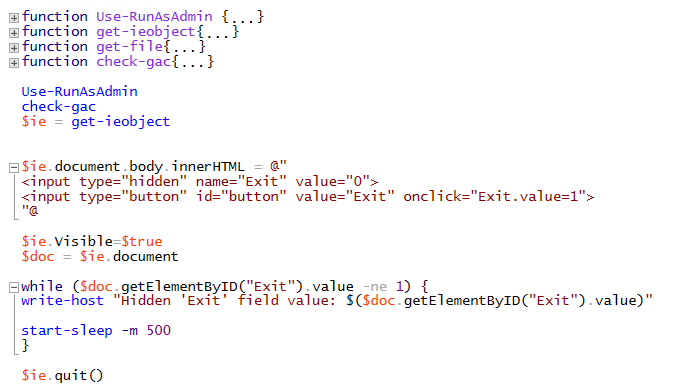
First thing to do is finding a way of exiting the script at will. The Internet Explorer Com object does NOT expose events that may be wired from PowerShell. However, there is a simple way of accessing the DOM in the IE com object and retrieving the state of the HTML controls that we drop in there.
Just for the record, according to w3.org “…the Document Object Model (DOM) is an application programming interface (API) for valid HTML and well-formed XML documents which defines the logical structure of documents and the way a document is accessed and manipulated.”
To summarize, we can add, access and manipulate HTML controls to the IE object but there is no way raising events via PowerShell.
The solution is to create a continuous loop that checks the state of the HTML controls and acts accordingly.
To exemplify we will create a couple of controls and show how to make them work.
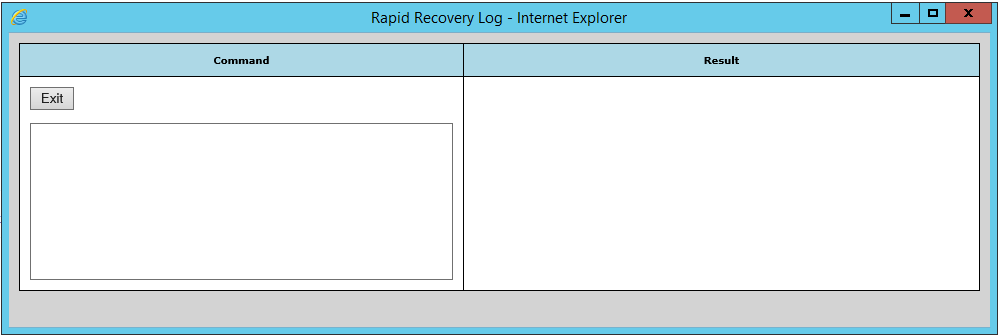
The first control is a hidden field called “Exit”. If its value changes to 1, the script terminates.

The second control is a button.

When the button is clicked, a JavaScript ‘onclick’ event is raised and the value of the hidden field above is changed to 1. Since the hidden field value is checked in the loop, when the value of 1 is encountered, the script exits.
Please note that I have added a “Write-Host” line that would display the value of the hidden field.
As such, the script looks like this now:
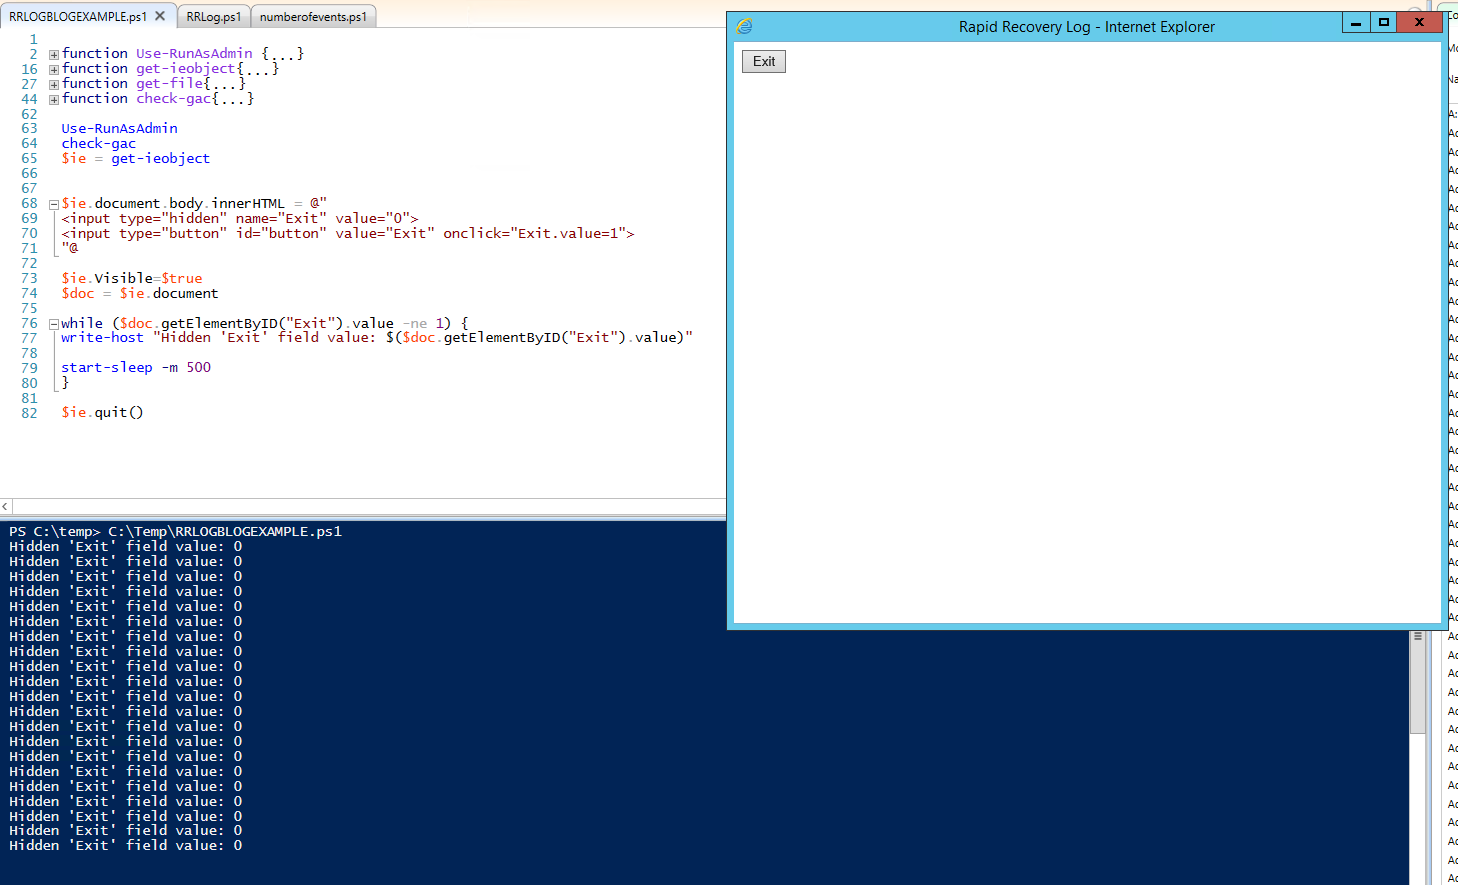
Running it results in a Internet Explorer Window that may be closed with the “Exit” button as shown below. Please note the value of the hidden field written on the output every 0.5 seconds due to line 77 in the script. Hitting the “Exit” button changes the value of the hidden field to 1 thus the loop exit condition is met and script execution is terminated after quitting the Internet Explorer Com object created at line 65.
This suggests that adding other hidden fields and changing & checking their values we can control the script execution and add various functions.
It makes good sense to write a few functions encapsulating a series of html elements and java script bits that would allow creating controls in a declarative manner.
However, before dwelling into this, there are two more things to consider:
1. The HTML layout of the Internet Explorer page and
2. Formatting the various HTML elements for a streamlined, uniform look.
Let’s start with the overall layout.
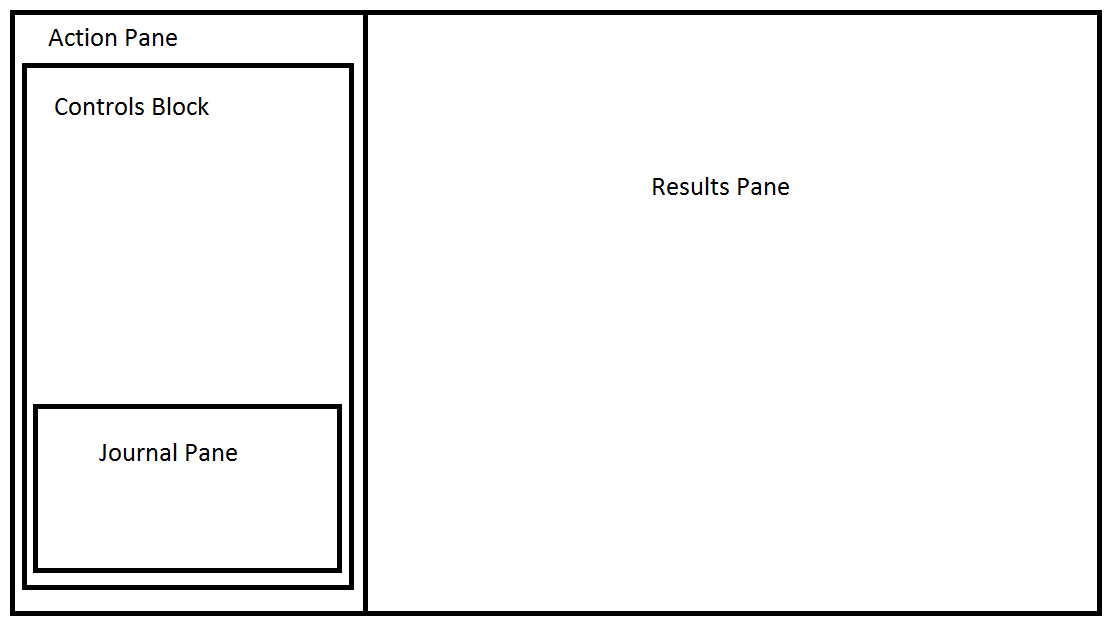
I settled to a two columns table. On the left side I set the HTML controls and on the right side I display the results. In more complex cases, the results in the right panel include their own HTML controls (i.e. if the result is a list of services, it makes sense including buttons for stopping/starting these services and dropdown boxes for setting their startup type) but showing how to deal with them would be for another time.
Returning to the layout shown below. The “Controls block table” inside the action pane is necessary as the right pane may grow excessively (i.e. 100+ lines), stretching the action Pane as well. Without the Controls Block table the HTML controls locations would stretch as well making it difficult to access them.
The adopted solution allows the controls block table to stretch based on the number of controls but not based on the vertical size of the results pane.
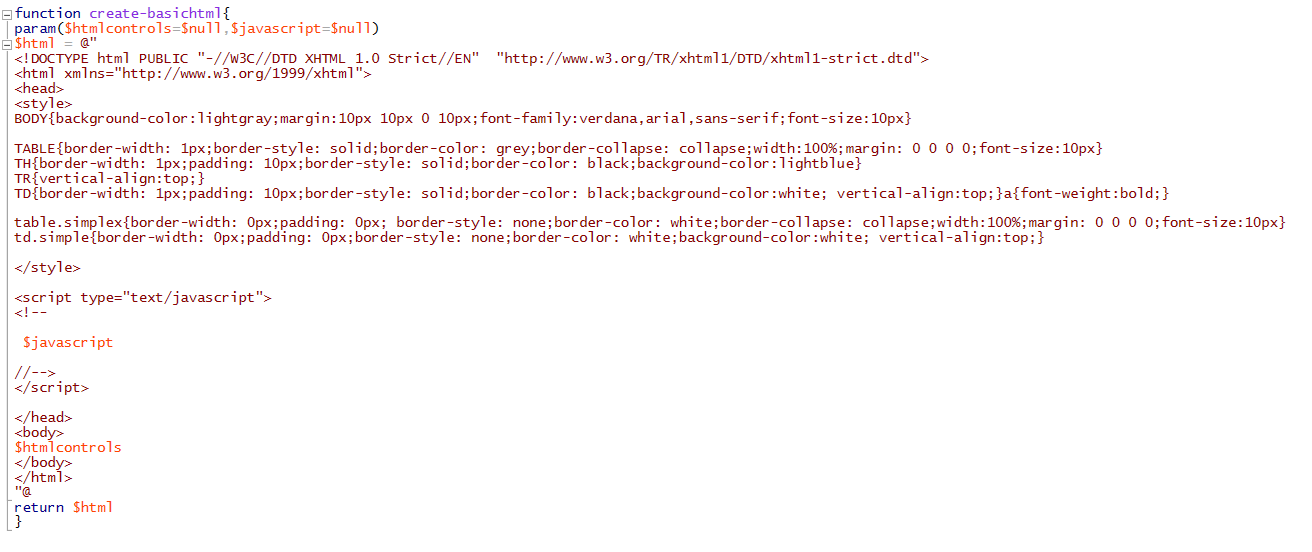
Now it is the time to take care of the HTML formatting part.
To do it in an elegant manner, I wrote a function containing the required HTML header, a style section with CSS stiles for the two types of table – a default table with nice table headers, and for tables without any dividing lines. To avoid spacing issues, I have added another table cell style with 5px padding to be used on an as needed basis.
Since I intend to use this function in the future, I added (just in case) a style for the default HTML body, a section for whatever javascripts may be needed in the future and, “pro forma”, the “closing” tags of the html document.
The function takes 2 parameters: one for including the layout html information (shown above) and another for the possible javascripts (not used for this script).
When all is done, the function looks like this:
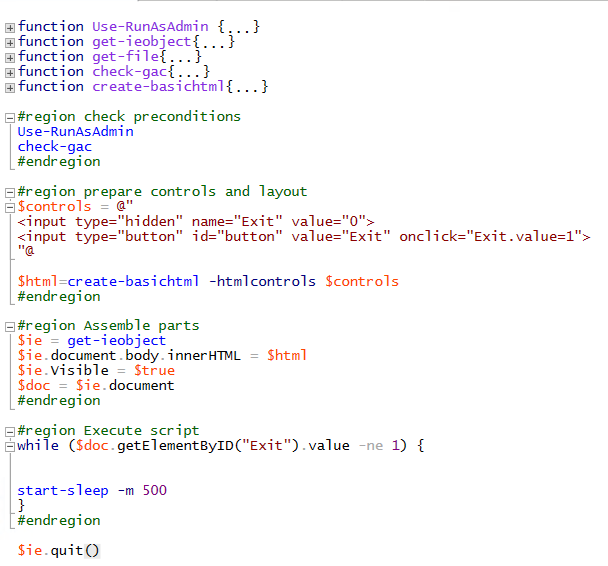
To simplify the body of the script, I divided it into 4 regions: Check preconditions, prepare controls and layout, assemble parts and execute script.
At this point, after a few modifications the script looks as below:
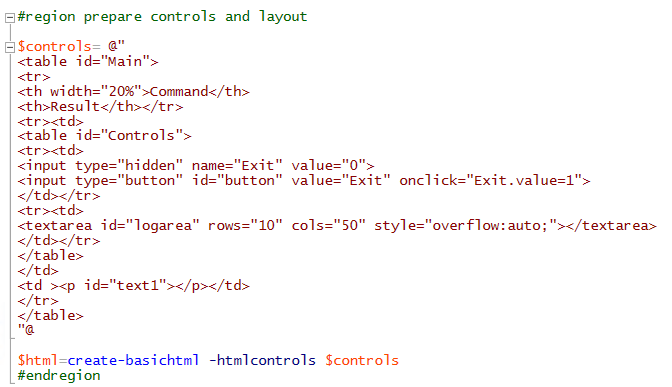
The next logical step is focusing on the controls and layout region. It may make sense to write a function for it but, based on my experience, I believe that it makes more sense to put it together manually as it may need to be tweaked several times before it works as desired.
The “skeleton” region looks as below. I will add "meat on its bones" later.
Running the script brings up the structure of the Internet Explorer GUI as shown in the diagram above.
The constituent elements are clearly visible.
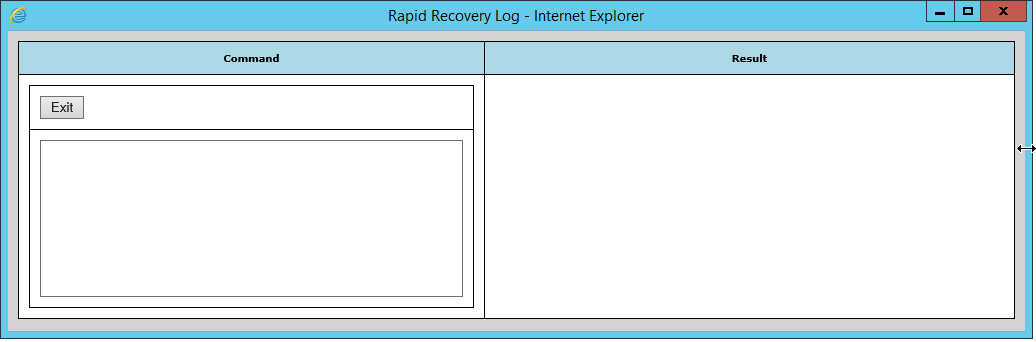
For added coolness, after a little tweaking I made the “Controls Block” are invisible. As you see, the distracting lines of the “Controls block” are gone now.
Time to begin building the cool stuff.
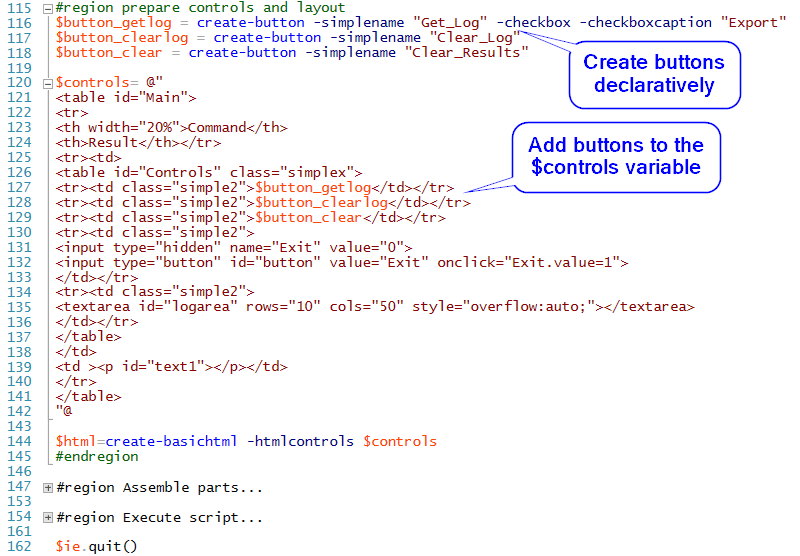
I want to be able to create a button declaratively so a new function needs to be written.
The first (and most common) control to build is a button.
It is a good practice to create a separate hidden field for each button so no confusion about which button was hit may be possible but I do not want to worry keeping track of them. I want the GUI to tell me what button was clicked and if the operation it performs is still going on. At last I want to have a little helper, a checkbox that I would be able show at will and select if I want to enhance the action performed by that button. Such a control is shown in action below.

To summarize, once clicked, the button gets a yellow underline that lasts while the action is performed.
If enabled, a checkbox is visible. When the checkbox is checked, the action of the button is altered in some desired way. In the example above, a “Save File” dialog permitting exporting the result is shown.
The function has three parameters:
-simplename (the name of the button),
-checkbox (used if the checkbox is present) and
–checkboxcaption which is self-explanatory.
The button control inside the function features an ultra-simple java statement that shows the highlighting control when the button is clicked and changes the value of the hidden field from 0 to 1. At the next loop, the value of the hidden field is captured and since it has changed, a function performing the desired operation is triggered.
The code looks as below:

The code to create the button in the example is shown below:

We will create 2 more buttons and add them to the “prepare controls and layout” region:

The code looks now like this:
Two more functions are needed before wrapping up for today.
First, a simple function for creating an independent checkbox. Nothing special here. Just three parameters:
-simplename (the name of the checkbox),
-checkboxcaption (self explanatory) and
–checked (a switch indicated the initial state of the checkbox)
The code is shown below:

Second, an even simpler function that creates a textbox. The parameters are: -simplename (the name of the control), -content (the initial displayed text), -caption (self-explanatory) and –width (by default 200px)
The code is shown below:

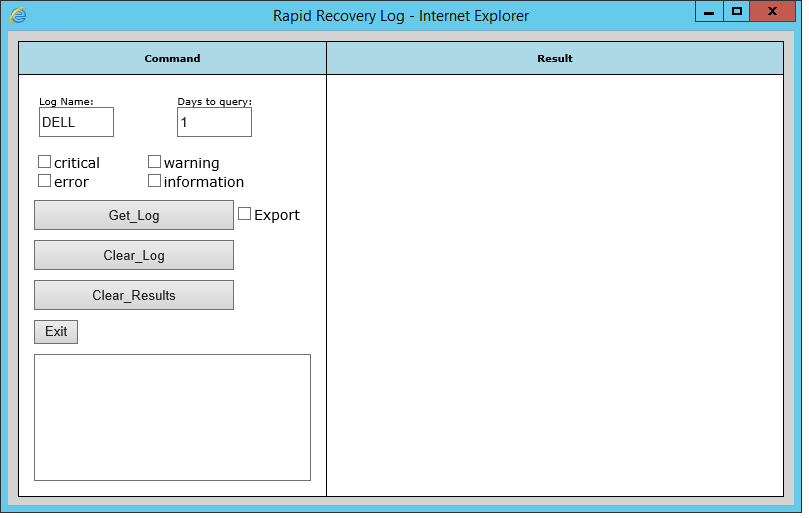
Now we have everything needed to finish up the Internet Explorer GUI. First some more controls are created. They allow defining the filters for the log to be parsed, the number of days to be included in the query and the type of events to be shown. The code is shown below:

Next, they are added to the $controls variable in the “prepare controls and layout” region. For better lining up some invisible tables are added. Since things do not line up properly due to the log area, the font type and size had to be specified. The “prepare controls and layout” region is finished now and it looks as below:

The script code looks like below:

When the code is executed, the Internet Explorer GUI comes up:
In the next part of this blog article I will show you how to write the code behind the Internet Explorer GUI so the events are properly collected and exported to a csv file.
