Part one of this blog series may be found here
Note: This blog series was supposed to be divided in 3 parts. However, some readers were gracious enough to ask me to publish all remaining material in one post and argued that an excessively long post should not be an issue as long as we walk together to reach the final result. As such, here it is. I apologize to those readers (if any) who would argue in turn that a post of such length is somehow difficult to digest...
Last post has explored a few ways for accessing the Active Directory (AD) Schema and laid down the foundation for a PowerShell script to achieve the goal of interacting with the Active Directory classes and attributes that govern the Exchange Server memory usage.
If you worked together with me, you may remember that the first part of the of the blog post was dedicated to digging in Active Directory using commonly accepted ways in an attempt to find the desired information.
We have shown how to make accessible the AD Schema Snap-In and identified the msExchangeInformationStore class and three of its attributes msExchESEParamCacheSize, msExchESEParamCacheSizeMin and msExchESEParamCacheSizeMax.
We decided that it makes sense to pursue setting values only for msExchESEParamCacheSizeMin and msExchESEParamCacheSizeMax.
Next step was to begin codifying this wishful thinking into PowerShell code.
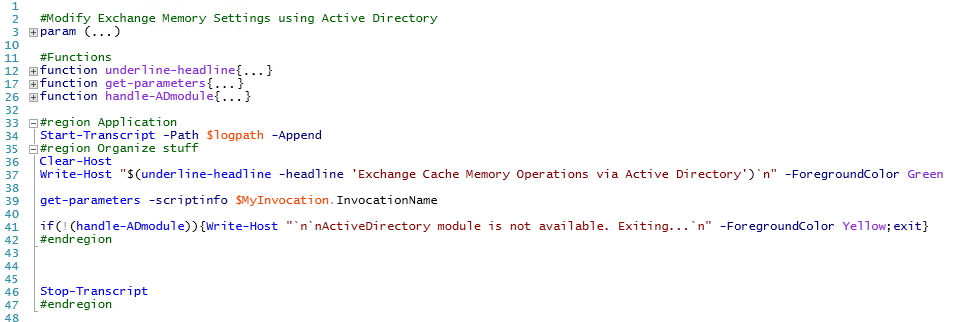
As such, we wrote a few simple functions to simplify the structure of the script.
These functions were:
Handle-ADModule which checks if the Active Directory PowerShell module is available and loads it if not already loaded. (Powershell 3.0 and later loads modules automatically but in the AD module case it is not always true).
Underline-headline which just does as it says while taking into account the variable length that a title may have
Get-parameters which displays invoked parameters, thus avoiding human errors due to a moment of confusion.
When all was said and done, the script looks like this:
Assuming that you are working together with me, at this point we are ready to navigate the Active Directory.
Powershell has many claims to greatness however, there are few features so cool as being able to navigate a whole series of objects – from the Registry to Web Services-Management (wsman) and to the Active Directoy in about the same manner as a file system made up of folders, files and properties. It is intuitive and allows discovering these structure in your own terms.
As such let’s delve into Active Directory (AD). In order to be able to reference my findings, as I dig down, I will call the results of each iteration “$level<number>” starting with “$level0”.
Looking at $level0 it makes sense to move one step further and attempt to get the object which is identified by the “Configuration” name. It would seem a simple step but alas, it is not.
The answer is easy to figure out, though. In Active Directory we navigate by the Distinguished name!
Let’s revisit the $level0 query:
What is the first thing that comes to mind? That is right, write a new function called navigate-ad that does programmatically what we just did manually: take the Name of the object to retrieve as a parameter, dig the $level object retrieved previously (which is a parameter as well) and retrieve the next object of interest.
This function looks like this:
The rewritten $level1 statement looks like this:
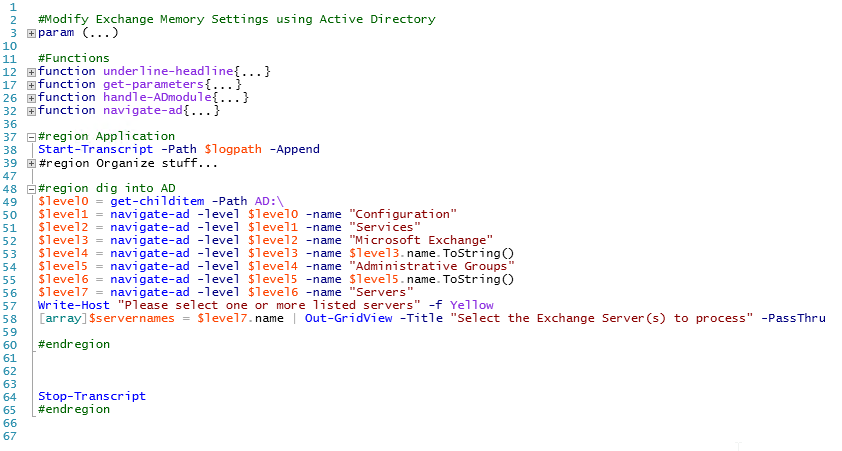
If we continue the process in short succession (without spending the time to explain what objects names have been chosen (as they are shown in the code), we get this:
Please note that $level3 contains just one object which in turn is bearing the name of the investigated domain. As such, in order to make sure that the script can be run on other domains without modification, when retrieving $level4, the indicated name was extracted programmatically from the $level3 object. Please note that it needs to be converted to string (it won’t work otherwise).
Same goes for $level5 and $level6 as the object to be retrieved (Exchange Administrative Group) has a specific id, in my case “Exchange Administrative Group (FYDIBOHF23SPDLT)”
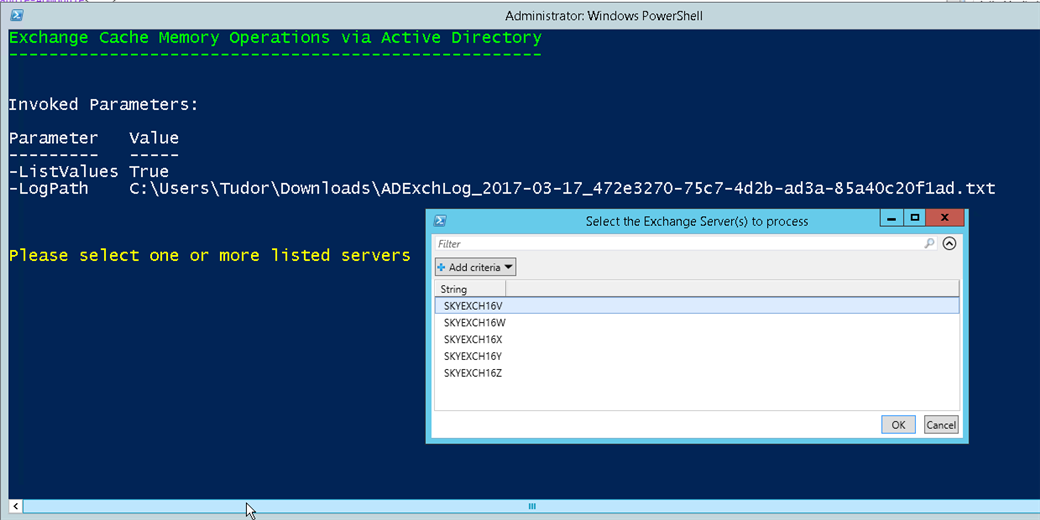
$level7 is the end of our AD digging as it contains the information of the Exchange Servers in the Exchange Organization. In my case there are 5 exchange servers.
It makes sense to be able to choose one or more servers to apply, reset or just list memory limits. Since this is a simple operation, achieved via a gridview, I will not show it separately.
At this point the Script looks like this:
and the result of running it looks like below:
At this point it looks that we are ready to process the selected servers, change the memory limits and go on with our lives. However, there is one more major hurdle to deal with.
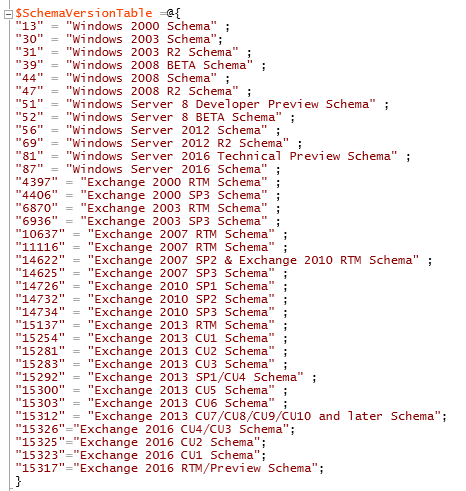
You may remember that the Exchange memory limits are not measured in bytes (or multiple of). They are measured in page blocks that can be either 4KB or 8KB. As such we need to identify the governing Exchange AD schema.
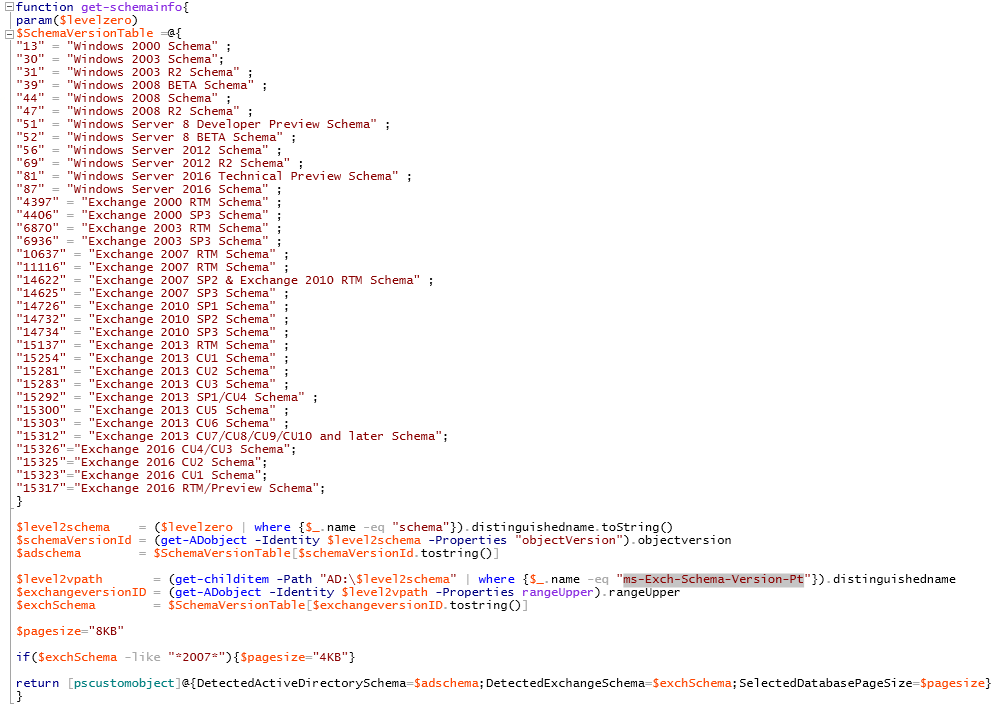
This is not an easy feat. However, with help from technet and other sources on the web I was able to put together a table containing not only the Exchange but the Windows Schema version table information and set it as hash table. Here it is:
From here it is rather simple to set up a function – called get-schemainfo -- that receives the $level0 object as a parameter and returns one object containing the detected AD Schema id, the detected Exchange Schema id and the Exchange memory page size.
It is a little difficult but not impossible to explain how it works J
One of the sub-objects in the $level0 object is the Schema. First step is to find its distinguished name then get the objectversion property value using the get-ADObject commandlet (if you do it step by step it will become immediately evident). At last, using the $schemaversiontable hashtable we get the schema version name corresponding to the value extracted at step 2.
The same process is used to get the Exchange Schema, this time using the distinguished object name for the ms-Exch-Schema-Version-Pt object and based on its value the memory page size is retrieved.
The function looks like this:
After adding the get-schemainfo function to the script calling it and displaying the results, the script looks like this:
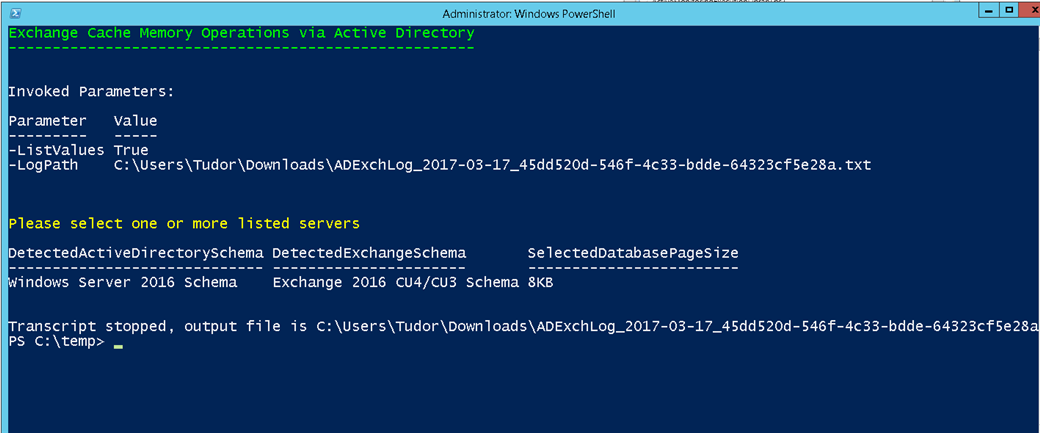
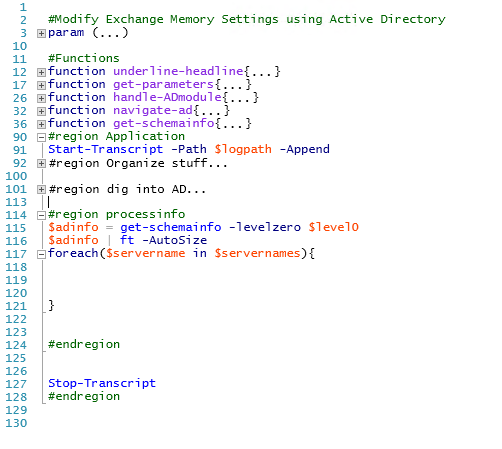 And the execution result looks like this:
At this point we are getting close to the core of this script: modifying the Schema attributes that in turn will govern the memory used by Exchange.
This is how we proceed.
First, the easy part: showing the name of the server that is processed.
Then we retrieve the AD object pertaining to the current server.
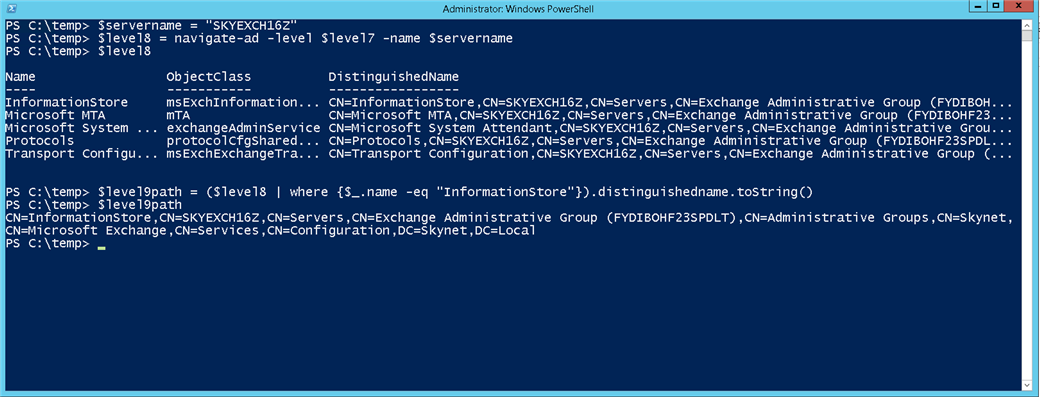
Once this is done, we get the distinguished name of the InformationStore as the information store hosts the attributes we are looking for.
Assuming that the selected server is “SKYEXCH16Z” these operations look like this:
Time for writing another function called get-ADvalues, which receives $level9path as a parameter, called $identity. As shown above, $level9path is the distinguished name (or the “identity”) of the information store path.
A second parameter for the get-ADvalues function is the page size for the memory size properties. This was calculated when the get-schemainfo was called and is the selecteddatabasepagesize property of the returned object.
The function is using the get-ADObject commandlet to retrieve the properties pertaining to memory size from the InformationStore of the selected Exchange Server. If you remember, these are called msExchESEParamCacheSizeMin and msExchESEParamCacheSizeMax.
Once these properties are retrieved, their values are processed and displayed in gigabytes (GB). Although writing to the screen from within a function body is not good practice, in this case helps streamlining the code.
At last but not at least, the get-ADvalues function returns a custom object containing the retrieved values.
The get-ADvalues function is shown below:
And the result of running it with the parameters already mentioned looks like this:
Before going further there is one last thing to take out of the way: a function called “parse-size” that would validate the values of the $MinSize and $MaxSize parameters of the script. In fact, we need to process these parameters which can be entered as numbers with the GB, MB, KB suffix (or no suffix at all if entered as bytes) and make sure that they translate in an integer number of blocks relative to the database memory pagesize.
The function takes two parameters: $size – which is any of the $minSize or $MaxSize script parameters and $pagesize which is the already calculated memory page size of the Exchange Database (4KB or 8KB).
Some artifices are needed because of how the GB, MB, KB values are handled by PowerShell but everything is pretty straightforward. The parse-size function looks like below:
 Calling the function with an arbitrary $size value yields a result similar with the one below:
The further script logic implies checking if the $listvalues parameter is present. If it is, the script terminates after listing the current values for the msExchESEParamCacheSizeMin and msExchESEParamCacheSizeMax information store attributes.
If $listvalues is not present and any or both of the msExchESEParamCacheSizeMin and msExchESEParamCacheSizeMax have values, these values are removed.
This operation is equivalent to resetting the msExchESEParamCacheSizeMin and msExchESEParamCacheSizeMax value and is performed either new values are to be set or reset.
If the $Reset parameter was used, the script exits, otherwise the new values requested by the $MinSize and $MaxSize parameters are set, the result displayed and the script continues to process the next Exchange server in the list.
The Set-ADObject commandlet was used to process the AD attributes. This commandlet allows setting or removing values presented as a hashtable.
Please note that the -Replace parameter needs to be used with the Set-ADObject commandlet even if the attributes to be modified have no value.
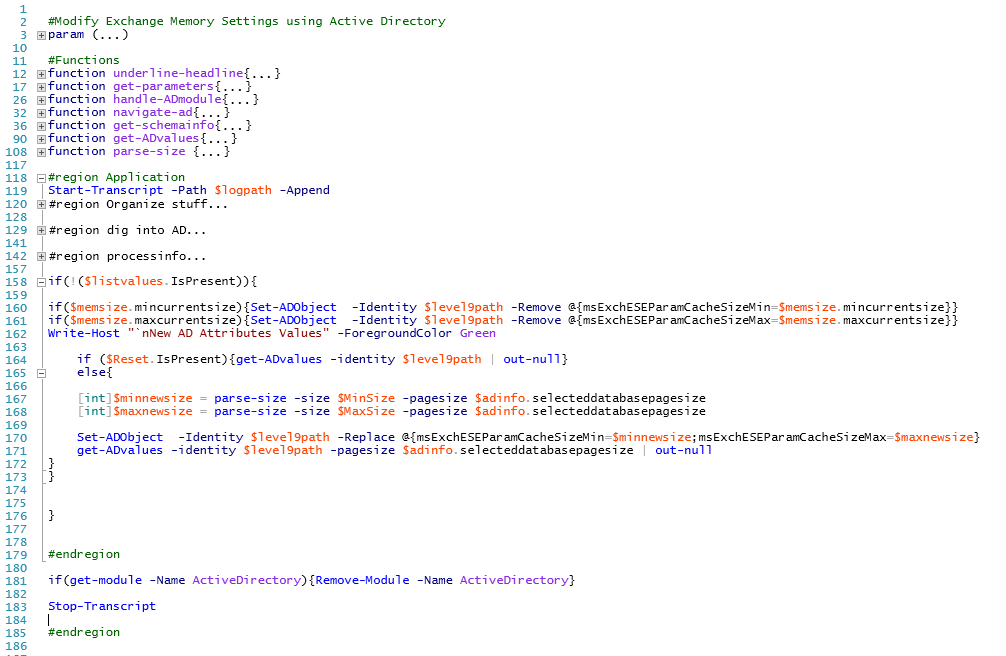
This rather convoluted code looks like this:
When the list is complete, the script removes the Active Directory Module, stops the transcript job, opens the log and exits.
The script is now completed. It looks as below:
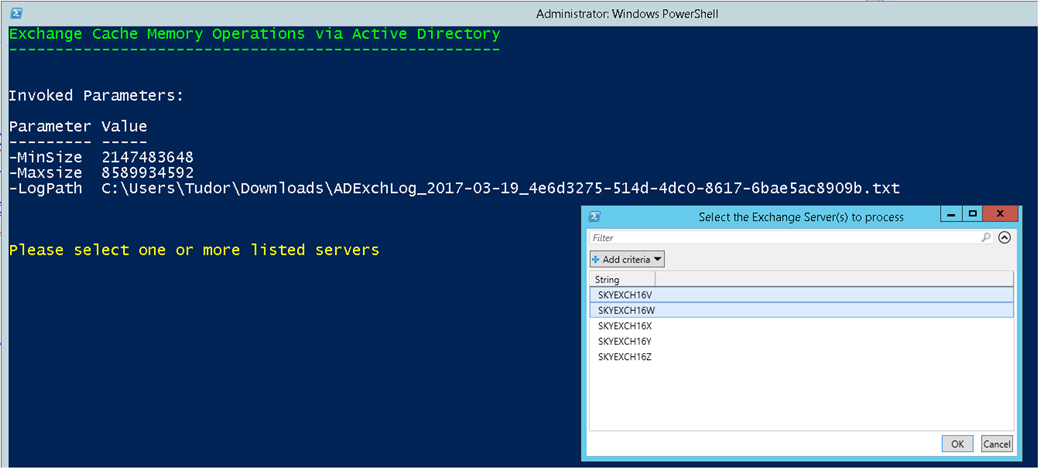
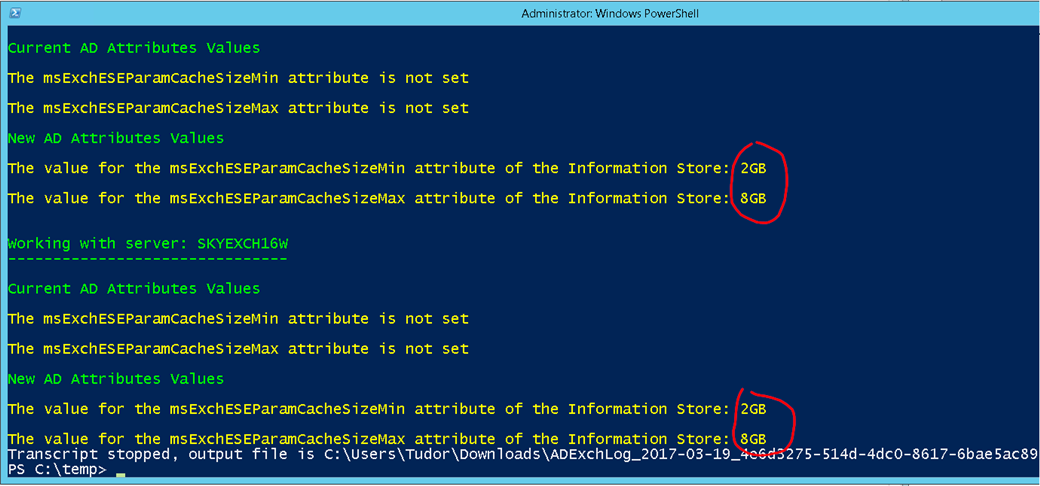
Let’s run the script attempting to limit the memory usage of 2 exchange servers. We decided to set the min value to 2GB and the max value to 8GB.
The Command line is:
The selected servers are SKYEXCH16V and SKYEXCH16W
And the result of running the script is:
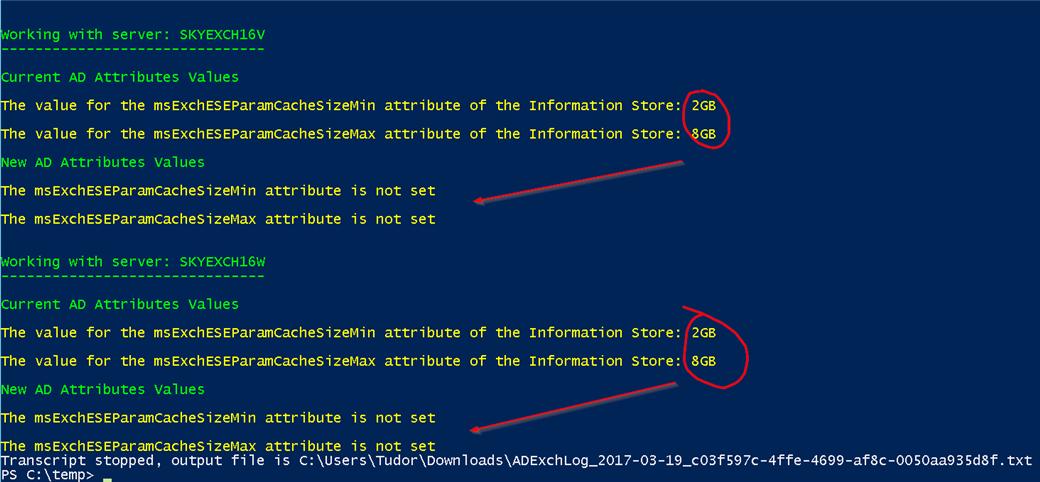
Before finishing this post, let’s leave my colleague’s environment as we found it and reset the values to their defaults.
Sure enough, after selecting SKYEXCH16V and SKYEXCH16W, the values are reset and the result looks like below:
This concludes this blog series.
Like always, I want to thank to all who gave me feedback and asked for more! Please do not hesitate to send me your take on the issue at hand.
Oh, before I end this, please do not forget to read the disclaimer below:
Disclaimer:
This script is provided "as is" for the purpose of illustrating how AppAssure/RapidRecovery tasks may be performed in conjunction with Powershell. Quest AppAssure/RapidRecovery shall not be liable for any direct, indirect, incidental, consequential, or other damage alleged in connection with the furnishing or use of this script or of the principles it demonstrates.


