
Spotlight reports are designed in SQL Server Report Definition files (RDL) and stored in the local installation folder of Spotlight client application making them accessible to Spotlight users. By default this path in Spotlight is C:\Program Files (x86)\Quest Software\Spotlight on SQL Server\Plug-ins\Trending\SSRS. Not only Spotlight provides users with the raw RDL files but also provides the pre-built Visual Studio Project file that includes are report files. This allows to load the project file including all Spotlight reports in VS at one time.
Below I’m outlining the steps on how to use Spotlight VS Project file to deploy, schedule and customize existing reports, and add new reports.
A few requirements before we begin:
- SQL Server Reporting Services 2008 and above is supported.
- Report Server Administrator privileges.
Deploy Spotlight Reports to SQL Server Reporting Services:
- Open the Business Intelligence Development in Visual Studio.
- Select File | Open | Project / Solution option.
- Select the project file SoSSE Reports.rptproj in the Spotlight Client installation folder: C:\Program Files (x86)\Quest Software\Spotlight on SQL Server Plug-ins\Trending\SSRS folder.
- Right click SoSSE Reports | Properties entity.
- Change the Target Server URL to your reporting server.
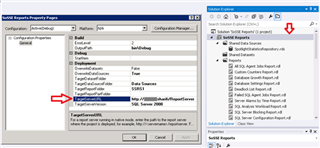
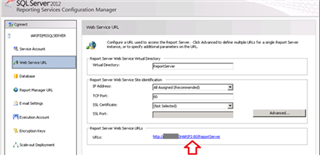
To confirm the URL string of server check Reporting Services Configuration Manager:
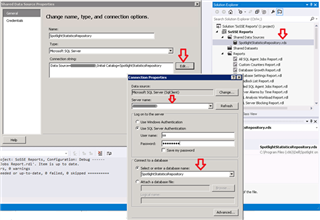
- Double click Shared Data Sources file | Spotlight Statistics Repository. Edit the Connection String and update the data source and database name if it has changed from the default.
- Right click Spotlight Statistics Repository Reports | Deploy.

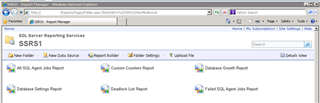
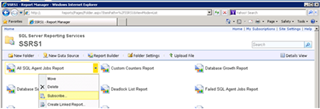
- View Spotlight reports in Report Manager URL:
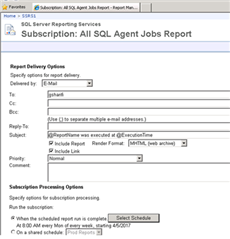
- Use Subscribe option to schedule and email reports:
Customize the default Reports:
- The definition (RDL) files and the project file SoSSE Reports.rptproj are in the Spotlight Client installation folder in the …\Plug-ins\Trending\SSRS folder.
- Copy the RDL files and project file to a folder outside of the Spotlight Client installation folder.
- Rename the copied RDL reports to a new filename so clarify it’s the customized version.
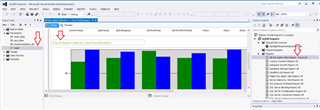
- Use the Business Intelligence Development to open and customize the report.
For example, I’ve renamed the ‘All SQL Agent Jobs Report’ and customized the report to show top 8 jobs instead of the default 6:
- Deploy the customized report to SQL Server Reporting Services.
Result of the default report: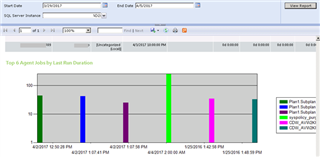
Result of the customized report:

Create new reports:
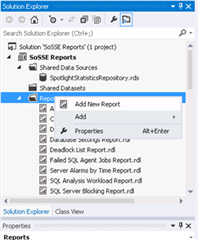
Users can add new reports to the project SoSSE Reports.rptproj and then deploy those reports to SQL Server Reporting Services.
- Right-click Reports | Add New Report option. Create report based on Spotlight Statistics Repository data source.
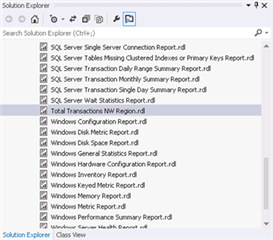
- New report name will show under Reports. Right click Spotlight Statistics Repository Reports | Deploy to deploy new list of reports.
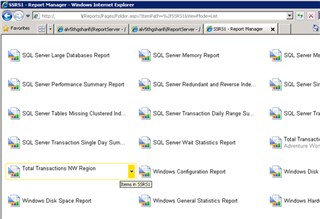
- See new report in SSRS:
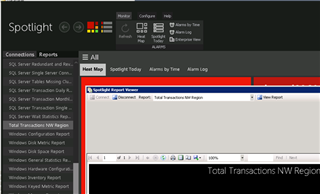
- Copy RDL file of new report from C:\Program Files (x86)\Quest Software\Spotlight on SQL Server\Plug-ins\Trending\SSRS to C:\Program Files (x86)\Quest Software\Spotlight on SQL Server\Plug-ins\Trending\Reports. View new report in Spotlight client:
See Spotlight Reports help page for more details.
Download the latest version of Spotlight from here.
Top Comments
Thanks Nirav for the feedback. The request for scheduling reports within Spotlight is indeed on the rise and I'll note it to the product management team. In the case of not having SSRS, I would try editing…