
When dealing with large number of connections, the power and advantage of PowerShell API can be leveraged to manage, automate, and administer Spotlight configuration. The efficiency gains obtained through command line access to automate configuration of Spotlight eliminates the need to navigate through the application resulting in time savings and redundant UI actions. Spotlight had previously released a set of PowerShell API command line functions in its earlier versions allowing the user the ability to control basic functions. However, as usual the users demanded more.
As a response to that demand, Spotlight 13.1 delivers an expansion to the PowerShell API functionality that is sure to please!
The complete set of PowerShell commands are outlined below.
To run commands, navigate to the Spotlight Client installation folder, by default: C:\Program Files (x86)\Quest Software\Spotlight Enterprise\Console. Locate and run DS_CLI.CMD file by using the ‘Run as Admin’ option.
See the Parameters file at the bottom of article for the list of command parameters and their format.
Diagnostic Server Commands
- Retrieve Diagnostic Server host name(s):
Command: Get-DS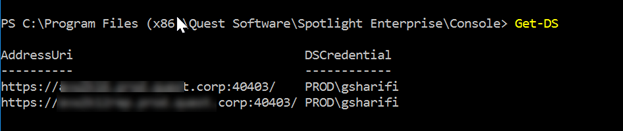
Federation Tip: If PS console is opened outside of DS-Cli.bat then run “Import-DS | Add-DS –PassThru” first to include all Diagnostic Server host names.
- Manage Diagnostic Server host names in the current PowerShell session
a. Show the local Diagnostic Server in the current PowerShell session:
Command: Import-DS
Example 1: Import-DS -HostName DSServerName1 -Port 40403 -Credential(Get-Credential)
Example 2: Import-DS -HostName DSServerName1,DSServerName2
Federation Tip: Use this command to return the local Diagnostic Server host name in the current PowerShell session.
b. Add Diagnostic Server to the current PowerShell session:
Command: Add-DS
Example 1: Add-DS -HostName DSServerName1 -Port 40403 -Credential(Get-Credential) –PassThru
Example 2: Add-DS -HostName DSServerName1,DSServerName2 -PassThru
Federation Tip: Use this command to add additional Diagnostic Server host names to the current PowerShell session.
c. Remove Diagnostic Server name from the current PowerShell session:
Command: Remove-DS
Example 1: Remove-DS -HostName -DSServerName1 -Port 40403 -Credential(Get-Credential) –PassThru
Example 2: Remove-DS -HostName DSServerName1,DSServerName2 -PassThru
Federation Tip: Use this command to remove Diagnostic Server host names from the current PowerShell session.
Connection Commands
- Retrieve list of connections:
Command: Get-Connection
Example 1: Get-Connection -Address SQLServer1_SQLServer
Example 2: Get-Connection -ConnectionName SQLServer1_SQLServer,WindowsServer1 -Technology sqlserver,windows -Tag tagname
Tip: The –Address parameter requires the connection name suffix i.e. for SQL Server connections, add “_SQLServer” suffix to end of the connection name. See Parameters files at the bottom of article for details of parameters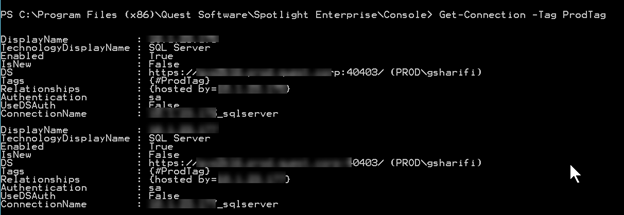
2. Create connections:
Command: Add-Connection
Example 1: Add-Connection -Address SQLServer1,SQLServer2,SQLServer3 -Enabled -Technology sqlserver –Tag tagname
Example 2: Add-Connection -Address WindowsServer1,WindowsServer2 -Technology windows -Tag tagname –Disabled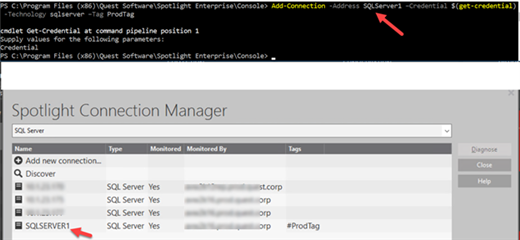
Tip: For SQL Server and Windows, Availability Group, Hyper-V, Replication, and VMware connections, if –Credentials parameter is omitted, then the Diagnostic Server owner account is used for the connection credentials. For all other connections, included –Credentials parameter in order to identify an account for the connection.
Federation Tip: Add the –DS parameter to identify the Diagnostic Server governing the connection, otherwise, Spotlight will assign the Diagnostic Server by default order.
- Configure Connections to add or modify tags, credentials and monitored flags:
Command: Set-Connection
Example 1: Get-Connection -Address SQLServer1_SQLServer | Set-Connection –Tag tagname
Example 2: Get-Connection -Address SQLServer1_SQLServer | Set-Connection -Disabled -UseDSAuth -Tag tagname1,tagname2
Example 3: Get-Connection -Address SQLServer1_SQLServer | Set-Connection –UseDSAuth
Tip: The –Address parameter requires the connection name suffix. Meaning for SQL Server connections, add “_SQLServer” suffix to end of the connection name. See Parameters files at the bottom of article for details of parameter formats.
4. Remove Connection:
Command: Remove-Connection
Example 1: Remove-Connection -Address SQLServer1_SQLServer,WindowsServer1 –Force
Example 2: Remove-Connection -Technology unix/linux –Force
Example 3: Remove-Connection -Address WindowsServer* –Force
Tip: Set parameters to remove by connections name or all connections by connection type. The –Address parameter requires the connection name suffix. Meaning for SQL Server connections, add “_SQLServer” suffix to end of the connection name. See Parameters files at the bottom of article for details of parameter formats
Federation Tip: The Remove-Connection command can be executed from any Diagnostic Server host along with remote clients.
Plan Outage Commands
- Configure Connection Planned Outage:
Command: Add-Outage
Example 1: Add-Outage -Address @{SQLServer="SQLServer1,SQLServer2,SQLServer3"; Windows="WindowServer1,WindowServer2,WindowServer3"} -ReoccurenceType Once -StartDateTime "10/27/2018 10:46" -FinishDateTime "10/27/2018 12:46" -Description DescriptionText -PassThru
Example 2: Add-Outage -Address @{SQLServer="SQLServer1,SQLServer2,SQLServer3"; Windows="WindowServer1,WindowServer2,WindowServer3"} -ReoccurenceType Daily -StartTime "10:46" -FinishTime "12:46" -Description DescriptionText -PassThru
Example 3: Add-Outage -Address @{Replication="ReplicationServer1,ReplicationServer2"; VMware="VWMareServer1,VMWareServer2,VMWareServer2"} -ReoccurenceType Weekly -DaysOfWeek Monday,Tuesday,Friday -StartTime "1:46" -FinishTime "2:46" -Description DescriptionText -PassThru
Example 4: Add-Outage -Address @{SQLServer="SQLServer1,SQLServer2,SQLServer3"; Windows="WindowServer1,WindowServer2,WindowServer3"} -ReoccurenceType Monthly -Day 2 -MonthInterval 3 -StartTime "10:46" -FinishTime "12:46" -Description DescriptionText –PassThru
Alarm Commands
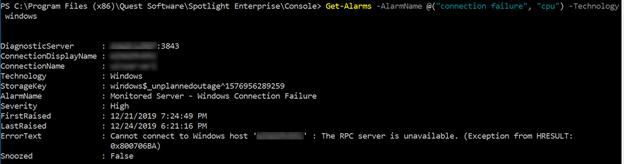
- Retrieve list of raised alarms:
Command: Get-Alarms
Example 1: Get-Alarms -Technology sqlserver
Example 2: Get-Alarms -ConnectionDisplayName @("SQLServer1", "SQLServer2") -Technology windows,sqlserver
Example 3: Get-Alarms -AlarmName @("connection failure", "cpu") -Technology windows
Example 4: Get-Alarms -Technology @("SQL Server", "Hyper-V", "SQL Azure")
Example 5: Get-Alarms -Severity @("High", "Information", "Low") -Technology sqlserver
Example 6: Get-Alarms -Snoozed $False -Technology sqlserver
Example 7:
PS C:\Users\example-user> $firstRaised = Get-Date -Date "2018-12-10 16:30:45"
PS C:\Users\example-user> Get-Alarms -FirstRaisedTime $firstRaised -Technology sqlserver
Example 8:
PS C:\Users\example-user> $lastRaised = Get-Date -Date "2018-12-12 16:30:45"
PS C:\Users\example-user> Get-Alarms -LastRaisedTime $lastRaised -Technology sqlserver
Example 9: Get-Alarms -Connection @("SQLServer1", "SQLServer2") -Severity @("High", "Low") -Technology sqlserver
Example 10:
PS C:\Users\example-user> $firstRaised = Get-Date -Date "2018-12-10 16:30:45"
PS C:\Users\example-user> $lastRaised = Get-Date -Date "2018-12-12 16:30:45"
PS C:\Users\example-user> Get-Alarms -ConnectionDisplayName @("SQLServer1", "SQLServer2") -Severity @("High", "Low") -AlarmName @("connection failure", "cpu") -FirstRaisedTime $firstRaised -LastRaisedTime $lastRaised -Technology sqlserver
- Acknowledge Alarms
Command: Update-AckAlarm
Example 1: Update-AckAlarm -DiagnosticServer DSServerName -ConnectionName "SQLSever1_sqlserver" -StorageKey "sqlserver$_spotlight$indexfragmentation^1547791314113" -Message "Ack Comment"
Example 2: Get-Alarms -ConnectionDisplayName @("SQLServer1", "SQLServer2") -Severity @("High") -Technology sqlserver | Update-AckAlarm -Message "Ack Comment"
Tip: Obtain value of –StorageKey from Get-Alarms. Use the second example to acknowledge all alarms with specified severity.
- Acknowledge Alarms via Scripts
Command: Update-AckAlarms
# This example acknowledges all alarms fetch from Get-Alarms. Save to PS1 script and execute in PS.
$Alarms = Get-Alarms
$AckAlarmRequests = [System.Collections.ArrayList]::new()
foreach($Alarm in $Alarms)
{
$AckAlarmRequest = New-Object DiagnosticServer.Install.Utilities.ObjectModel.AlarmQueue.AckAlarmRequest
$AckAlarmRequest.AlarmName = $Alarm.StorageKey
$AckAlarmRequest.DiagnosticServerHost = $Alarm.DiagnosticServer
$AckAlarmRequest.MonitoredEntityName = $Alarm.ConnectionName
$AckAlarmRequest.Message = "Ack by PowerShell script"
$AckAlarmRequests.Add($AckAlarmRequest) >$null
}
Update-AckAlarms -Alarms $AckAlarmRequests
- Snooze Alarms
Command: Update-SnoozeAlarm
Example 1:
$SnoozedUntilDate = (Get-Date).AddMinutes(30); Get-Alarms -AlarmName " SQL Agent – Status " -Technology sqlserver | Update-SnoozeAlarm -SnoozeUntilDate $SnoozedUntilDate
Example 2:
$Alarms = Get-Alarms -AlarmName "SQL Agent – Status” -Technology sqlserver
$SnoozedUntilDate = (Get-Date).AddMinutes(30)
Write-Host "Snoozing $($Alarms[0])"
Update-SnoozeAlarm -ConnectionName $Alarms[0].ConnectionName -DiagnosticServer $Alarms[0].DiagnosticServer -StorageKey $Alarms[0].StorageKey -SnoozeUntilDate $SnoozedUntilDate
- Snooze Alarms via Scripts
Command: Update-SnoozeAlarms
Example:
$Alarms = Get-Alarms
$SnoozedUntilDate = (New-TimeSpan -Start (Get-Date -Date "01/01/1970") -End (Get-Date).AddMinutes(60)).TotalMilliseconds
$SnoozeAlarmRequests = [System.Collections.ArrayList]::new()
foreach($Alarm in $Alarms)
{
$SnoozeAlarmRequest = New-Object DiagnosticServer.Install.Utilities.ObjectModel.AlarmQueue.SnoozeAlarmRequest
$SnoozeAlarmRequest.AlarmName = $Alarm.StorageKey
$SnoozeAlarmRequest.DiagnosticServerHost = $Alarm.DiagnosticServer
$SnoozeAlarmRequest.MonitoredEntityName = $Alarm.ConnectionName
$SnoozeAlarmRequest.SnoozeUntilDate = $SnoozedUntilDate
$SnoozeAlarmRequests.Add($SnoozeAlarmRequest) >$null
}
Update-SnoozeAlarms -Alarms $SnoozeAlarmRequests
User Level Access Commands
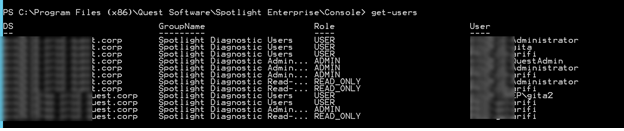
- Retrieve user accounts of each Spotlight user group:
Command: Get-Users
Example 1: Get-Users
Example 2: Get-Users -DS DSServerName -Role ADMIN -User user1
- Retrieve user permission:
Command: Get-Permission
Example 1: Get-Permission -DS DSServerName -User domain\username -DisplayName SQLServer1 -Technology sqlserver -Tag tagname
Example 2: Get-Permission -User domain\user1,user2 -DisplayName SQLServer1,WindowsServer1 -Tag tagname1,tagname2 –Denied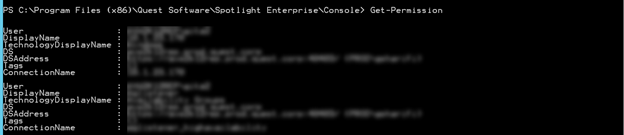
- Grant user access permission to connection(s):
Command: Grant-Permission
Example 1: Grant-Permission -User domain\user1 -ConnectionName SQLServer1_replication,SQLServer1_sqlserver
Example 2: Get-Permission -User domain\user1,user2 -Denied -Technology sqlserver | Grant-Permission
- Revoke the user access permission from connections:
Command: Revoke-Permission
Example 1: Revoke-Permission -User domain\user1 -ConnectionName WindowsServer1,SQLServer1_SQLServer
Example 2: Get-Permission -User domain\user1,user2 -ConnectionName WindowServer1,SQLServer1_SQLServer | Revoke-Permission
See Spotlight Help for additional details. See attached Parameters files for full list of parameters and their formats.
Download the latest release of Spotlight on SQL Server Enterprise from here.
