
Here are some quick instructions on how to install and set up Spotlight so you can quickly find and diagnose issues in your SQL Server instance. You can start by downloading a free, 30-day trial of Spotlight here: https://www.quest.com/register/54738/. The actual installation should only take an hour (or less) to start reviewing performance issues right away.
Figure 1 below, shows an example of the download page for Spotlight Enterprise edition, and the add-on of SQL Optimizer for SQL Server. SQL Optimizer is included with the Spotlight’s Xpert edition, and can be used to tune queries, or evaluate / recommend additional indexes for performance. During the trial, I would recommend downloading both so you can experience all the performance features Spotlight has to offer.
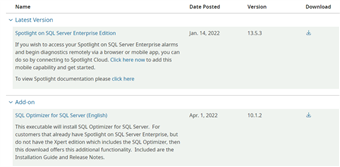
Figure 1
To get started, you will need to install Spotlight Diagnostic Server and the client on a server or VM with Windows OS. The installation documentation and requirements can be found here: https://support.quest.com/spotlight-on-sql-server-enterprise/13.6. For convenience, I’ve listed the requirements for Spotlight Diagnostic Server in the Figure 2, below.

Figure 2
Install the Diagnostic Server
The installer will first prompt you to choose which type of installation (see Figure 3). Choose the Typical installation by clicking on the highlighted word, ‘Typical’. Please note that you can also view the deployment guide, run the sizing wizard, or watch an example of a Spotlight installation on this page.
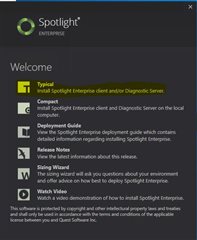
Figure 3
The next step is to install the Spotlight Client and the Diagnostic Server (Figure 4, below). Please note, once you have installed and configured your Diagnostic Server, you will want to re-run this installation to install the Client software on your workstation, so you don’t have to log into the Diagnostic Server to view performance data. To install the Client, simply uncheck the ‘Spotlight Diagnostic Server’ box. More on the client installation later in this article…
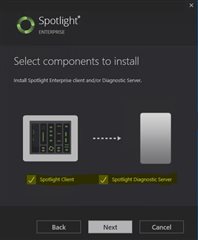
Figure 4
The Installer will prompt you for further information then install the Diagnostic Server software and start a local running service called the ‘Spotlight Diagnostic Server’.
Configure Spotlight on SQL Server Enterprise
Once Spotlight on SQL Server Enterprise is installed, bring up the UI and begin configuration. First, you will want to set up the Statistics Repository for additional long-term viewing and reporting. Figure 5 & 6 shows you the steps to set up the Statistics Repository. Please note in Figure 5, this menu can be used to configure other features such as the Mail Server, Spotlight Connections and SNMP Trap for sending Alerts.
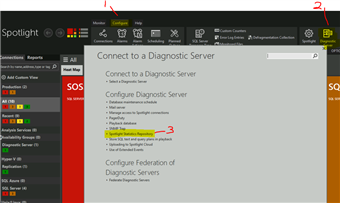
Figure 5
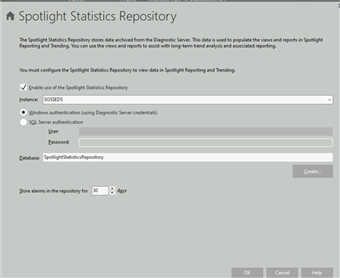
Figure 6
To set up monitoring, follow the steps, 1-4 listed in Figure 7. Basically, you will choose Configure > Connections, and select the type of connection you want to create. In this example, I’ve chosen the ‘SQL Server’ type (Step 3).
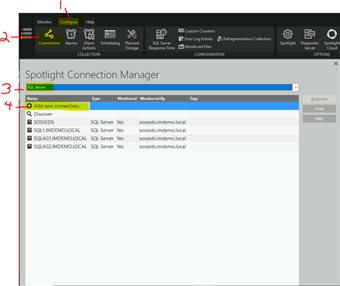
Figure 7
Please note that there are several connection types to choose from in Figure 8, below.

Figure 8
For the SQL Server connection, you will be prompted for the following information shown in Figure 9. Notice that you can choose to create a connection to the OS for the SQL Server instance at the same time.
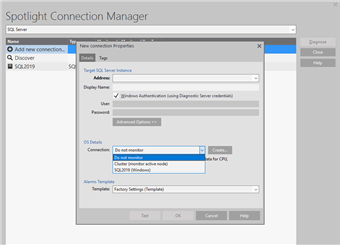
Figure 9
Once you’ve set up monitoring, Spotlight will begin collecting and displaying valuable performance metrics. Spotlight will also show any alerts for specific issues that it finds. For more information on managing alerts, please review this video: https://www.quest.com/video/how-to-configure-alarm-actions-in-spotlight-on-sql-server-876927/.
Configure Spotlight Client(s)
After installing the Diagnostic Server, you should install the Spotlight Client on everyone’s workstation that will be using it. To install the client software, simply copy the Spotlight download file to the appropriate workstation (or use a shared drive) and run the install again. This time, you only need to choose the client install as in Figure 10.
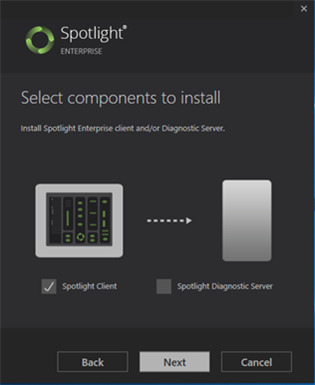
Figure 10
After the client is installed, select ‘Configure’ then the ‘Diagnostic Server’ menu and enter in the address of your Diagnostic Server (see Figure 11).
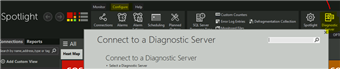
Figure 11
Once the client is connected to the Diagnostic Server, you will begin seeing performance metrics and alerts.
Install SQL Optimizer for Query Tuning & Index Optimization
SQL Optimizer must be installed on each client workstation to tune and/or recommend indexes for queries found in Spotlight. To install SQL Optimizer, just run the download .msi file and follow the prompts.
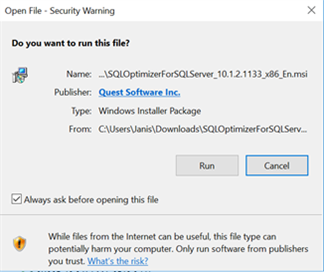
Figure 12
This concludes the initial setup for Spotlight. Happy Monitoring!
P.S. Here is a list of other articles and videos that may be helpful:
Video: How to install Spotlight on SQL Server Enterprise
Templates: https://www.quest.com/community/blogs/b/performance-monitoring/posts/vlog---spotlight-templates
Alarm Actions: https://www.quest.com/community/blogs/b/performance-monitoring/posts/vlog---spotlight-alarm-actions
The Why and Where (Pt 1): https://www.quest.com/community/quest/performance-monitoring/b/performance-monitoring-blog/posts/tune-your-queries-with-sql-optimizer-part-one-why-tune-and-where-can-i-get-it
The What and How (Pt 2): https://www.quest.com/community/quest/performance-monitoring/b/performance-monitoring-blog/posts/tune-your-queries-with-sql-optimizer-pt-2
