
Foglight REST APIs have been firstly introduced in Foglight from version 5.7.5.7.
Now, we embrace Foglight 5.9.2 release with awesome REST API new features as well as improvements which might help you to save your time working with Foglight.
If you didn’t have a basic knowledge of Foglight REST APIs, we strongly suggest you to go through Foglight REST APIs Introduction - Java and Python Sample Code first before reading this blog.
In this blog, we will use Postman for all the demonstrations, you can import Foglight template into your Postman from here.
Support Enable/Disable REST APIs
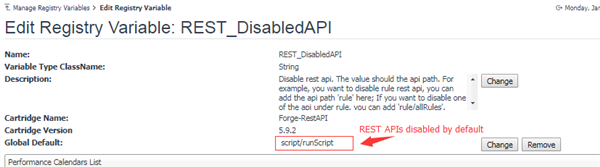
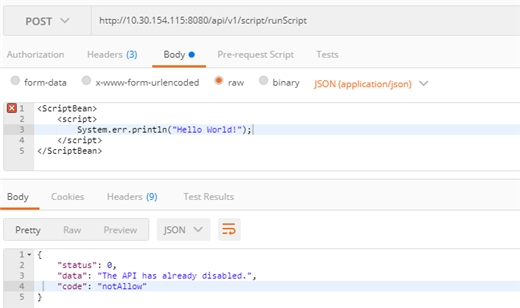
Foglight REST APIs can do a lot of things and also can help you to integrate with your other systems. However, since some REST APIs might allow you to do everything to Foglight, you might not want to expose them for use from the aspect of security. Thus, with this new feature, you can configure registry variable "REST_DisabledAPI" to disable exposure of REST APIs (Only "/script/runScript" is disabled by default).
Demonstration
Support Push Alarms into Foglight
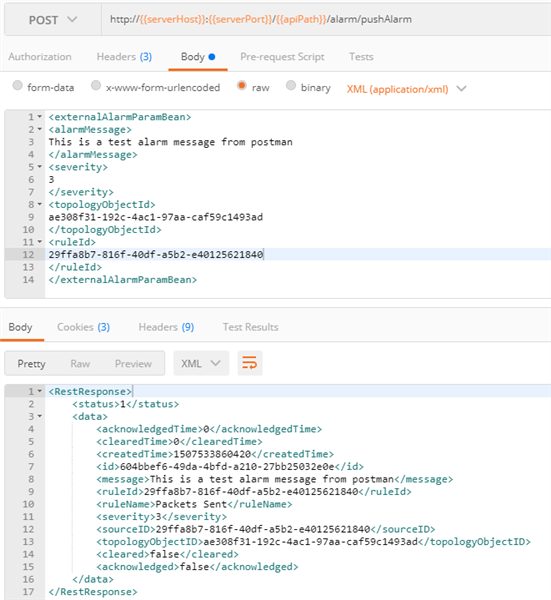
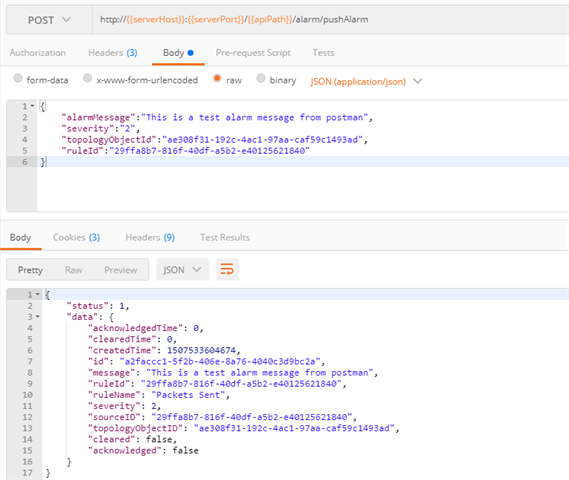
In order to use this REST API, you need to provide alarm related configurations including Alarm Message, Severity, Topology Object ID and Rule ID. Rule ID is optional, instead we will use "ExternalAlarm". It support both XML and JSON format.
For find Rule ID, Topology Object ID, you can use "Get all rules’ data" and "TopologyObject Query" REST APIs to query the IDs you want. For more detail, please refer to API document.
Demonstration
- XML Format Sample
- JSON Format Sample
Support Push Data into Foglight
In order to use this REST API, you need to understand Foglight’s Topology Type system quite well, because this feature must work together with Add Topology Type where you can import customized topology type definitions. For more detail about Topology Types, you can refer to Foglight Administration and Configuration Guide.
Currently, this feature supports JSON format only.
Before we start our demonstration, do you remember this REST API is disabled by "REST_DiabledAPI" introduced in Support Enable/Disable REST APIs section? So you need to enable it first.
Demonstration
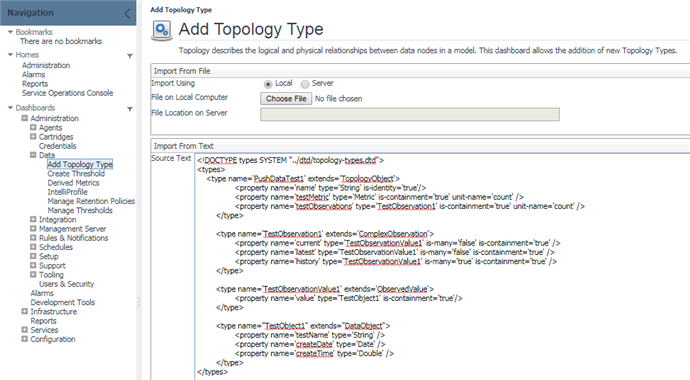
- Suppose you’ve already had a type definition as below.
<types>
<type name='PushDataTest1' extends='TopologyObject'>
<property name='name' type='String' is-identity='true'/>
<property name='testMetric' type='Metric' is-containment='true' unit-name='count' />
<property name='testObservations' type='TestObservation1' is-containment='true' unit-name='count' />
</type>

<type name='TestObservation1' extends='ComplexObservation'>
<property name='current' type='TestObservationValue1' is-many='false' is-containment='true' />
<property name='latest' type='TestObservationValue1' is-many='false' is-containment='true' />
<property name='history' type='TestObservationValue1' is-many='true' is-containment='true' />
</type>

<type name='TestObservationValue1' extends='ObservedValue'>
<property name='value' type='TestObject1' is-containment='true'/>
</type>

<type name="TestObject1" extends="DataObject">
<property name='testName' type='String' />
<property name='createDate' type='Date' />
<property name='createTime' type='Double' />
</type>
</types>
- Then, you need to import this new type into Foglight through console.
Login to your Foglight and navigate to Add Topology Type at "Administration -> Data -> Add Topology Type" and import your new topology types to Foglight as below.
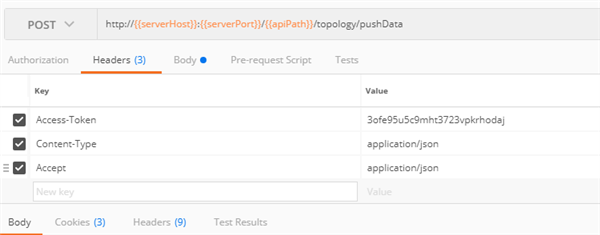
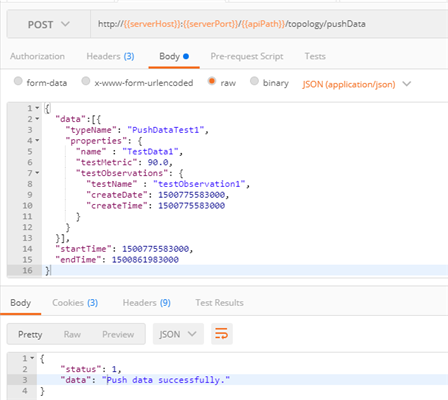
- Request Push Data REST API as below.
Here, we suppose you’ve already get the access-token through Security Login REST API.
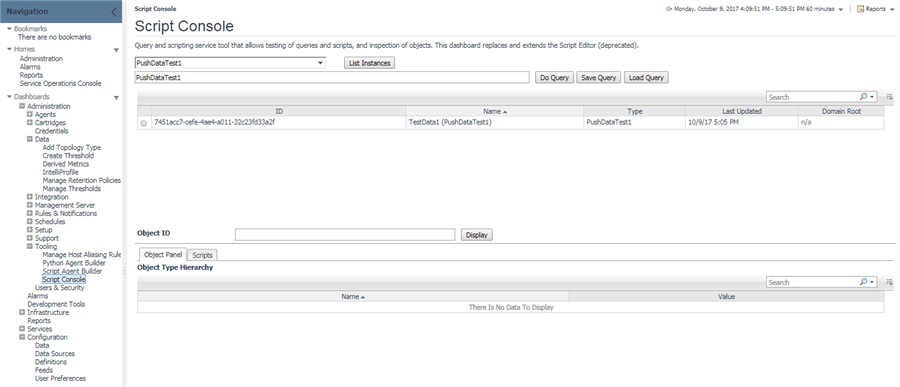
- Then you can find the new pushed data by listing instance with its type name from "Administration -> Tooling -> Script Console" as below.
Support Publish Customized REST API
Can you image how awesome it is if you can add your own REST API to Foglight? Yes, through this new feature, you are able to achieve customization for new REST APIs.
Add a REST API to Foglight
Demonstration
- Navigate to "Administration -> Tooling -> Script Console", switch to "Scripts" tab and click "Add" button to open the "Run Script" window.
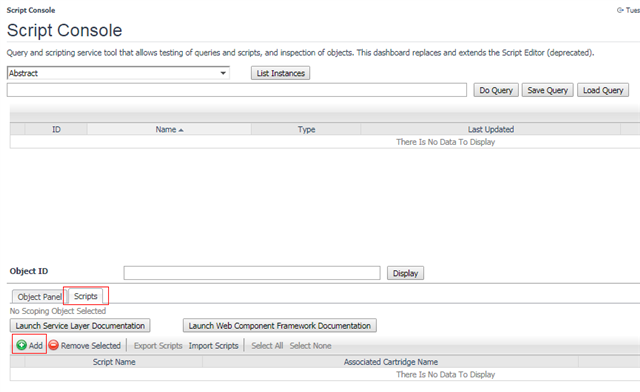
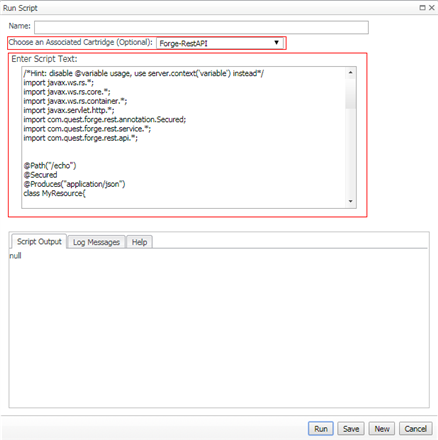
- Choose "Forge-RestAPI" in the Choose an Associated Cartridge (Optional) dropdown list. Then copy and paste your groovy script of this REST API server code to "Enter Script Text". Finally click "Run" button. If you see the null as the Script Output, then it executes successfully.
Suppose you get a server groovy script as below.
/*Hint: disable @variable usage, use server.context('variable') instead*/
import javax.ws.rs.*;
import javax.ws.rs.core.*;
import javax.ws.rs.container.*;
import javax.servlet.http.*;
import com.quest.forge.rest.annotation.Secured;
import com.quest.forge.rest.service.*;
import com.quest.forge.rest.api.*;


@Path("/echo")
@Secured
@Produces("application/json")
class MyResource{

@Context
private ContainerRequestContext requestContext;

@Context
protected HttpServletRequest request;

@GET
@Path("host")
public Response echoSampleHost(){
def foglightServiceLocator = ServiceFactory.getInstance().getFoglightServiceLocator();
def ts = foglightServiceLocator.getTopologyService();
def hosts = ts.getObjectsOfType(ts.getType("Host"));
if(!hosts){
return Response.ok("Empty hosts").build();
}else{
def host = (hosts as List).get(0);
def helper = foglightServiceLocator.getExtensionContext().get(ForgeRestApiHelper.class);
def entity = null;
try{
entity = helper.toSerializableEntity(host, request, requestContext);
}catch(ConversionException e){
entity = host.toString();
}
return Response.ok(entity).build();
}
}
}

class MyRestAPIExtension implements ForgeRestApiExtension{
@Override
public Class getRestResourceClz(){
return MyResource.class;
}

@Override
public String getCartridgeName(){
return "DummyCartridge";
}
}

def rrm = server.context('extensionContext').get(RestResourceManager.class);
rrm.unregisterRestAPIExtensions("DummyCartridge");
rrm.registerRestAPIExtension(new MyRestAPIExtension());
Add this REST API through Run Script console as below.
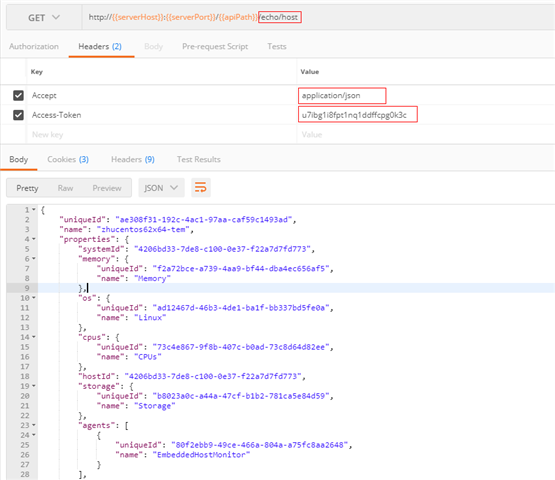
- Open Postman and request for this new REST API you just added to Foglight as below. We suppose you’ve already get the access-token through Security Login REST API.
Remove a REST API from Foglight
Demonstration
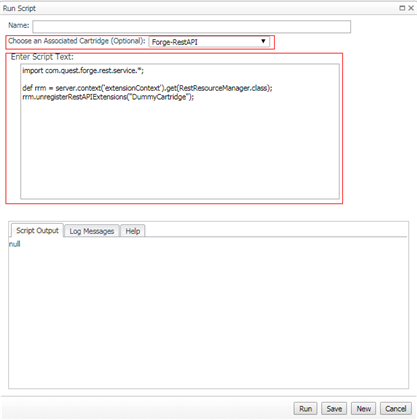
- Navigate to "Administration -> Tooling -> Script Console", switch to "Scripts" tab and click "Add" button to open the "Run Script" window.
- Choose "Forge-RestAPI" in the "Choose an Associated Cartridge (Optional)" dropdown list. Then copy and paste your groovy script of this REST API server code to "Enter Script Text". Finally click "Run" button. If you see the null as the Script Output, then it executes successfully.
Suppose you have already add the REST API in the previous section into Foglight. Then you need the following script to remove it from Foglight.
import com.quest.forge.rest.service.*;

def rrm = server.context('extensionContext').get(RestResourceManager.class);
rrm.unregisterRestAPIExtensions("DummyCartridge");
Remove this REST API from Foglight as below.
Support Run Named Script
Named script can be used to integrate to your other system easily and flexibly. Foglight provide a lot of embedded Named Scripts for customers.
You might have the following questions like Where to find Named Scripts? How many parameters should the Named Script have? And How to request for Named Script?
So let’s continue to answer these questions.
Demonstration
- Where to find existing Named Scripts?
Enter "http://<serverip>:<serverport>/jmx-console", find "service=Scripting" and click to check its detail. In the detailed page, you can find all the existing Named Script in the value of "AllScriptNames".
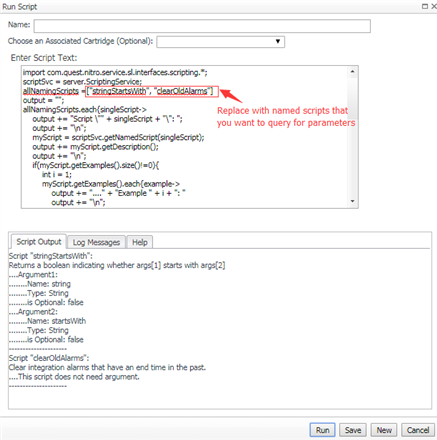
- How many parameters should the Named Script have?
import com.quest.nitro.service.sl.interfaces.scripting.*;

scriptSvc = server.ScriptingService;

allNamingScripts =<Here put your naming script list>

output = "";


allNamingScripts.each{singleScript->
output += "Script \"" + singleScript + "\": ";
output += "\n";
myScript = scriptSvc.getNamedScript(singleScript);
output += myScript.getDescription();
output += "\n";
if(myScript.getExamples().size()!=0){
int i = 1;
myScript.getExamples().each{example->
output += "...." + "Example " + i + ": "
output += "\n";
output += "...." + myScript.getExamples()[i-1].getUsage();
output += "\n";
i++;
}
}
if(myScript.getArguments().size() == 0){
output += "....This script does not need argument."
output += "\n";
}
else{
int i = 1;
myScript.getArguments().each{argument->
output += "...." + "Argument" + i + ": ";
output += "\n";
output += "........Name: " + argument.getName();
output += "\n";
output += "........Type: " + argument.getType();
output += "\n";
output += "........is Optional: " + argument.isOptional() ;
output += "\n";
i++;
}
}
output += "---------------------";
output += "\n";
}

return output;
Use the above script to check the Named Script parameters in script console and the result shown as below.
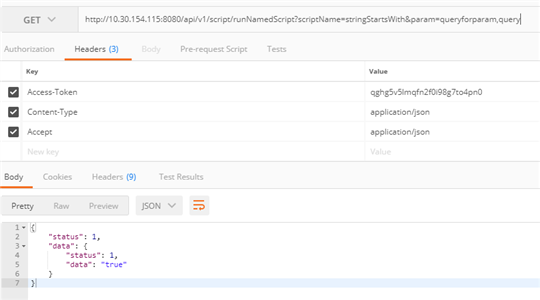
- How to request for Named Script?
Support Auto-Login
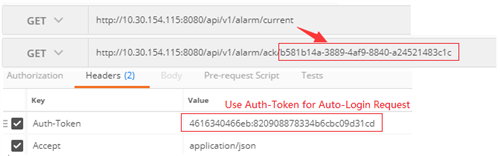
Auto-Login feature enables you to request for a REST API directly without requesting login by the help of Auth-Token. In another words, for example, you can request "/agent/allAgents" using Auth-Token without call "/security/login" first.
For better customization, we provide a registry variable "REST_AuthToken_AutoLogin" to enable or disable this feature. And it is enabled by default.
Demonstration
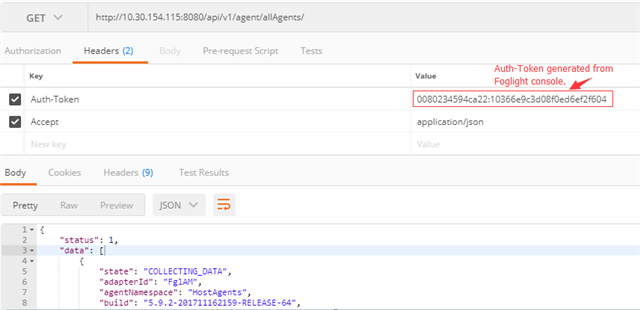
First, we need to generate an Auth-Token from Foglight console. And remember by default this feature is enabled.
Then we can request "/agent/allAgents" directly with our generated Auth-Token as below.
Improve Audit Log Customization
Before 5.9.2, Foglight generates an audit log for each REST API request.
However, sometimes, in some use cases, you might not care about most of them.
So, from 5.9.2, you can customize the audit log filter "REST_Audit_Filter" to filter-out REST APIs that you don’t want to generate an audit log.
By default, we configured the filter not to generate an audit log for the following REST APIs:
- Agent Realted REST APIs (/agent/*)
- Cartridge Related REST APIs (/cartridge/*)
- Registry Related REST APIs (/registry/*)
- Remote Client Related REST APIs (/remoteClient/*)
- Rule Related REST APIs (/rule/*)
- Topology Type Related REST APIs (/type/*)
- User Related REST APIs (/user/*)
- Subscribe Alarm Related REST APIs (/subscription/*)
- Alarm Related REST APIs except Push Alarm (/alarm/pushAlarm), Acknowledge Alarm (/alarm/ack) and Clear Alarm (/alarm/clear).
Another improvement for audit log is related to the new feature Support Auto-Login, we will only generate one audit log for each login session.
Demonstration
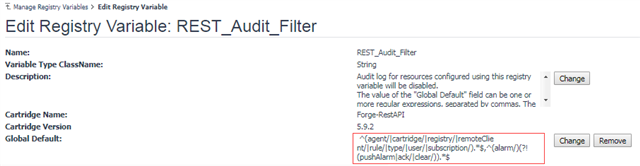
Above is the default configuration for registry variable "REST_Audit_Filter". Remember that we have already filtered-out the alarm acknowledgement REST API for generating audit log.
Then we use the auth-token (Please refer to Auto-Login section) to help us to do the request for alarm acknowledgement.
Finally, when we checked the audit log from console, we can find that there is no audit log generated for this alarm acknowledgement REST API.

Resources
Sample Code for REST APIs
We’ve made the sample code open source that you can find it from our Github repositories. You can find java, python, go, shell samples of Foglight REST APIs from Foglight Github Repositories.
Cartridge Download
You can download the cartridge from the official web site.
Documentation
The detailed API document can be found at the following repositories:
- If you've installed this cartridge, the REST API document can be found at "http://{{serverapi}}:{{serverport}}/api/doc"
- If the cartridge is not installed, the REST API document can be found inside the cartridge installation file (Forge-RestAPI.car/Forge-RestAPI-5_9_2/api-/api.war/doc).
