System administrators find themselves frequently applying required updates to their server hardware, operating system, security packages, or disaster recovery processes in order to maintain system and data integrity. Such enterprise modifications occasionally require updates to the server applications within the system. Consequently, administrators have to address the migration of these tools as well.
The good news is that Spotlight is portable! With application rebuilding efforts being very time consuming and costly, administrators often need a well-planned migration plan. When it comes to Spotlight, you can rest assure that it includes a well-planned migration strategy with built-in capabilities to migrate Spotlight Diagnostic Server from source to destination. More importantly, during this migration, server connections and custom configurations are preserved without any loss of historical data.
***Update: These steps apply to Spotlight 13.0 and below versions.
Spotlight Migration Best Practices:
Step 1: Backup Data Files
a. Open Spotlight client application and check the version of Spotlight from About | Window option
b. Stop the Spotlight Diagnostic Server service
c. Locate Spotlight Diagnostic Server installation folder in source server. By default it is:
C:\Program Files\Quest Software\Diagnostic Server
d. Make a copy of this folder to destination server or a shared drive where destination server can access
Step 2: Install Application on Destination Server
a. Install the same version of Spotlight client and Diagnostic Server on destination server as in source server. Use the same Playback database used in the source Diagnostic Server.
b. Open Spotlight application on destination server and ensure client application connects to Diagnostic Server
Step 3: Migrate Data
a. Stop Diagnostic Server services on the destination server. Open CMD console using “Run As Administrator” option. Change directories Diagnostic Server installation folder. By default: to C:\Program Files\Quest Software\Diagnostic Server\Agent\Bin\
b. Run:
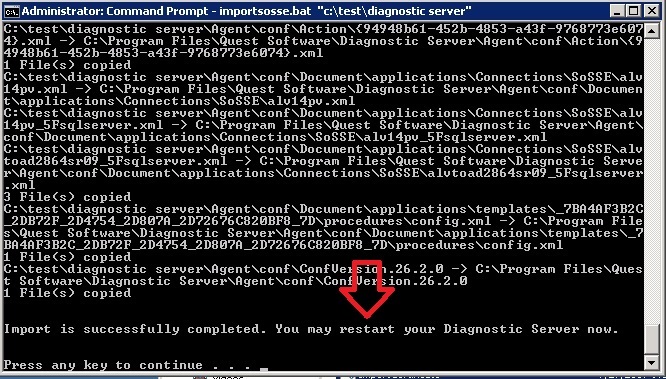
ImportSosse.BAT “<path>” - - path is backed up source server path in Step 1c
c. You should see the message at the end of process:
d. Start Diagnostic Server services on destination server
Step 4: Test Migrated Application
a. Open Spotlight client application on destination server. Verify that connections and custom configurations are migrated. Open different configuration windows: Alarms, Scheduling, and Alarm Actions windows to ensure templates and custom settings are preserved.
b. Stop Diagnostic Server on source server. Change to Manual start service or uninstall Diagnostic Server and client from source server if necessary.
Step 5: Migrate Spotlight Playback and Statistic Repository Databases (optional)
Note: Perform these steps only if moving these databases to a new server as well
a. Stop Diagnostic Server service both on the destination and source hosts
b. Back up and detach existing Spotlight Playback Database and Spotlight Statics Repository. Move database mdf file(s) to the new SQL Server Database and attach them.
c. In Spotlight application, click Configure | Diagnostic Server | Playback Database option and enter new instance name of database. Repeat step for Spotlight Statistics Repository database using Spotlight Statistics Repository database option.
Step 6: Configure Spotlight Clients and Go Live
Open additional local Spotlight client applications. Use Configure | Diagnostic Server | Configure Diagnostic Server Address option and change Address field to the destination server host name or IP address.
Step 7: Post-Migration - Update Historical Data
Update Playback and Statistics Repository databases with destination Diagnostic Server host name. Perform steps during slow time of Spotlight usage.
a. Stop destination Diagnostic Server services
b. In SSMS login to instance(s) holding Playback and Statistics Repository databases
c. First, run the below query against the Spotlight Repository database in order to obtain the old and new Diagnostic Server names.
exec spotlight_get_domains
d. Run the attached script against the Spotlight Playback database in order to update Diagnostic Server host name. Be sure to change the new and old Diagnostic Server host names in the script.
Note: Perform these steps only if historical reporting data was configured in source Diagnostic Server.
e. In SSMS login to instance holding your Spotlight Statistics Repository database. Run the following query against the Spotlight Statistic Repository to identify the Domain IDs of the source and destination Diagnostic Server host names: select * from spotlight_domains
f. Under SpotlightStatisticsRespository | Programmability node, execute SP MoveDiagnosticServerHost()
Enter the input parameter values:
set @From_Domain = Domain ID of source Diagnostic Server from step c
set @To_Domain = Domain ID to destination Diagnostic Server from step c
set @FixBug = 0 if the Diagnostic Server port is 3843, otherwise, set to 1
With these steps your Spotlight migration will be seamless with least amount of downtime. Visit our portal page for the latest version of Spotlight Enterprise.


