

In the first part of this two part blog series, we looked at how Metalogix Essentials for Office 365 can be automated using the Windows command shell and by creating a batch file to build a list of tasks that can linked together. In Part 2, we are looking at using PowerShell instead of a batch file to build in automation functionality. This offers more options to extend the scope of migration tasks.
- Parameterize the commands using XML.
- Grouping common functions and input files together.
- Logging
Target Audience: This blog assumes the reader has previous experience of PowerShell such as creating and calling functions and structuring variables. A comprehensive reference for learning PowerShell (you never stop learning!) can be found on Microsoft's website.
For this blog I will use the current Quest automation scripts as the basis for explaining how an automation process can be put together. The beauty of PowerShell is that there is no single way of doing things. You could follow these suggestions while also including other tasks on top of the migration, perhaps to re-architect content either before or after it has been transformed.
Start by downloading a trial of Metalogix Essentials for Office 365.
This blog post was written by Chris Frewin - a Quest Software Sales Engineer based in the UK. Chris Frewin joined Quest as part of the Metalogix acquisition and came with a wealth of migration and product expertise.
Getting Started with the PowerShell Scripts
As we have seen in the previous blog, automation with a batch file allows migration tasks to be 'chained' together. Each batch file has its own configuration parameters which can lead high complexity as more and more tasks are created. Introducing PowerShell to run these commands can provide flexibility in how these tasks are configured.
For this example, we will use a file shares to SharePoint migration as we did in Part 1.
Recommendation: Use PowerShell version 5 or higher. If you are running Essentials from Microsoft Windows Server 2016 or higher then this is automatically installed. You can also use the provided Windows PowerShell ISE application that comes with Windows Server 2016 to create your scripts however the Microsoft Visual Studio Code development environment provides a much richer experience.
There are three main areas to the script:
- XML parameter file
- PowerShell script (along with files containing supporting functions and variables)
- Logging
XML Parameter File
When executing a large migration any parameters should be preconfigured (like a template) and used for all tasks. Doing this will simplify the process as everything will use one set of 'rules' enabling all content to be treated in the same way. This file will differ depending on the source and target environments e.g. migrating SharePoint sites T2T. Multiple files may also be required when migrating different types of content e.g. SharePoint Publishing sites which can be difficult to shift due to their complexity. When migrating file shares into SharePoint, we are looking at moving one common set of content. Thus, we can use the same configuration for everything.
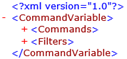
The Quest scripts use XML to host the command parameters. This enables parameters to be copied to multiple instances and easily adjusted. The parameters are split out into two separate nodes, one for commands and one for filters. This way a clear distinction can be made between the two functions and they can be easily read.
Each parameter is taken from the command line and added as a child node within the Commands parent node.
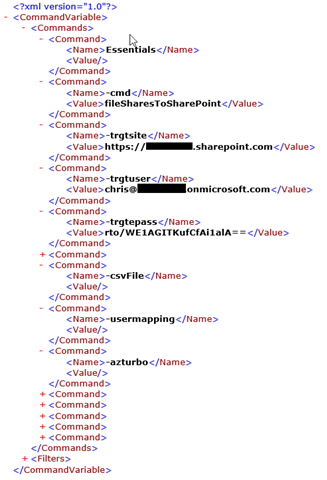
This gives a set configuration that can be used for all migration tasks. There are a few things to note with the example above…
- The switch -trgtsite is the root SharePoint site in the tenant and is used as an anchor.
- The user for the switch -trgtuser must be a SharePoint tenant administrator.
- The password hash for -trgtepass is created in the Essentials user interface and is automatically decrypted each time it is needed. This way passwords are not stored in clear text and can be used by multiple migration tasks.
As we have seen in Part 1, the source content is loaded via a CSV. The reference to the CSV is declared using the -csvFile switch. However, the value is blank. This acts as a placeholder to enable the script to consume multiple CSV files.
The last part of the configuration is to set any filters that are required for the migration. Examples of parameters including filters can be obtained by setting up an example migration task in the user interface, selecting Generate Script at the end of the process and copying the required values.
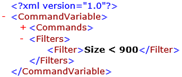
This process is explained in more detail in Part 1. The filters available are included below:
|
Filter: |
Description: |
|
DirectoryExclude |
Any folders to be excluded. |
|
ntfsOwner |
File owner. |
|
Size |
File size (kilobytes). |
|
Extension |
File extension. |
|
Name |
File name. |
|
Created |
File creation date (YYYY-MM-DD hh:mm:ss). |
|
Modified |
File modified date (YYYY-MM-DD hh:mm:ss). |
|
ntfsIsHidden |
Include hidden system files |
Table 1: List of Parameters with Descriptions
The only exception is the ntfsIsHidden filter which has a value of 1 if this is set.
When filtering values the following operators can be used:
|
Operator: |
Description: |
|
> |
Greater than |
|
< |
Less than |
|
= |
Equal to |
|
!= |
Not equal to |
|
*= |
Contains |
|
*!= |
Not contains |
|
^= |
Starts with |
|
^!= |
Not starts with |
Table 2: List of Operators with Descriptions
PowerShell Script
The script will be running the tasks related to the migration. Only partial scripts are displayed below as examples. With all the parameters configured in XML, the script can carry out the main task of running the migration. The container folders for the logging and CSV files are created and checks performed to make sure they exist. A test is also run to check that Essentials is installed.
CreateTempFolders -OutPutFolder $outPutFolder -LoggingFolder $loggingFolder -MigrationFolder $migrationFolder

if (!(Test-Path -Path $LOGDIR)) {

  New-Item $LOGDIR -ItemType Directory | Out-Null

}
RunEssentialsInstallTest($essentialsInstallPath);
The parameters are loaded from XML and all values are extracted into a string.
[xml] $xmlCommands = Get-Content $xmlFilePath

[string] $commandLine = Get-EssentialsCommand($xmlCommands)
We can now move on to getting each CSV file in the folder location.
foreach ($csvfile in $csvFileLocation) { ... }
Now that we have the first CSV we can then take the command string and insert the CSV file name and location along with any other files we might want to use e.g. user mappings.
$commandLineUpdated = InsertParameter -commandLine $commandLineUpdated -parameterKey "-csvFile" -parameterValue $csvfile.FullName
We now have a fully constructed command that we can use to run the migration task. All that remains now is to have PowerShell execute it.
RunProcess -CommandLine $commandLineUpdated -EssentialsExePath $essentialsInstallPath

-OutputFileLocation $essentialLog.OutputFileLocation -ErrorFileLocation $essentialLog.ErrorFileLocation
Logging
It is important to maintain logs at each step of the process to ensure all actions are tracked. There are two aspects to this:
- outer script logging
- events and internal logs generated by Essentials
The logs are set to a designated folder for storage in the script variables. The Quest scripts also produce a summary of the CSVs that are processed with start / end times and a success / failure status.
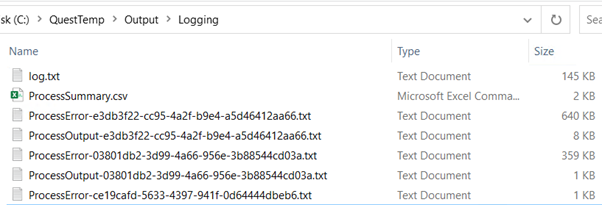
Figure 1: Logging Files Location
It is important to cover all aspects of how and where a script runs. To capture logging for the outer script a simple logging function can be created to append the results to file.
function LogMessage([string] $logMessage, [string] $logStage, [string] $logStatus, $verboseLogging) {

    $currentDateTime = Get-Date

    $logLocation = $LOGDIR + $logFileName

    if ($verboseLogging -eq $true) { $currentDateTime.ToString() + " :: " + $logStage + " :: " + $logStatus + " :: " +  $logMessage | Out-File $logLocation -Append }

}
The above function can be trimmed by setting the variable $verboseLogging to true or false. Calling this function from the main script we can also set log message statuses to either LOG, WARNING or ERROR depending on the purpose of the message.
All Essentials internal logs can be interrogated through the log viewer in the user interface which provides a detailed method of drilling into events that have occured during the migration. It can also be used to trigger the reprocessing of any tasks that failed.
Running the Script
After the command is run by the script we have the option to perform any housekeeping tasks like sending an email to say that the CSV has been processed before moving on to the next one.
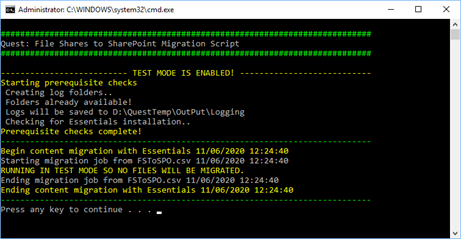
Figure 2: Screenshot of Script Execution in ‘debug’ mode.
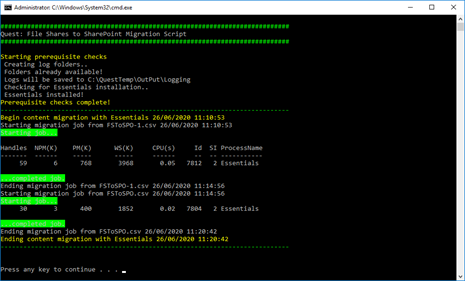
Figure 3: Script Execution of two CSV lists with feedback from Essentials.
Summary
The above steps explain how to use PowerShell to automate Essentials command tasks and scale out your migration to handle larger workloads. This example has looked at automating the migration of file shares to SharePoint Online but you can also use PowerShell in Essentials to with other sources and destinations such as…
- File shares to OneDrive for Business.
- SharePoint Online to SharePoint Online.
- OneDrive for Business to OneDrive for Business.
- Office 365 Groups to Office 365 Groups.
- Box to Office 365.
- GoogleDrive to Office 365.
- DropBox to Office 365.
Next Steps
As mentioned at the beginning of this blog post, Quest is happy to provide an example script to customers upon request. Contact our Professional Services Organization if you need assistance with customized and/or complex scripts.
Read the Essentials for Office 365 User Guide for the configuration steps to migrate to SharePoint Online and/or OneDrive.
Download a trial of Metalogix Essentials for Office 365.
Contact Sales when you are ready to buy licensing to proceed with your full migration.