

Metalogix Essentials for Office 365 is a fantastic tool for migrating content from both on-premises to Office 365 and tenant to tenant. Many customers love the way that Essentials can be quickly configured to both move content in bulk and also for incremental changes made by users.
The user interface of Essentials offers an intuitive way to configure migration tasks. While this works well for small to medium sized migrations; it does not suit all use cases. What happens when a content source is too large and complex to justify the man-hours to create migration tasks manually? This is where automation can help to achieve a fast, efficient and repeatable process in requirements demanded by enterprise organisations.
Part one of this two part blog post series will explain ...
- How automation is achieved with Essentials
- How to produce an example command
- How this process can be expanded out to offer a more automated approach to using the user interface.
Start by downloading a trial of Metalogix Essentials for Office 365.
This blog post was written by Chris Frewin - a Quest Software Sales Engineer based in the UK. Chris Frewin joined Quest as part of the Metalogix acquisition and came with a wealth of migration and product expertise.
Generating an Example Automation Script
So you have your migration task assigned to you. Essentials is capable of migrating content from many different environments to both OneDrive for Business and SharePoint Online. For the purposes of this blog the task will be to migrate content from file shares into a SharePoint Site Collection in Office 365 using a script rather than the user interface. To do this we first need to generate an example script that we can work with.
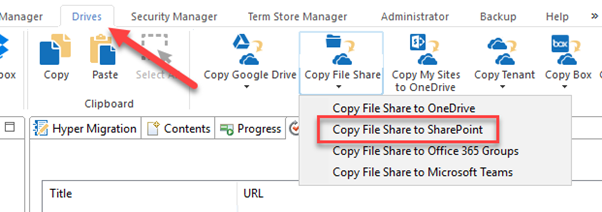
In Essentials for Office 365 make sure you have the Drives tab selected then select Copy File Share and Copy File Share to SharePoint.
This will launch the wizard where you are able to import a list of the source and target content locations. Add the Project Name, SharePoint central administration site URL for your Office 365 tenant and then ensure you have a CSV file that you can load in with some source and target locations. To format this correctly you will need to add the following column headers:
Source Path
- Target SharePoint Site
- Target Share List
- Target folder path
For more information you can review the online documentation for loading source and target locations into Essentials (https://support.quest.com/technical-documents/metalogix-essentials-for-office-365/2.5/user-guide/63#TOPIC-1383491).
Once your CSV has been loaded click Next. You will then be prompted to configure your migration task by selecting various check boxes. Once these have been completed to your requirements you will then be able to either click Finish which will run your task immediately, Schedule to run it at a later time or Generate Script. Click Generate Script.

The script generation window will then appear.
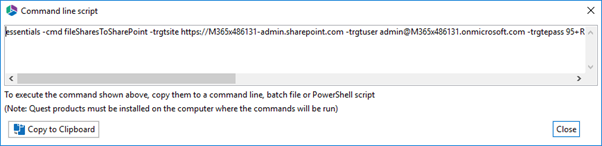
What this gives you is the command line that will run the Essentials task you have just defined. We can see that it has a number of parameters that were created as a direct result of the options selected in the wizard. With it we are able to run Essentials without needing to go through all the steps required by the user interface which will really help speed up the migration process. It can either be run directly from a command shell window on your Windows operating system or put into the Windows scheduler for execution at a later date.
NOTE: If you are not familiar with the Windows command shell you can find an overview on Microsoft's web site (https://docs.microsoft.com/en-us/windows-server/administration/windows-commands/windows-commands).
Running the Command
So, we now have a process that we can execute with one command. To run it simply open a command shell window, change the directory to where the Essentials.exe file is located (by default this will be C:\Program Files\Quest\Essentials\), then copy/paste it in and hit 'Enter'.
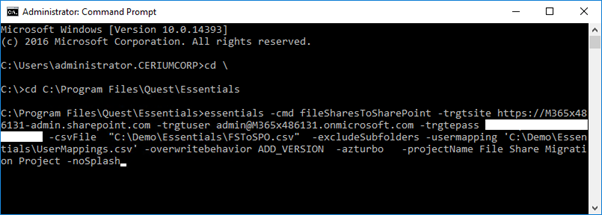
This will then run your migration task.
When running the command make sure you have closed down Essentials first. Depending on the memory allocation of the machine you are running this on you may find you receive a message saying there is not enough memory to run the Essentials user interface and the command process at the same time.
Expanding Functionality with a Batch File
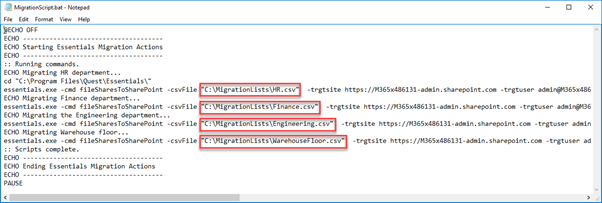
For a more repeatable approach we can expand this concept by using a batch file and copy/paste multiple commands into it, altering each one to use different CSV files that will point the script at different source/target locations. In this way we can move through multiple lists and split up our migration into logical slices of a file share structure. You can build one by simply creating a .txt file and changing the extension to .bat and then editing it in Notepad.
NOTE: It is not the aim of this blog go into depth on what a batch file is or what commands can be used in it; chances are, anyone reading this will already know about them as they have been around as a technology since Windows NT! This example is intended to show how multiple migration task commands can be linked together.
When creating your batch file you will need to again direct it to where the Essentials.exe file is located. Once this is done it should be all set up to add the migration commands in. Each one could vary in parameter configuration according to the type of content and it's location. For example, the example below shows the commands loading four different CSVs however other parameter values may also vary such as including sub folders or running incremental instead of overwriting content.
Using this approach we can run multiple migration machines all loading CSV lists from a central location that would significantly reduce effort and cut down on configuration time.
Next Steps
The next article in this series Automating Essentials Part 2: Automating Commands using PowerShell will focus on using PowerShell to execute the commands and also build in more intelligence like logging, alerts and consuming migration lists automatically.
Read the Essentials for Office 365 User Guide for the configuration steps to migrate to SharePoint Online and/or OneDrive.
Read the blog post Setting up Metalogix Essentials for Office 365 to Use OAuth and Claims to learn how execute long-running migrations by configuring claims authentication and OAuth authorization to keep the user's authentication alive with bearer tokens.
Download a trial of Metalogix Essentials for Office 365 .
Contact Sales when you are ready to buy licensing to proceed with your full migration.