
Quest is excited to announce a new feature in On Demand Migration for Active Directory that gives end users more visibility into their device cutover process.
Migration admins can choose to enable the interactive client for end users and can customize it to accommodate different business needs:
- Allow users to postpone device cutover if they are not quite ready
- Configure how many times a user can postpone the cutover process
- Allow users to fully cancel device cutover if it needs to be scheduled for another day
- Choose which cutover steps should show status to the end user
- Customize the description displayed for each step in the process
Note: This feature was released as a limited preview but will be available in all ODM orgs by end of August 2025. If you do not see these options in your project yet and wish to use it immediately, contact Quest Support to enable the feature in your org.
Visual components of the Interactive Client
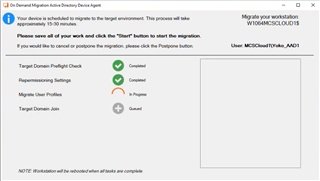
When you submit a device cutover job with the interactive client options enabled, the end user will see the screen below, which includes the following information:
- Top – The device name, the name of the currently logged in user, and a short explanation of what to expect once the cutover process begins.
- Left side – The list of cutover tasks that you selected to display in the client, which can be a mix of default system tasks and custom tasks.
- Right side - A description of the task that is currently running, which is customizable.
- Bottom – The actions available to the end user, including Cancel, Postpone, and Start. You can choose to hide the Cancel and Postpone buttons as part of the configuration.

Once the cutover process begins, the steps on the left will show status updates as they progress in order, from Queued to In Progress to Completed. Once all steps are complete, the device will automatically reboot.
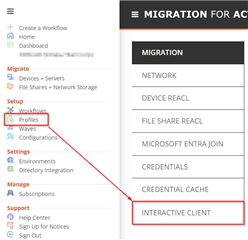
Creating Interactive Client profiles
When you select Profiles from the hamburger menu in On Demand Migration for Active Directory, you will see a new section for creating Interactive Client profiles.
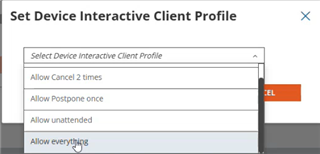
Create a new profile and configure the options for allowing end users to postpone and cancel the device cutover. Enable the option to allow unattended cutover if you want the device cutover to proceed even if the user is not logged on or if they do not respond to the interactive client when it appears. You can create multiple profiles with different options.

Enabling a device to display the Interactive Client during cutover
When viewing devices in the Ready Devices grid, you will see a new option in the Action dropdown named “Set Interactive Profile.” Select one or more devices in the grid, apply this action, and then select the profile you want to assign to the selected devices. This action must be completed prior to starting a cutover for end users to see the interactive client.
Note: Devices are not configured to display the interactive client by default and this step is optional. If you do not assign an interactive profile, end users will just get the standard reboot warning.
Customizing which tasks are shown in the Interactive Client
Identify the Action you are using for device cutover
Select Configurations from the hamburger menu to view the Actions and Tasks available in your project. If you have created custom actions and tasks, they will be visible, while system actions and tasks are hidden by default but can be viewed by clicking the “Show System” button.
When you assign an interactive client profile to a device, it will be displayed when you run an action that has an Activity value of Cutover, Offline Domain Join, or Microsoft Entra ID Cutover.
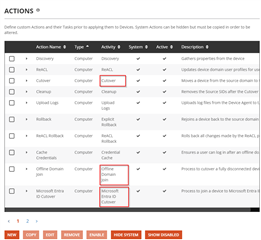
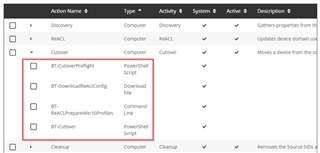
Identify the individual Tasks used during the cutover Action
Click the arrow next to the action name to view the individual tasks that run as part of the cutover. These are the tasks that will be displayed in the interactive client by default.
Customize how the tasks are displayed in the interactive client
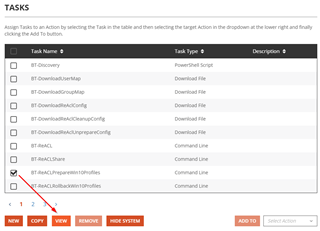
If you want to customize the display name and description of the tasks shown to the end user, scroll down to the Tasks section of the page and click “Show System” to display system tasks along with any custom tasks you have created.
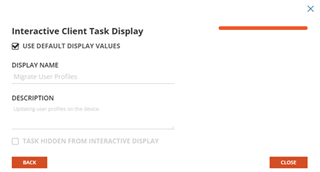
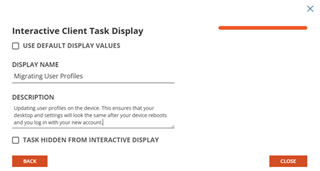
Select a task and click “View” for system tasks or “Edit” for custom tasks. Click Next until you see the options for the Interactive Client Task Display. By unchecking the box “Use Default Display Values”, you can change how the task is displayed to the end user:
- Display Name – This is how the task will be listed on the left side of the client
- Description – This is what will be displayed on the right side of the client when the task is running
- Task hidden from interactive display – If you select this option, the task will still run as part of the cutover action, but it will not be displayed in the interactive client
What’s next for ODMAD end user enhancements?
Quest has developed a self-service portal that allows end users to schedule their own device migrations. Migration admins can configure their scheduling and velocity parameters and then enable self-scheduling to reduce the amount of back-and-forth rescheduling that can occur during migration planning.
Further Information
For more information on this and many other features within On Demand Migration, check out the On Demand Migration for Active Directory User Guide, and come visit us at Quest.com.
