
Quest is excited to release a new module in On Demand Migration for Active Directory (ODMAD) that gives end-users more control over scheduling their device cutover.
Migration admins can choose to enable the self-service scheduling option for end user devices and can customize it to accommodate different business needs:
- Configure the date range and time slots that end-users can select for self-scheduling
- Create custom email notifications to send before, during, and after migration
- Control end-user access to the self-service portal using RBAC for Entra groups
- Allow users to migrate their devices on demand
This blog provides high-level details on how to configure the product, how to enable a device for self-service scheduling and notify users, and what the end-user experience looks like.
Note: This module was initially released as a limited preview. The features will automatically become available in all ODMAD, T5, and T7 projects by September 2025.
Table of Contents
- ODMAD: Preconfigure self-service cutover settings
- ODMAD: Configure devices for self-service portal
- On Demand: Preconfigure end-user portal access
- Self-service portal: Preconfigure settings and notifications
- Self-service portal: Upload user notification email addresses
- Self-service portal: Schedule devices and notify end-users
- End user experience
Note: The steps below assume that you have already configured ODMAD for standard device migration, including discovering and registering devices and performing an initial ReACL.
ODMAD: Preconfigure self-service cutover settings
When you select Profiles from the hamburger menu in On Demand Migration for Active Directory, you will see a new section for creating Self Service profiles.
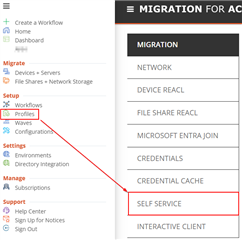
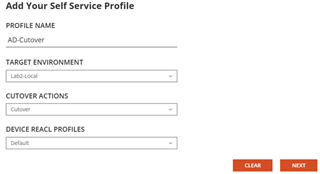
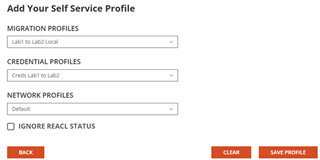
Create a new profile and preconfigure the options that should be used during device cutover. The configuration wizard will include additional options based on the type of target environment and cutover action selected. You can create multiple profiles with different options.
- Target AD environment with default or custom Cutover action that is not ODJ
- Select Migration Profile, Credential Profile, and Network Profile (example below)
- Target AD environment with default or custom Offline Domain Join action
- Select Cutover Credential profile
- Target Entra environment with default or custom Microsoft Entra ID Cutover action
- Select Microsoft Entra Join profile
ODMAD: Configure devices for self-service portal
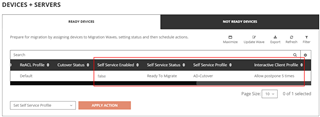
When viewing devices in the Ready Devices grid, you will see a new option in the Action dropdown named “Set Self Service Profile.” Select one or more devices in the grid, apply this action, and then select the profile you want to assign to the selected devices.
The “Self Service Status” will display "Ready To Migrate" when a self-service profile has been assigned to a device that has successfully completed a ReACL job. The “Self Service Enabled” column will display "false" until you enable the scheduling in the self-service portal for the device.
Tip: Configure an Interactive Client Profile to provide the end-user with additional visibility and control over their device migration.
Note: Once you assign a self-service profile, the device cutover must be performed from the self-service portal using the scheduler or by selecting the Migrate Now option; you will still be able to perform all non-cutover actions from the Ready Devices grid in ODMAD.
On Demand: Preconfigure end-user portal access
End users will need a valid M365 source account and be assigned a valid RBAC role to log into the self-service portal and manage their device cutover schedule. Instead of adding each individual user to On Demand, configure RBAC access for Entra groups using the steps below.
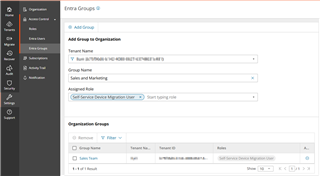
- In your source M365 tenant, create one or more groups that will contain the end users who will access the self-service portal.
- In On Demand, navigate to Tenants and add the source tenant, which will grant the Core consent. No additional tenant consents are required for self-service device migration scheduling.
- In On Demand, navigate to Settings > Access Control > Entra Groups.
- Select your tenant and enter the name of the group you created.
- Assign the role “Self-Service Device Migration User” and click “Add Group”.
- Add additional groups as needed.
Note: If the source devices are migrating from Active Directory, ensure the source UPN of the device’s user profile matches the UPN of the M365 account used to log into the portal.
Self-service portal: Preconfigure settings and notifications
In On Demand, navigate to Migrate > Self Service > Device Migration to access the self-service admin portal to configure your settings and manage individual device cutovers.
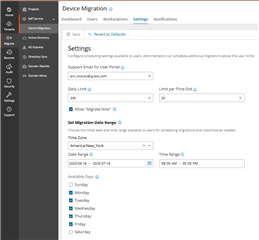
Settings
Select the Settings tab to configure the scheduling parameters that will be available to end-users.
- Support Email for User Portal: This email address will be displayed to end-users on their portal dashboard.
- Daily Limit and Limit per Time Slot: Restrict how many migrations can be scheduled each day or timeslot to control the volume of potential helpdesk calls. Once a limit is reached, that day or time slot will not be available for additional end-users to select.
- Allow Migrate Now: Choose whether end-users will have the option to migrate their device immediately from the self-service portal or whether they will be required to pre-schedule the cutover.
- Time Zone, Date Range, Time Range, Days: Configure which days, dates, and times will be available for end-users to select. The time zone setting helps you plan the time range in context of your support team’s availability.
Notifications
Select the Notifications tab to configure email notifications. A default template is provided for notifying end-users that their device is ready for scheduling. You can modify the default template as well as create new templates.
- Sender Display Name: Configure a friendly Display Name that should be shown on notifications to end-users; the message itself will come from a no-reply Quest address.
- Message Subject and Message Body: Customize the content and formatting as desired and upload an optional image to help end-users recognize the notification is from their company. The default message includes a table that lists all devices where ODMAD discovered a user profile tied to the user’s source account as well as a link to access the end-user portal.
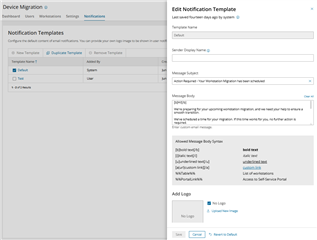
Tip: Create additional templates to customize the message content for different types of users or create separate pre- and post-migration email reminders.
Self-service portal: Upload user notification email addresses
Before you start scheduling individual cutovers, you must provide the email addresses that should be used for sending notifications.
Select the Users tab to view all users whose profiles were discovered on devices configured for self-service. Click “Upload User Emails” on the action bar and provide a file that contains each user’s source UPN and desired email address for notification.
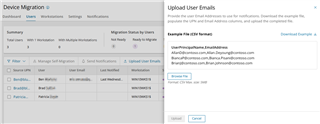
Tip: If your source environment in ODMAD contains accurate email address information, you can export user details from ODMAD under Environments > Source Environment > Details > Users > Export and then modify the exported file to match the required format above.
Self-service portal: Schedule devices and notify end-users
Once you have completed all the required configurations above, you can start scheduling individual cutovers for devices and notifying end-users. You can manage the self-migration from either the Users grid or the Workstations grid.
Users Grid Overview
- Search and sort by individual users and upload email addresses for notifications.
- Click on a Source UPN to display all linked workstations for that user, along with a history of their notifications and device scheduling activity.
- When you schedule migration for a user, note that you are scheduling migration for all workstations tied to that user since the migration occurs at the device level.
Workstations Grid Overview
- Search and sort by device name, similar to the Ready Devices grid in ODMAD.
- Click on a Workstation to display all linked users who have profiles on the device, along with a history of notifications and device scheduling activity.
- When you send notifications for a workstation, you can choose whether to notify all users on the device or just the last logged on user.
- If additional users have logged onto a device since the device initially registered with ODMAD, run a Discovery action for the device in ODMAD to update the linked users and the “Last Discovered” timestamp.
- Click on the Events link for a workstation to open the ODMAD UI in a new tab. This will display the full job history for the device and allow you to run non-cutover actions including Discovery and ReACL.
Action: Manage Self-Migration
Select one or more users or workstations and click “Manage Self-Migration” on the action bar. Configure the following options:
- Self-Migration:
- Select “Enabled” for the device to appear on the dashboard of any end-user that logs into the portal who has a profile on that device. This will also update the "Self Service Enabled" column in the ODMAD UI to display "true".
- Select “Disabled” to hide the device from the end-user portal. This will also update the "Self Service Enabled" column in the ODMAD UI to display "false".
- Set Schedule (Optional):
- When this option is selected, you can preselect a day and time for the device cutover, which the end-user will be able to modify. The device will migrate according to the preselected schedule if the end-user does not make any changes.
- The available scheduling parameters you configured for end-users will be displayed in green, but a migration administrator can select any day or time, including full timeslots.
- Leave this option unchecked if you simply want to notify end-users to log in and schedule their own migration.
- Send Notification (Optional):
- Select a notification template to send to the device user(s).

Additional Actions:
- Send Notifications: Send notification emails to users without changing the self-migration status of the device. This is useful for sending T-minus reminders or post-migration follow-up messages.
- Migrate Now: When you configure a device for the self-service portal, you can migrate the device on-demand using Migrate Now instead of scheduling it for later.
- Remove from Schedule: If you have scheduled a device for a timeslot, you can cancel the schedule using this option. The device status will change from Scheduled to Canceled, but you can still reschedule it or migrate it on-demand.
End user experience
Notification Email
When you enable a device for self-service scheduling, the end user will receive an email notification based on the settings you configured for the selected notification template.
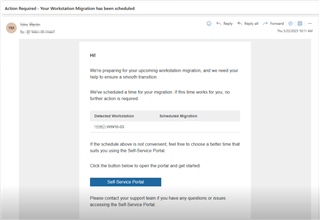
Portal Login
When the user clicks the Self-Service Portal link in the email, they will be directed to the portal landing page (https://selfservice.quest-on-demand.com) and will be prompted to log into On Demand using their source M365 account. As long as their account belongs to an Entra group that has the “Self-Service Device Migration User” role in On Demand, they will see their device(s) enabled for self-service scheduling.
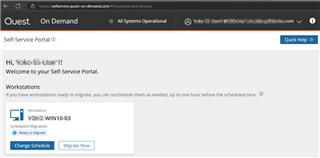
Self-Service Scheduling
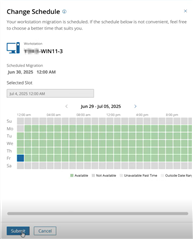
The user can click “Change Schedule” to manage their upcoming device migration. They will be able to select a day and time that matches the scheduling parameters configured in the project. If a given day or timeslot is already at its limit, it will not be available to select.
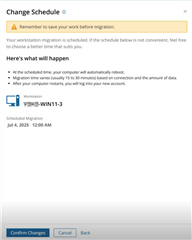
When the user submits the schedule change, they will see a summary of what to expect on the scheduled migration day so they can review and confirm the change.
If the user prefers to migrate their device immediately, they can click “Migrate Now” and the migration process will simply begin within 15 minutes. The portal will update to display the migration status of the device and the user can see more detailed migration status on their device if you have enabled the Interactive Client Profile.
Further Information
For more information on this and many other features within On Demand Migration, check out the On Demand Migration for Active Directory User Guide and come visit us at Quest.com.