Hi, there. My name is Gary Hughes, and I'm a technical product manager here at Quest. Thank you for joining me for this video for a migration of Microsoft Teams with On Demand Migration.
Today, we will be reviewing the features and options available within discovery, provisioning, and migration of Microsoft Teams, including its channels, files, applications, and chat conversations from tenant to tenant. Since Teams migrations can quickly become fairly complex, it is worth checking out our documentation for on demand migration to understand what exactly we can migrate and support. Simply search for the section called Once We Migrate within the Teams migration user guide. But now, let's jump into the demo.
So here we are in our migration dashboard. In this dashboard, you can find the various modules of on demand migration, including accounts, mail, SharePoint, OneDrive, public folders, and of course, Teams. As you can see from the dashboard, the accounts I want to migrate for this tenant to tenant migration have already been discovered, matched, and migrated from source to target. This is required for a Teams migration to ensure that membership and content ownership are processed correctly. For this video, we want to jump right into the Teams migration module.
At first, we get a view of the Teams migration dashboard from where we can either follow the breadcrumbs to help us get started, or we can change into the Teams tab and start configuring the migrations directly. Before we can start a migration task, we have to discover our Microsoft Teams with a new discovery task. We can either do this by configuring our discovery task to get all Teams within the source tenant automatically, or by uploading a CSV file, which has the migrated team URLs already listed. To improve our migration, we can also opt in to collect further statistics related to our Microsoft Teams from the source.
Just like nearly all tasks and jobs within on demand, we can now decide if we want to run this task now, later, or at a scheduled time and date. Up next, we get a quick summary of a task in which we can also define a custom task name for it to be easily recognizable. With a click on Finish, our task will be started.
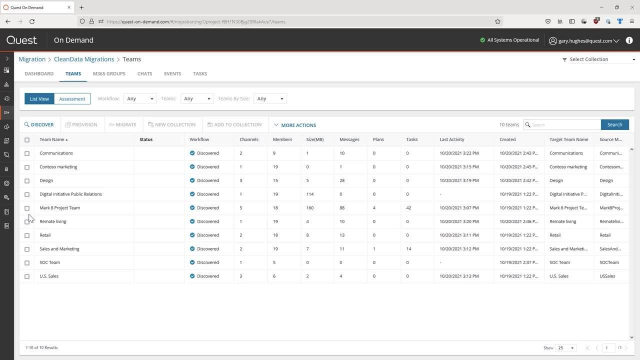
Once our discovery and collection tasks have been completed, we can now go back into the Teams tab, and here, we can find a full list of all available Microsoft Teams within the source tenant. This also includes various information of the Teams available, including its sizes, channels, number of members, and other useful information to help us determine which of these has what priority to be migrated.
Up next, we can select the to-be-migrated teams with the checkboxes and can provision these on the target tenants. This ensures that we have a target to migrate into. We can now decide what should happen if a team already exists on the target. We can have it merged these teams together or provision a new team with a specific suffix to be identifiable on the target.
Up next, we can also determine how we want to handle any multi-geo tenant situations. Leave the preferred data locations default if the target tenant is a multi-geo tenant. All teams and groups will be migrated to the same region as the target admin.
Alternatively, select the geolocation configured for the target tenant. It is also possible to suppress the automatic Welcome message a user will receive when being added to a new group and team on the target. Once again, we can schedule this provisioning task for a later point in time if desired and can confirm our configuration in the summary page. With a click on Finish, our task will be started, and our selected teams will be provisioned on the target tenant.
Now that the provisioning task has completed, we can go back into our team's list and understand the teams, which we've selected for provisioning, has now been updated with the workflow status of Provisioned. Now that we have a target team to migrate the content into, we can select our provision teams and migrate these with on demand. From here, we decide what we want to include within the migration. Simply check the boxes for the content types you want to bring across, including channel posts or messages within the Teams channel.
Here, we can also decide if we want to archive any of these posts based on how old the messages are. For this type of migration, the messages will be merged into a single file and migrated across as such. We can further migrate the channel files, including Planner and, of course, the group mailbox. Once again, define when you want this migration to run and confirm the configuration of your migration from the Summary page. With a click on Finish, our migration task will now show up within the Task tab in on demand.
Now that the migration is completed, we can go back into the Teams overview and understand that our team has successfully been migrated and updated accordingly. For more information, including technical documentation, white papers, and data sheets, please visit quest.com/on-demand. Thank you for watching.
 05:21
05:21
