A Foglight Community member recently posed this question in the Discussions forum :
I am creating dashboards for a wide variety of end users. One of the requirements I have is to be able to provide a view similar to the
"Host Status with Summary" from the drag and drop dashboards and find a way to hard code the host that is to be monitored, so that
the end user doesn't see the "Host Selector" and can't change the displayed host. Any great ideas about how to accomplish this?
In this blog, I'll answer this question and cover some dashboarding tips, tricks and best practices along the way.
Here's an outline of what you'd need to do to modify an existing out-of-the-box system dashboard or view:
- Create a WCF module that will contain the modified view
- (Deep) copy the original view into the target WCF module
- Use the WCF editor to make changes to the copied view and add additional elements if required
- Export the module containing the modified view
For this example, the requirement is to remove the Host selector from the original view.
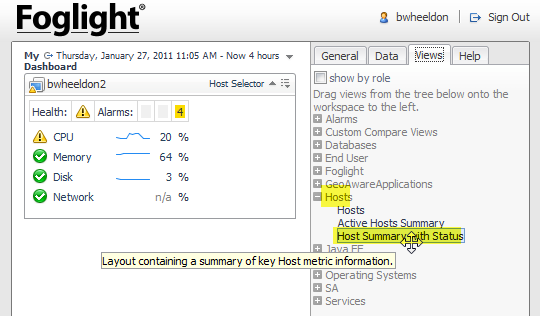
| In other words, we'll start with this: | 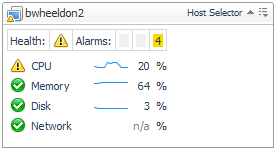 |
|
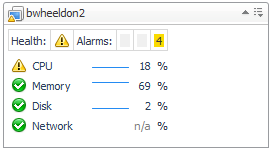
And end up with this: |
We'll remove the Host Selector in step 3. Then we'll need to configure an alternative method to chose the 'subject' Host for the view.
We'll do that by adding a WCF query and calling that query with a host name to get the right Host object.
Let's begin.
1. Create a WCF module that will contain the modified view
Foglight dashboards are organized into modules, and most domain cartridges include one or more of these modules. The dashboards are defined in XML. The XML configures a rich set of underlying widgets called the Foglight Web Component Framework, or 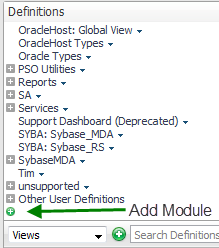
WCF. If you want to learn more about WCF, search for "Web Component Tutorial" in the Foglight Help.
The smallest UI element that can be imported or exported into Foglight is a module. Therefore we must create a new module if we want to maintain new or customized dashboards.
The WCF dashboard editor is available in Configuration/Definitions. You must log in to Foglight as a user with the "Dashboard Designer" role in order to create and manage custom dashboards.
Once logged into Foglight as a "Dashboard Designer", open the Configuration/Definitions dashboard. In the top left pane of the Splitter window that appears, you will find a green "+" button at the bottom of the list.
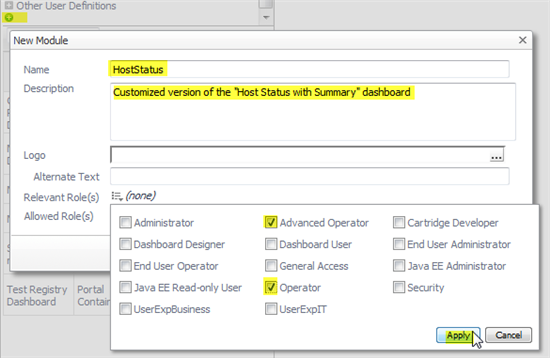
Click on this button to create a new system module. You will be prompted for a name for the module and you can optionally enter a description, logo, and Allowed Role(s) for the module. Make sure that you enter at least one Relevant Role for the module. I usually add 'Operator' and 'Advanced Operator' roles.
Let's create our modified version of the "Host Status with Summary" portlet in a module called "HostStatus".
2. Copy the original view into our custom module
It's very important to make copies of original dashboards rather than editing them in place. If you have the "Dashboard Designer" role, there is nothing preventing you from modifying existing core or domain dashboards. But if you do that, subsequent FMS or cartridge upgrades will overwrite your modifications. That's why it's a best practice to always copy system dashboards into a new module before attempting to modify them.
There are two types of Copy available. A (shallow) Copy will apply to the single element you have selected to copy. This works well for elements without dependencies like Queries or Functions, but will fail for a View if the View has any references to elements that are not tagged "Public".
Deep Copy will apply not only to the selected element, but will also copy any referenced non-public elements.
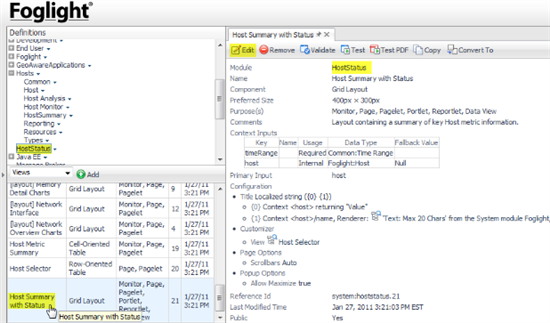
We know from dragging and dropping the original view that it's located in the "Hosts" module.
Select the "Hosts" module in the Definitions list at the top left and select the "Host Summary with Status" from the Views group on the lower left. That will display the view summary in the main portion of the page. Select Copy/Deep...
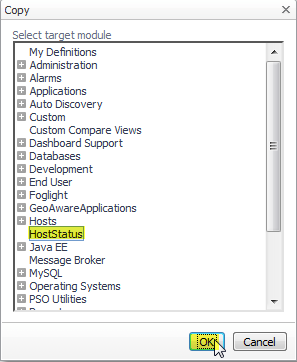
Select the module you just created as the target and click OK.
You'll get a warning message telling you about the long list of non-public views, renderers, and queries that will be copied into your module. Click OK.
You'll see a message that the copy succeeded with a list of elements copied:
Before going any further, close the orignal "Host Summary with Status" view by click the 'x' in the tab at the top. If I had $5 for every time I thought I was editing the copied version but later discovered to my dismay that I was modifying the original...
3. Use the WCF editor to make changes to the copied view
Select the new "HostStatus" module in the top left pane.
Select the copied "Host Summary with Status" from the View list in the lover left pane.
Make sure that you're working with the copied version from your new module, not the original version from the Hosts module.
To remove the host selector from the copied view, we'll need to remove the "Customizer" entry and modify the "host" context input for this view so that a specific host is displayed.
Click the Edit button for the selected view.
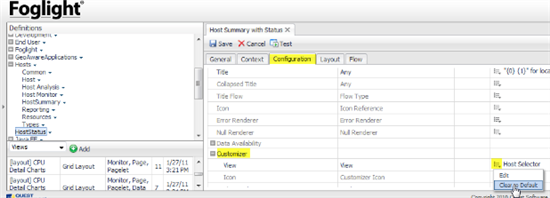
To remove the customizer, select the Configuration tab, open the Customizer property and click the edit icon for the View element. Select "Clear to Default".
Now that the customizer has been removed, the view needs a different way to get the Host object to display. Select the Context tab and edit the host input.
Change the Usage to Optional.
Let's set the host value simply the first time for testing; we'll implement a more elegant solution next.
Click the edit icon in the Fallback Value cell and select "Change to Binding". Select "Data" from the menu.
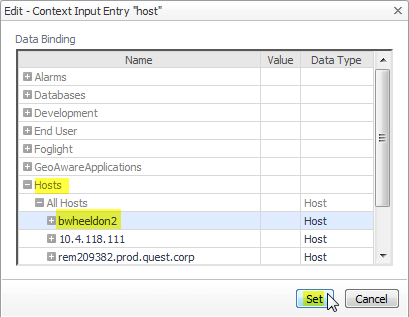
In the Data Binding Editor, open Hosts, find and select the host you want to display, then click Set.
Now that the host is hard-coded, we should change the name of the view accordingly.
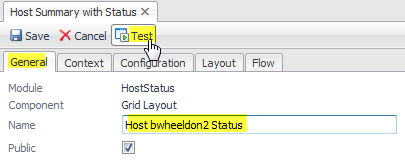
Select the General tab and change the name of the view to something more specific like "Host <hostname> Status".
Click Test to validate the view. Click "Results" in the Test dialog. Validate the result.
So the view works. Great. Save the view.
The problem with using a Data reference to specify the target host is that it's not portable. If we were to export this dashboard to a different FMS, the data link we used would not exist and the view would display a bunch of "n/a".
The best practice is to use a more general and flexible method to specify the host.
Let's create a Query that takes a hostname as input and returns a Host object. We can use that query instead of the Data reference to make our dashboard more generally useful.
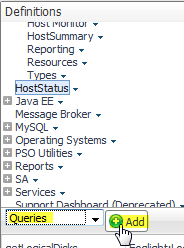
With our module selected in the top left tab, change the dropdown to Query and click Add.
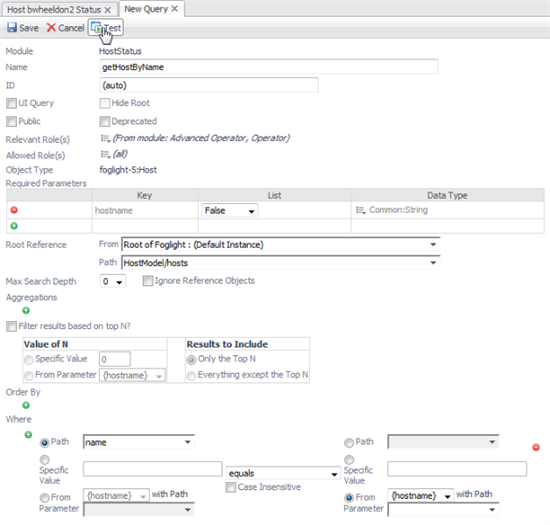
Create a Blank Query returning Host: enter "host" in the filter list and select "Host" from the Data Type Table.
Click OK.
Set the name of the query: getHostByName
Required Parameters: "+" Key=hostname Data Type: String
Root Reference From: Data Sources/Foglight
Path: HostModel/Hosts
Where: "+" Comparison
Path: name
equals
From Parameter: {hostname}
Did you get all that? Make sure that the result looks like the screenshot above.
Save the Query.
Test the query. Specify the hostname as a String in the Input Values dialog and click Results.
Make sure that the Query Results screen lists the target Host.
Now we can use this query in the modified Host Status view.
Edit the view and navigate to the Context tab.
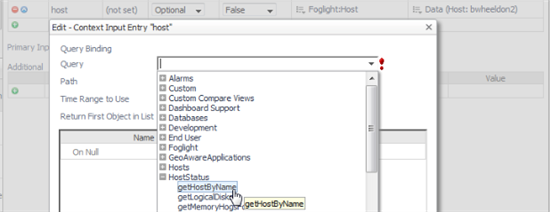
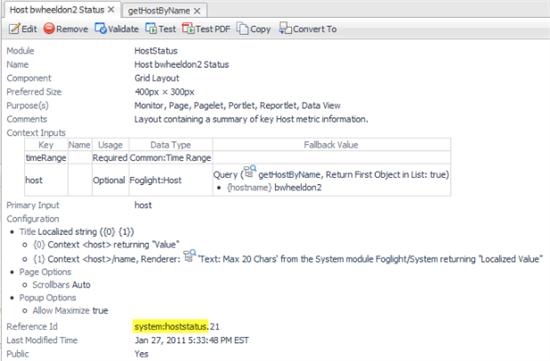
Click the edit icon in the Fallback Value of the 'host' context line and "Change to Binding" "Query".
Select the getHostByName query from the HostStatus module.
Important Note: Queries always return a list of values, even if there are zero or one result.
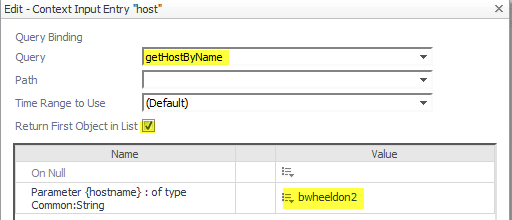
Since we want only the one matching host, check the 'Return First Object in List' box.
The dialog will prompt you for the 'hostname' parameter. Enter the target hostname as a String.
Save the view.
The View Summary should now look like this:
Now it's much easier if you want to create a summary for a different host.
Here's how:
With the same module selected in Configuration/Definitions, and Views selected in the dropdown, select Add.
Select the Copy an Existing View tab. Open the HostStatus module and select the view you just created and click OK.
Change the name "Copy of Host <Host1> Status" to "Host <Host2> Status".
Select the Context tab and edit the Fallback Value of the "host" context.
Change the "hostname" parameter to the name of the <Host2> and click Set.
Save the view.
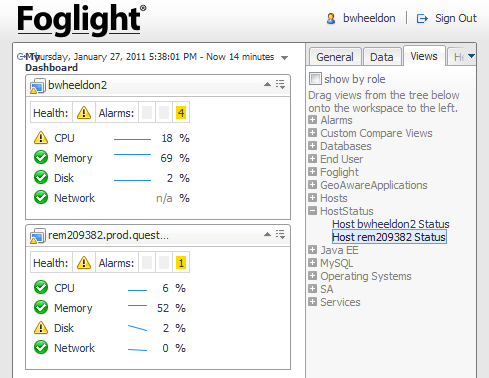
Now there are two specially named host Portlets to drag and drop:
You can create additional host Portlets the same way.
4. Export the module containing the modified view
Now that the custom dashboard has been implemented, it's a best practice to export the module so that your work is saved.
The full instructions for exporting dashboards (and importing them on a different FMS) are described in "Building a custom dashboard to summarize LogFilter alarms"
You can export the module by name from the command line using fglcmd.
What is the module name, you ask? It appears in the view summary above beside the "Reference Id".
In our example, it's "system:hoststatus".
So you would export this module with something like:
C:\Quest_Software\foglight5\bin> fglcmd.bat -srv fmshost -port 8080 -usr foguser -pwd fogpwd123 -cmd util:uiexport -m system:hoststatus -f C:\Temp\CustomHostSummaryDashboardV1_0.zip
If you have any questions or problems following these steps, or if you're able to benefit from this dashboard or these instructions, please leave a comment below.
Happy Dashboarding!
Brian Wheeldon


